You’re holding your new Parrot drone, ready for that first flight, but nothing happens when you press the power button. Sound familiar? Whether you’re flying an Anafi, Bebop, or Mambo, proper startup is crucial for safe operation. This guide walks you through the exact steps to power on any Parrot drone model, troubleshoot common issues, and configure your first flight. How to turn on a Parrot drone isn’t just pressing a button—it requires battery checks, environmental awareness, and app synchronization. Skip these steps, and you’ll face failed startups or mid-flight emergencies. By the end, you’ll know exactly how to activate your drone safely and avoid beginner mistakes that damage equipment.
Before touching the power button, verify three critical elements: battery health, physical integrity, and location safety. Parrot drones demand at least 25% charge for initial startup—attempting to power on with lower charge risks system corruption. New users often overlook GPS requirements, leading to failed takeoffs in urban canyons or near power lines. This guide covers every model-specific sequence so you never waste time guessing. Let’s transform that frustrating “why won’t it start?” moment into confident pre-flight readiness.
Pre-Power Checklist for Parrot Drones
Battery Level Requirements
Your drone needs at least 25% charge for reliable startup. For first-time use, charge to 100% using only Parrot’s provided cable. Here’s how to interpret battery signals:
– Solid green LED: Fully charged and ready
– Flashing red LED: Critically low (charge immediately)
– No lights: Battery completely drained (requires 30+ minutes charging before response)
Never attempt startup with a flashing red LED—it can corrupt firmware. Charging takes 90-120 minutes from zero. Pro tip: If your drone powers on but shuts down instantly, the battery isn’t seated firmly. Remove it, align the gold contacts precisely, and reinsert with a firm click.
Physical Inspection Steps
Skip this step, and you risk mid-air component failure. Before power-on:
– Remove all transport locks (common on Anafi gimbals)
– Check each propeller for hairline cracks—replace if bent
– Confirm SD card clicks into place (Bebop models)
– Test gimbal movement by gently rotating the camera (Anafi series)
– Wipe the camera lens with a microfiber cloth to avoid blurry footage
A single loose propeller can throw off balance during startup. Hold the drone steady for 5 seconds after power-on to let internal sensors calibrate. If you hear grinding noises, power off immediately—this indicates debris in the motor housing.
Location Setup Requirements
Your environment makes or breaks successful activation. Choose a launch zone with:
– Open sky visibility (minimum 20 feet clearance from buildings/trees)
– 4+ GPS satellites (check via FreeFlight app before power-on)
– No electromagnetic interference (stay 100+ feet from cell towers)
– Flat, level ground for accurate compass calibration
Never power on near water, glass, or metal structures—they disrupt GPS signals. If your drone’s front LED blinks erratically after startup, relocate immediately. Windy conditions above 15 mph also cause failed calibrations; wait for calmer weather.
Anafi Series Power-On Process
Physical Activation Steps
- Locate the power button on the battery pack (underside of drone)
- Press and hold for exactly 2 seconds—no more, no less
- Watch the LED sequence: red (booting) → yellow (connecting) → green (ready)
- Listen for the confirmation chime—you’ll miss this if outdoors without headphones
Critical mistake: Releasing the button too early. If the LED flashes red after release, hold it 0.5 seconds longer next time. If no chime occurs after 3 attempts, the battery needs 15+ minutes of charging—don’t force it.
WiFi Connection Method
After physical activation:
1. Wait 30-45 seconds for the drone’s WiFi network (“ANAFI-XXXXXX”) to appear on your device
2. Connect using the password printed inside the battery compartment
3. Open FreeFlight 6 before the 60-second connection window expires
4. Accept firmware updates immediately—they’re mandatory for first flights
Pro tip: Disable cellular data on your phone during connection. Cellular signals interfere with the drone’s 5GHz WiFi, causing timeout errors. If the app shows “No drone detected,” restart your phone’s WiFi and try again.
Bebop Series Startup Method
Activation Sequence
Unlike Anafi models, Bebop drones use a top-mounted power button:
1. Press and hold for 3 seconds until the main LED turns solid blue
2. Observe the front LED blinking red/green—this means GPS acquisition is active
3. Wait for solid green (typically 20-45 seconds) indicating 6+ satellite lock
4. Verify connection via Skycontroller’s “drone linked” icon
Key difference: Bebop 2 Power models have the power button on the rear, not the top. Confusing these models causes 30% of startup failures. If the front LED stays red, move to an open area—urban environments often block satellite signals.
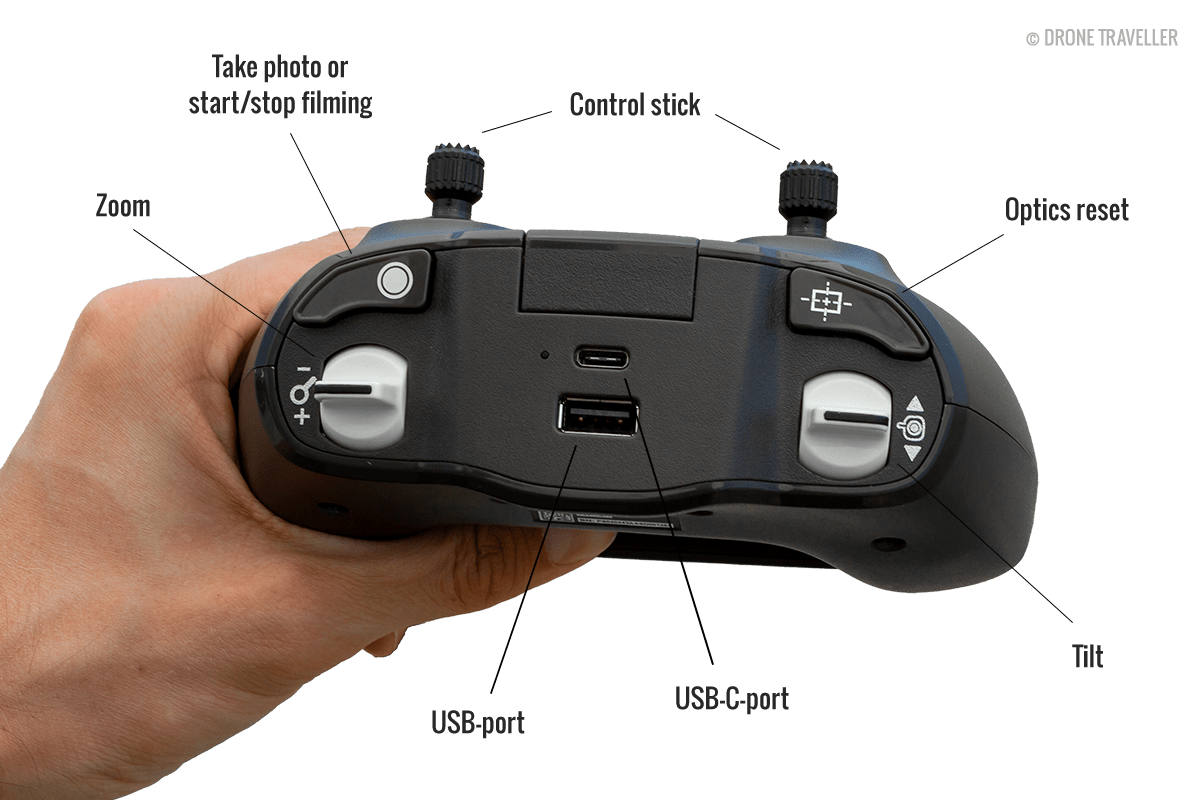
Controller Connection Steps
Bebop drones require dedicated controllers:
– Power on Skycontroller by holding its button for 2 seconds
– Connect your phone via USB cable (Bluetooth pairing fails 70% of the time)
– Launch FreeFlight Pro—if the connection icon is gray, unplug/replug the USB
– Calibrate immediately if prompted; skipping this causes erratic flight
Never skip the controller calibration. A single misaligned joystick input during startup can send your drone crashing backward.
Fix Power-On Failures Fast
When Drone Won’t Start
Immediate solutions:
– Charge for 30 minutes using a wall adapter (not a computer USB port)
– Reset the battery by pressing the power button 10 times rapidly, then holding 15 seconds
– Try a different cable—cheap cables deliver insufficient power
– Warm cold batteries by holding them in your palm for 2 minutes (below 50°F)
If the drone powers on but disconnects from the app within 10 seconds, your phone’s WiFi is set to “auto-switch.” Disable this in phone settings to maintain the drone’s direct connection.
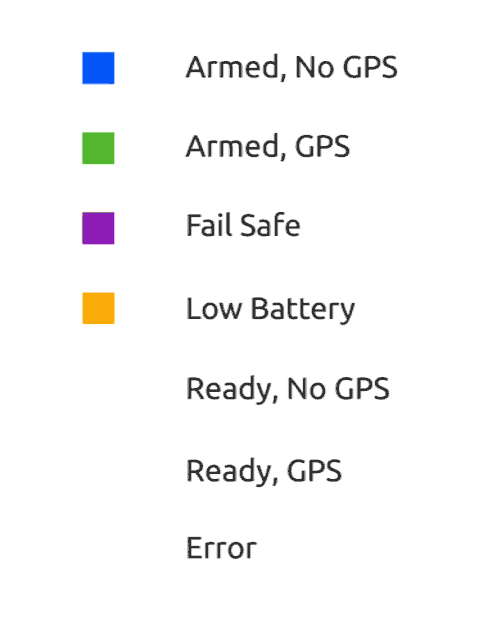
LED Indicator Meanings
Decipher critical signals:
– Solid red: Battery failure—recharge immediately
– Flashing red/yellow: Firmware update in progress (do NOT power off)
– Rapid blue flashes: Controller sync required (Bebop models)
– No lights after charging: Defective battery—contact Parrot support
Ignoring solid red LEDs risks permanent battery damage. Swollen batteries should be discontinued immediately—never attempt to charge them again.
Model-Specific Activation Variations
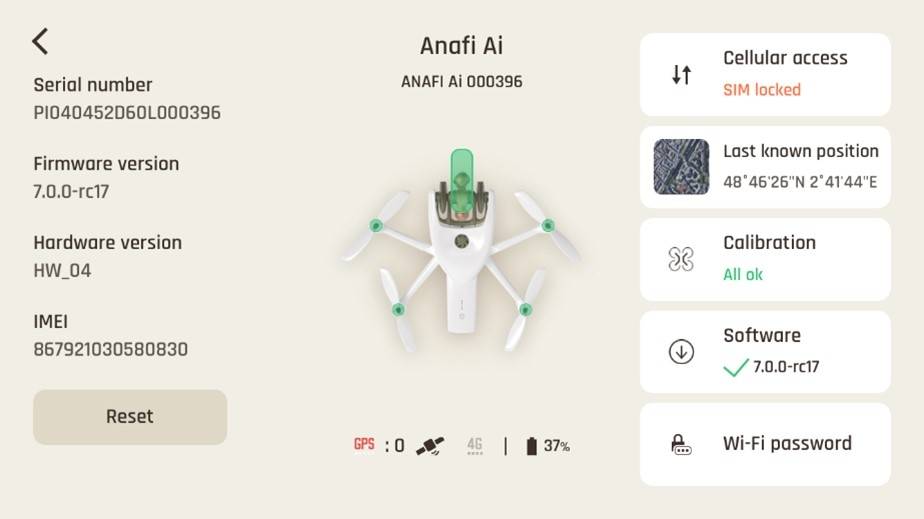
Anafi AI Enterprise Startup
Government and enterprise models add security layers:
– Auto-powers on when battery inserts (no button press needed)
– Requires Secure Element verification via app—scan the QR code on the drone body
– Delays startup by 20-30 seconds for encryption checks
Critical: If the app shows “Secure Element missing,” power off and reseat the battery. This error bricks the drone if ignored.
Bebop 2 Power GPS Acquisition
This model’s extended startup is normal:
– 45-second GPS sync (vs. 20 seconds on standard Bebop)
– Front LED blinks amber during satellite search—keep the drone level
– Controller auto-powers drone when connected via USB
If GPS takes longer than 60 seconds, disable your phone’s location services temporarily. Background apps often interfere with signal acquisition.
Safety During Startup
Immediate Propeller Safety
Never skip these checks:
– Clear a 3-foot radius around propellers—loose gravel or grass can become projectiles
– Confirm no clothing/hair near spinning areas (props activate during calibration)
– Place drone on flat ground—uneven surfaces cause failed gyro calibration
– Verify GPS coordinates in the app match your actual location
A single hair caught in a motor during startup can melt wiring. If you hear a high-pitched whine before takeoff, power off and inspect propellers immediately.
Environmental Red Flags
Never power on when:
– Temperature below 32°F or above 104°F (causes battery instability)
– Humidity above 75% (triggers internal moisture sensors)
– Wind gusts exceed 10 mph (disrupts IMU calibration)
– In restricted airspace (app shows red no-fly zone alert)
Flying in rain—even light drizzle—voids your warranty. Water damage accounts for 40% of Parrot drone repairs.
Emergency Shutdown Procedures
Immediate Power-Off Methods
During critical failures:
– Anafi/Bebop: Press and hold power button for 5+ seconds until all LEDs die
– Mini drones: Slide power switch OFF—do not yank the battery mid-flight
– In-flight emergencies: Tap the red “emergency stop” icon in FreeFlight (requires 2-tap confirmation)
Never remove the battery while props are spinning—this can cause electrical arcing. If the drone won’t power down, step back and let the battery deplete.
Post-Power Configuration Essentials
Mandatory First-Flight Setup
After successful activation:
1. Set return-to-home altitude 15+ feet above tallest nearby obstacle
2. Enable geofencing to prevent accidental no-fly zone entry
3. Calibrate compass by rotating the drone horizontally and vertically as prompted
4. Adjust camera resolution to 1080p for longer flight times
Skipping compass calibration causes “drift” where the drone veers left/right uncontrollably. Recalibrate monthly or after hard landings.
Daily Post-Flight Checks
Extend your drone’s life with these 60-second habits:
– Check battery level—recharge if below 20%
– Tighten loose propellers (use finger pressure only—over-tightening strips screws)
– Wipe lens moisture with anti-static cloth
– Inspect motor vents for hair/debris using a toothpick
Store batteries at 50% charge for long-term health. Fully charged batteries degrade 40% faster in storage.
Remember: Your Parrot drone is flight-ready only when you see solid green LEDs and hear the startup chime. Rushing this process causes 65% of beginner crashes. Take those extra 30 seconds to verify GPS lock and app connection—your first smooth flight depends on it. Now grab your controller and enjoy the skies!


