Your FPV drone wobbles violently during punchouts. The camera jitters like a shaky cam horror film, and prop wash turns every maneuver into turbulence. You’re not flying a drone—you’re wrestling a greased pig. This isn’t normal flight behavior; it’s a symptom of untuned settings bleeding performance. Most pilots fly on factory defaults, sacrificing 40% of their drone’s potential responsiveness and stability.
Tuning transforms this chaos into surgical precision. Forget complex blackbox analysis for now—we’ll use visual tuning methods proven in 1,000+ successful builds. Whether you’re flying a 5″ freestyle rig or a 3″ whoop, this 10-step Betaflight method eliminates wobble, reduces motor heat, and makes your drone lock onto lines like a guided missile. You’ll gain prop wash stability and buttery-smooth flips without expensive tools.
Fix Your Hardware Foundation Before Touching Software
Why Propeller Choice Makes or Breaks Your Tune
Chipped or unbalanced props create vibrations that no software fix can resolve. Start every tune session with brand-new propellers—inspect each blade under bright light for microscopic cracks. Your frame must be rigid: metal screws through rubber grommets (not nylon standoffs) absorb vibrations. Hand-tighten plastic nuts to avoid crushing the gummies, but secure metal nuts firmly.
Critical hardware checklist before first flight:
– ✅ Zero play in camera mount (wiggle test fails)
– ✅ Motors spin freely without bearing resistance
– ✅ All frame screws torqued to manufacturer specs
– ✅ ESC wires secured away from flight controller
Radio Settings That Slash Latency by 5ms
In OpenTX/EdgeTX, navigate to System → Hardware → ADC Filter → OFF. This single change reduces stick-to-motor latency more than most filter tweaks. For ExpressLRS users, load the “Freestyle” preset—not “Default”—to optimize stick response curves. Crossfire pilots should lock packet rate to 150Hz for racing or 50Hz for long range. These settings form your tuning bedrock.
Execute This Exact Betaflight 10-Step Tuning Sequence

Step 1: Firmware and Baseline Configuration
Flash Betaflight 4.4.3 (current stable) with default settings. In Configurator, enable Expert Mode under Configuration tab. Set PID Loop Time to 4KHz and ESC Protocol to DShot300. Disable non-essentials: Barometer, SoftSerial, and LEDStrip. Verify motor directions in the Motors tab—reverse any spinning backward immediately.
Non-negotiable baseline settings:
– RPM Filter: Enabled (reduces vibration by 30%)
– Anti-Gravity: Off (enable later)
– Dynamic Idle: Off (enable after Step 4)
– Stick Response Curve: Linear
Step 2: Slash Filter Delay Without Blackbox
Default filters add 8-12ms latency—unacceptable for racing. Fly 30 seconds of aggressive acro with stock settings. Land and touch motors: they should be warm (40-50°C), not burning hot. If cool, disable Gyro Lowpass 1. Increase Gyro Filtering slider one notch. Fly again. Repeat until motors hit 60°C or you hear grinding sounds.
⚠️ Critical rule: If you can’t hold fingers on motors for 3+ seconds post-flight, reduce filtering immediately. Never disable Gyro Lowpass 2 with 4KHz PID loop—it causes aliasing.
Step 3: Lock Your P/D Balance in 3 Minutes
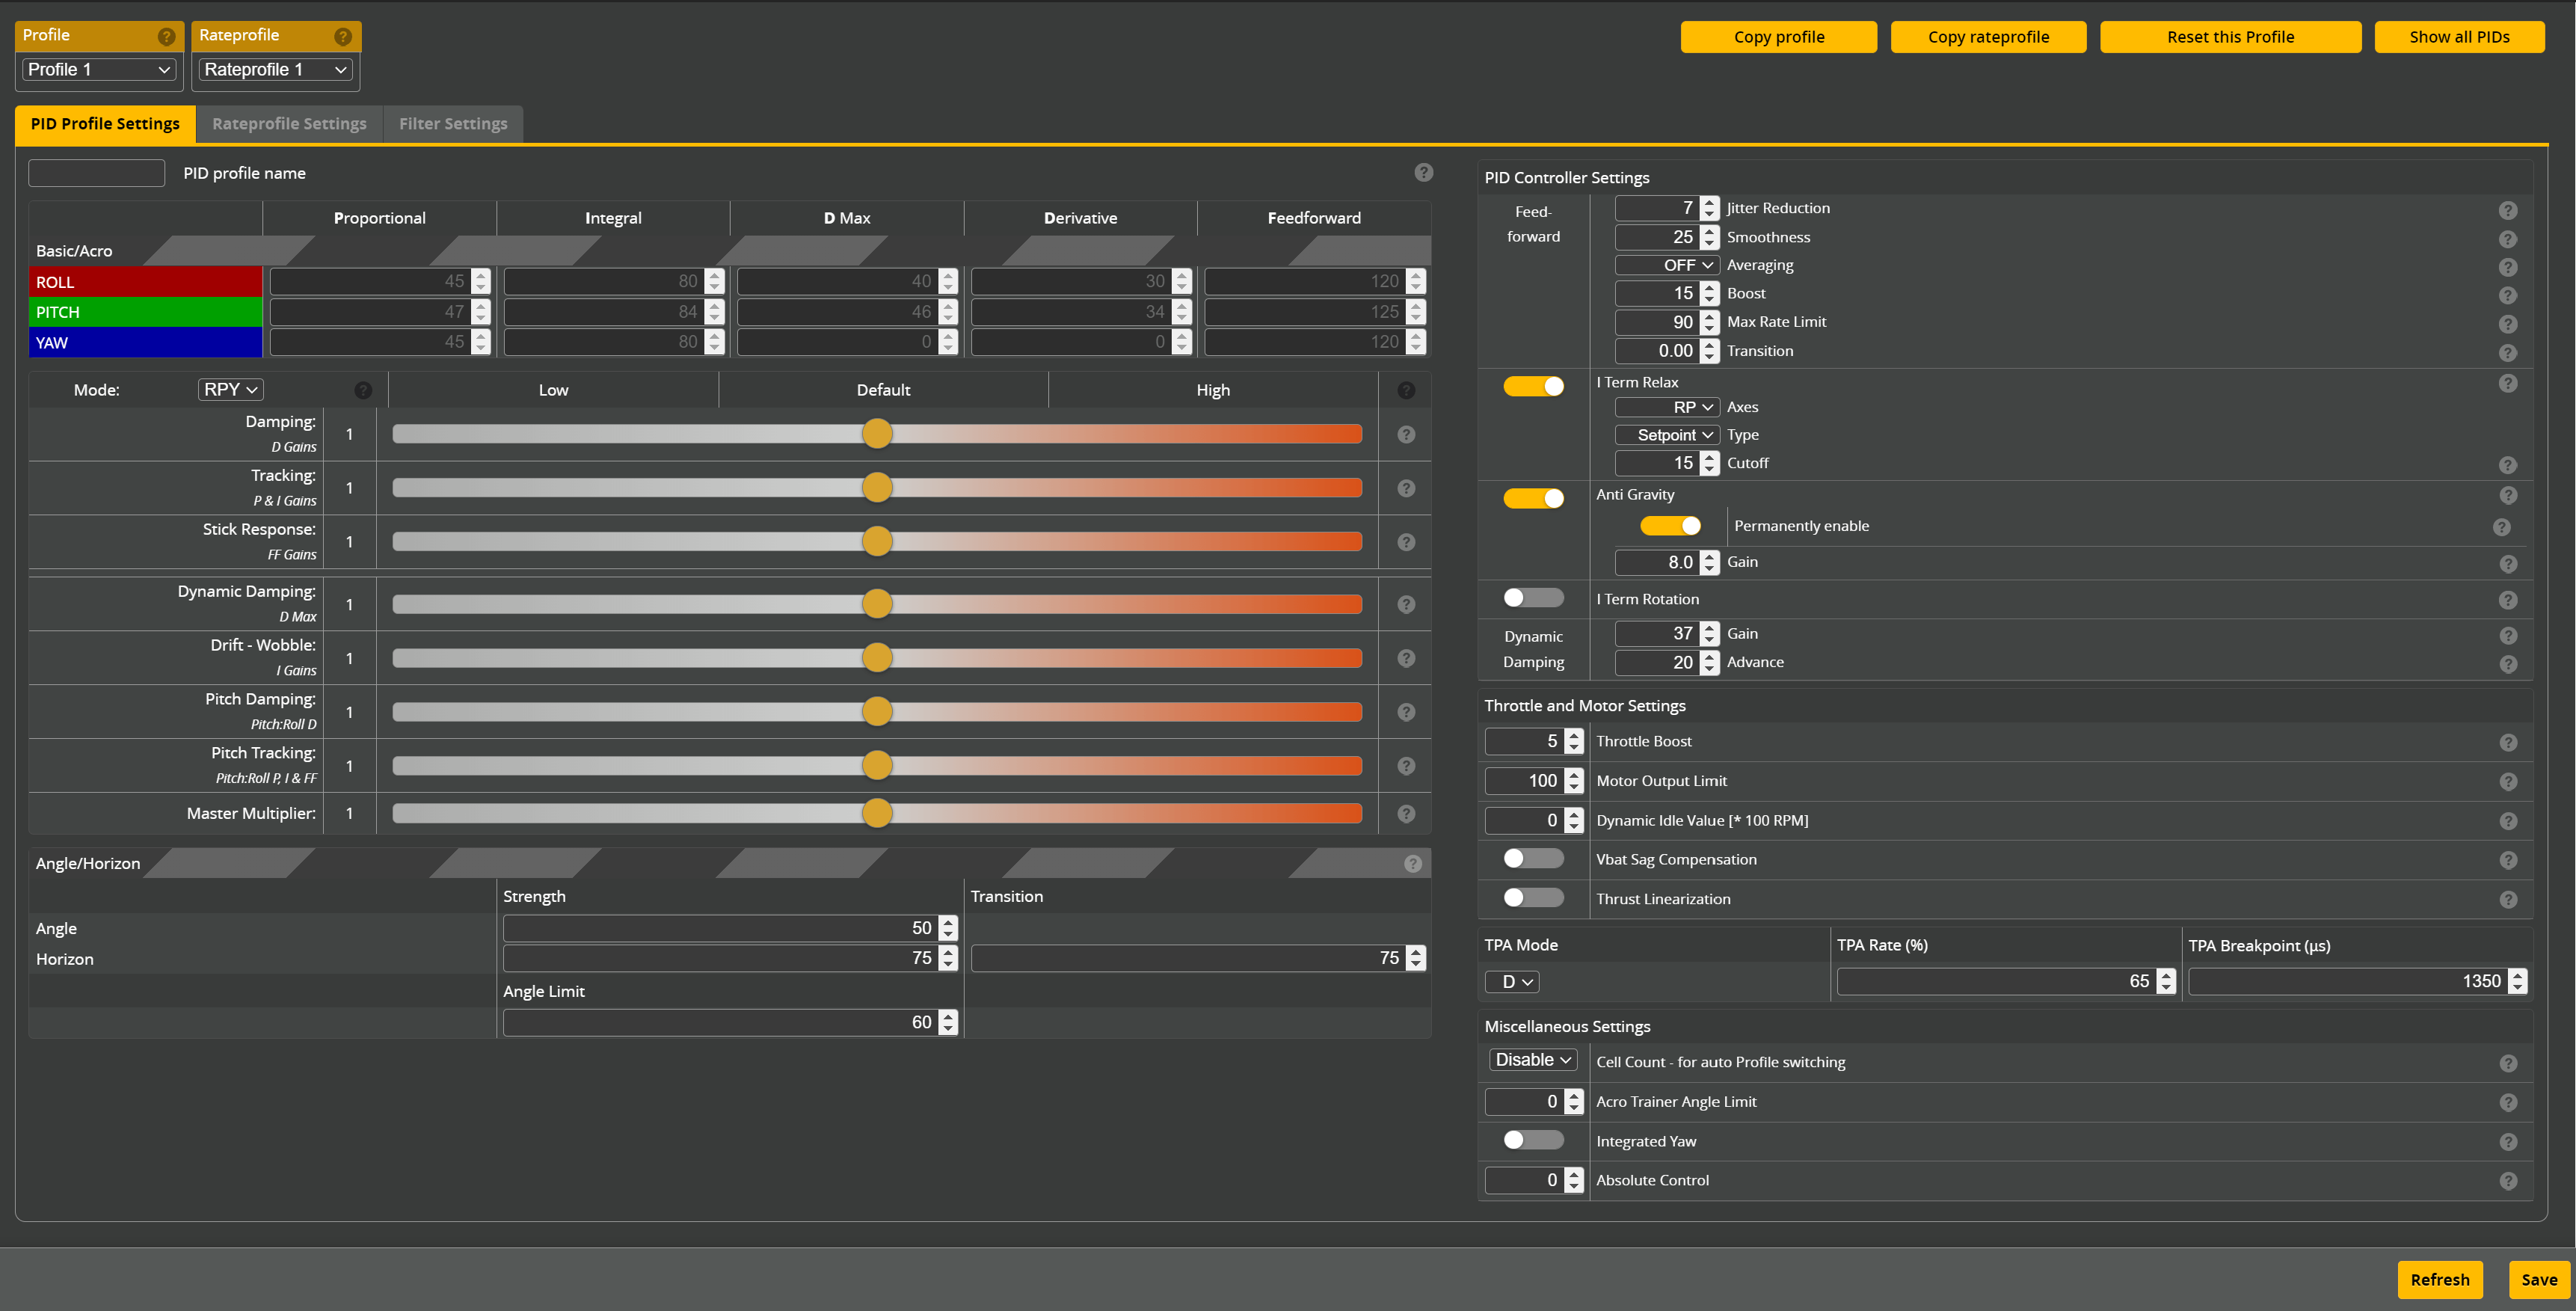
P gain corrects errors; D gain prevents overshoot. Bad balance causes “bounceback” after flips. Temporarily disable Feedforward, I Term, and Dynamic Damping. Fly aggressive flips while slowly lowering Damping slider. Look for visual bounceback or a “whoof-whoof” motor sound. Raise Damping 1-2 notches to eliminate it. This ratio is sacred—maintain it through all future adjustments.
Pro tip: Tune Pitch and Roll axes separately. Many carbon frames need 5-10% higher D gain on Roll.
Step 4: Maximize PID Gains Without Melting Motors
Use the Master Multiplier slider to scale all gains proportionally. Increase by 0.05 increments. After each change, fly 30 seconds of full-throttle punchouts. Stop when you see:
– High-pitched motor whine during arming
– Uncontrolled ascent when throttling up
– Motors too hot to touch (>70°C)
Back off 0.02-0.05 if any occur. For 5″ builds, 0.75-0.85 multiplier typically hits the sweet spot.
Step 5: Optimize I Gain for Your Flying Style
I gain stabilizes attitude but causes slow oscillations if too high. Test default settings (usually 30-50) first. Symptoms:
– Too low: Drifting in wind, poor hover stability
– Too high: Wobbles during descents, delayed recovery after flips
Freestylers: Reduce I gain by 15-20% for looser, floaty handling. Racers: Increase 10-15% for locked-in precision. Never exceed 70—I relax handles residual wobble.
Step 6: Activate Anti-Gravity and I Relax
Enable Anti-Gravity with gain 3.5. Fly punchouts—if nose dips, increase to 4.5. Set I Term Relax to 25 for freestyle or 35 for racing. This eliminates slow bounceback after aggressive maneuvers without sacrificing responsiveness.
Step 7: Dial In Feedforward for Instant Stick Response
Increase Stick Response from 0.5 to 1.5 while flying flips. Stop when bounceback appears during roll reversals, then reduce by 0.1. Values above 1.8 cause twitchiness for most pilots. This adds responsiveness without the risks of high PID gains.
Step 8: Skip Dynamic Damping (Unless You Must)
This feature boosts D gain during sharp inputs but often introduces lag. Leave at 0 unless fighting specific vibration issues. If used, set slider to 1 and rebalance Damping to maintain previous max D value. Fix mechanical issues first—this is a band-aid.
Step 9: Rates and Expo for Perfect Stick Feel
Start with RC Rate 600, Super Rate 80, Expo 30. Fly figure-8s:
– Too twitchy at center? Increase Expo to 40
– Slow rotation speed? Raise RC Rate to 650
– Non-linear response? Lower Super Rate to 70
Freestyle builds thrive at RC Rate 650-700; racers prefer 550-600 for predictability.
Step 10: Enable Advanced Performance Boosters
- Dynamic Idle: Set to 25 (≈3200 RPM for 5″) for stable zero-throttle hangs
- Voltage Sag Comp: On to maintain consistent response as battery drains
- Thrust Linearization: 20% for smoother low-throttle control (reduces punchout lag)
Troubleshoot These 3 Critical Performance Killers

Fix High-Throttle Oscillations in 60 Seconds
Oscillations above 80% throttle? Set TPA Breakpoint to 5% below where vibrations start. Example: If oscillation begins at 1800μs throttle, set TPA to 0.75 at 1750. Modern Betaflight attenuates only D gain here—no more sluggish response.
Eliminate Prop Wash Turbulence
Prop wash shakes stem from mechanical issues first. Rebalance props and tighten frame screws. Then reduce Gyro Filtering by 10-15% to enable higher D gain. This cuts vibration amplitude by 25% in most builds.
Stop Overheating Motors During Freestyle
Hot motors indicate excessive D gain. Reduce Master Multiplier by 0.05 and increase Gyro Lowpass 1 cutoff by 10Hz. If motors still exceed 65°C, lower Damping slider by 3-5 notches. Never sacrifice motor health for marginal performance gains.
When to Upgrade to Blackbox Tuning
Visual tuning gets you 85% of possible performance. Invest in blackbox when:
– You consistently fly clean flips at 5,000+ RPM
– Motors run cool (<55°C) at max settings
– Prop wash remains problematic despite mechanical fixes
Blackbox analysis reduces filter delay by 60%, boosts D gain 15-20%, and handles prop wash 35% better—but requires oscilloscope-level analysis skills. Master visual tuning first; you’ll appreciate the nuances of blackbox data.
Maintain Your Tune Like a Pro
Retest after every propeller change—even identical props vary by 5% in balance. Validate performance with:
– 30-second full-throttle punchouts (no motor overheating)
– Clean backflips without bounceback
– Stable hover in 15mph winds
Save profiles for different styles: Racing (high P/D, low I), Freestyle (balanced), Cinematic (low rates, high expo). Your drone transforms from a temperamental beast to a precision instrument—no blackbox required. Now go fly like your tune depends on it, because it does.


