You’ve invested in a high-end drone, but your survey results still look like a toddler’s finger painting—overlapping at some points, missing coverage at others. That’s because programming a drone flight path isn’t just drawing lines on a screen; it’s the difference between professional-grade data and wasted flight time.
Most drone operators don’t realize that 80% of mission failures stem from poor flight path programming, not equipment limitations. Whether you’re mapping construction sites or inspecting cell towers, the exact coordinates, altitude parameters, and sensor triggers in your flight path determine if you’ll get usable data or spend hours reshooting.
This guide reveals the exact workflow enterprise drone operators use to program flawless flight paths every time—covering everything from grid pattern selection to RTK precision setup and geofence troubleshooting.
Select the Right Flight Path Pattern for Your Mission
Grid vs Cross-Hatch: Critical Overlap Settings for Accurate Mapping
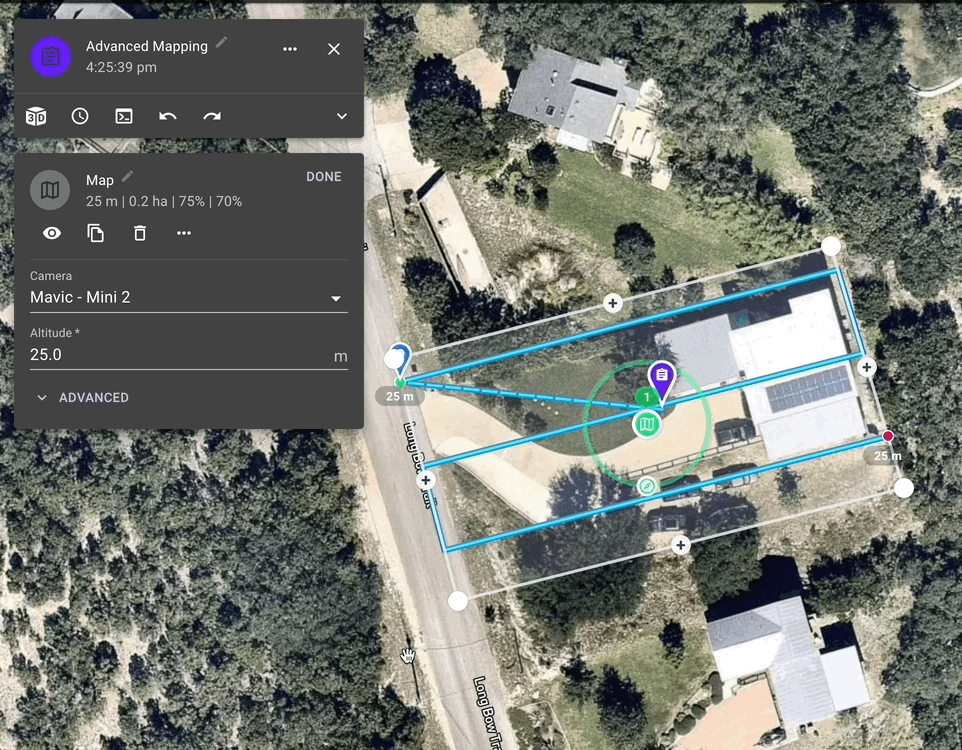
Grid patterns create parallel flight lines like a lawn mower—perfect for standard orthomosaics. Set 75% front overlap and 60% side overlap for reliable photogrammetry results. For critical infrastructure inspections requiring sub-centimeter accuracy, increase to 80%/70% overlap.
Cross-hatch patterns add perpendicular passes over your grid, capturing vertical surfaces for detailed 3D reconstruction. This doubles flight time but produces models accurate to 1-2 centimeters. Essential for creating as-built models of complex structures like bridges or industrial facilities.
Waypoint Sequences vs Corridor Planning for Targeted Inspections
Waypoint sequences deliver surgical precision for inspections. Each waypoint holds specific commands: altitude changes, gimbal angles, camera triggers, and payload actions. For cell tower inspections, program waypoints every 5 meters with 360-degree photo sequences at each stop.
Corridor planning transforms a single centerline into an automated survey strip. Import a KML file of your pipeline route, set corridor width to 50 meters, and your drone calculates every necessary pass automatically—saving hours of manual path creation.
Execute the Professional Flight Path Programming Workflow
Define Mission Parameters Before Touching Software
Start with your data requirements—not drone capabilities. Your mission purpose dictates every subsequent decision:
- Survey accuracy: ±10cm for construction, ±1m for agriculture
- Flight time budget: Factor 30% battery reserve minimum
- Environmental constraints: GPS-denied areas require different approaches
- Data deliverable: Orthomosaic, 3D model, or inspection photos
Skipping this step leads to mismatched data quality and wasted flights. A construction survey requiring centimeter accuracy needs RTK positioning, while agricultural field mapping might work with standard GPS.
Hardware Verification Checklist Before Path Creation
Never program missions your drone can’t execute:
- Flight controller firmware: Update to latest stable release
- GNSS quality: RTK for centimeter accuracy, standard GPS for meter-level
- Battery capacity: Calculate using mission distance + wind compensation
- Sensor triggers: Verify PWM or MAVLink compatibility for camera control
Verify your equipment’s capabilities match your mission requirements. A Phantom 4 RTK can handle RTK missions up to 10km from base station, while consumer drones might struggle with basic grid patterns beyond 500m.
Design Your Flight Path with Precision Parameters
Here’s where most operators make critical errors:
- Import boundaries: Use KML, SHP, or draw polygons directly
- Select path type: Match to your mission requirements
- Set altitude mode: AGL for terrain following, AMSL for absolute reference
- Configure overlap: 75%/60% standard, 80%/70% for critical work
- Add actions: Camera triggers, gimbal movements, and ROI commands
For forestry surveys with elevation changes exceeding 50 meters, use terrain following with pre-loaded DSM data. Without this, your images will have inconsistent ground resolution, ruining photogrammetry results.
Software Selection for Reliable Flight Path Programming

Commercial Tools That Prevent Costly Mistakes
DJI Pilot 2 delivers enterprise-grade path programming:
– Per-waypoint gimbal and zoom control for precise inspections
– DSM terrain following for consistent ground resolution
– Corridor and orbit templates for linear infrastructure
– RTK base station integration for centimeter accuracy
PIX4Dcapture specializes in agricultural mapping:
– Automatic overlap calculation based on terrain
– Offline DSM caching for remote operations
– Multi-battery mission planning for large areas
Open-Source Alternatives for Complete Control
For full customization, use Mission Planner with ArduPilot:
- Draw polygon boundary or import KML
- Right-click each waypoint → Set Alt, Set Speed, Do-Set-Cam-Trigg-Dist
- Verify height using SRTM or custom DSM
- Write WPs → arm → switch to Auto → observe
This approach gives you granular control over every parameter but requires more technical expertise than commercial apps.
Troubleshoot Common Flight Path Programming Failures
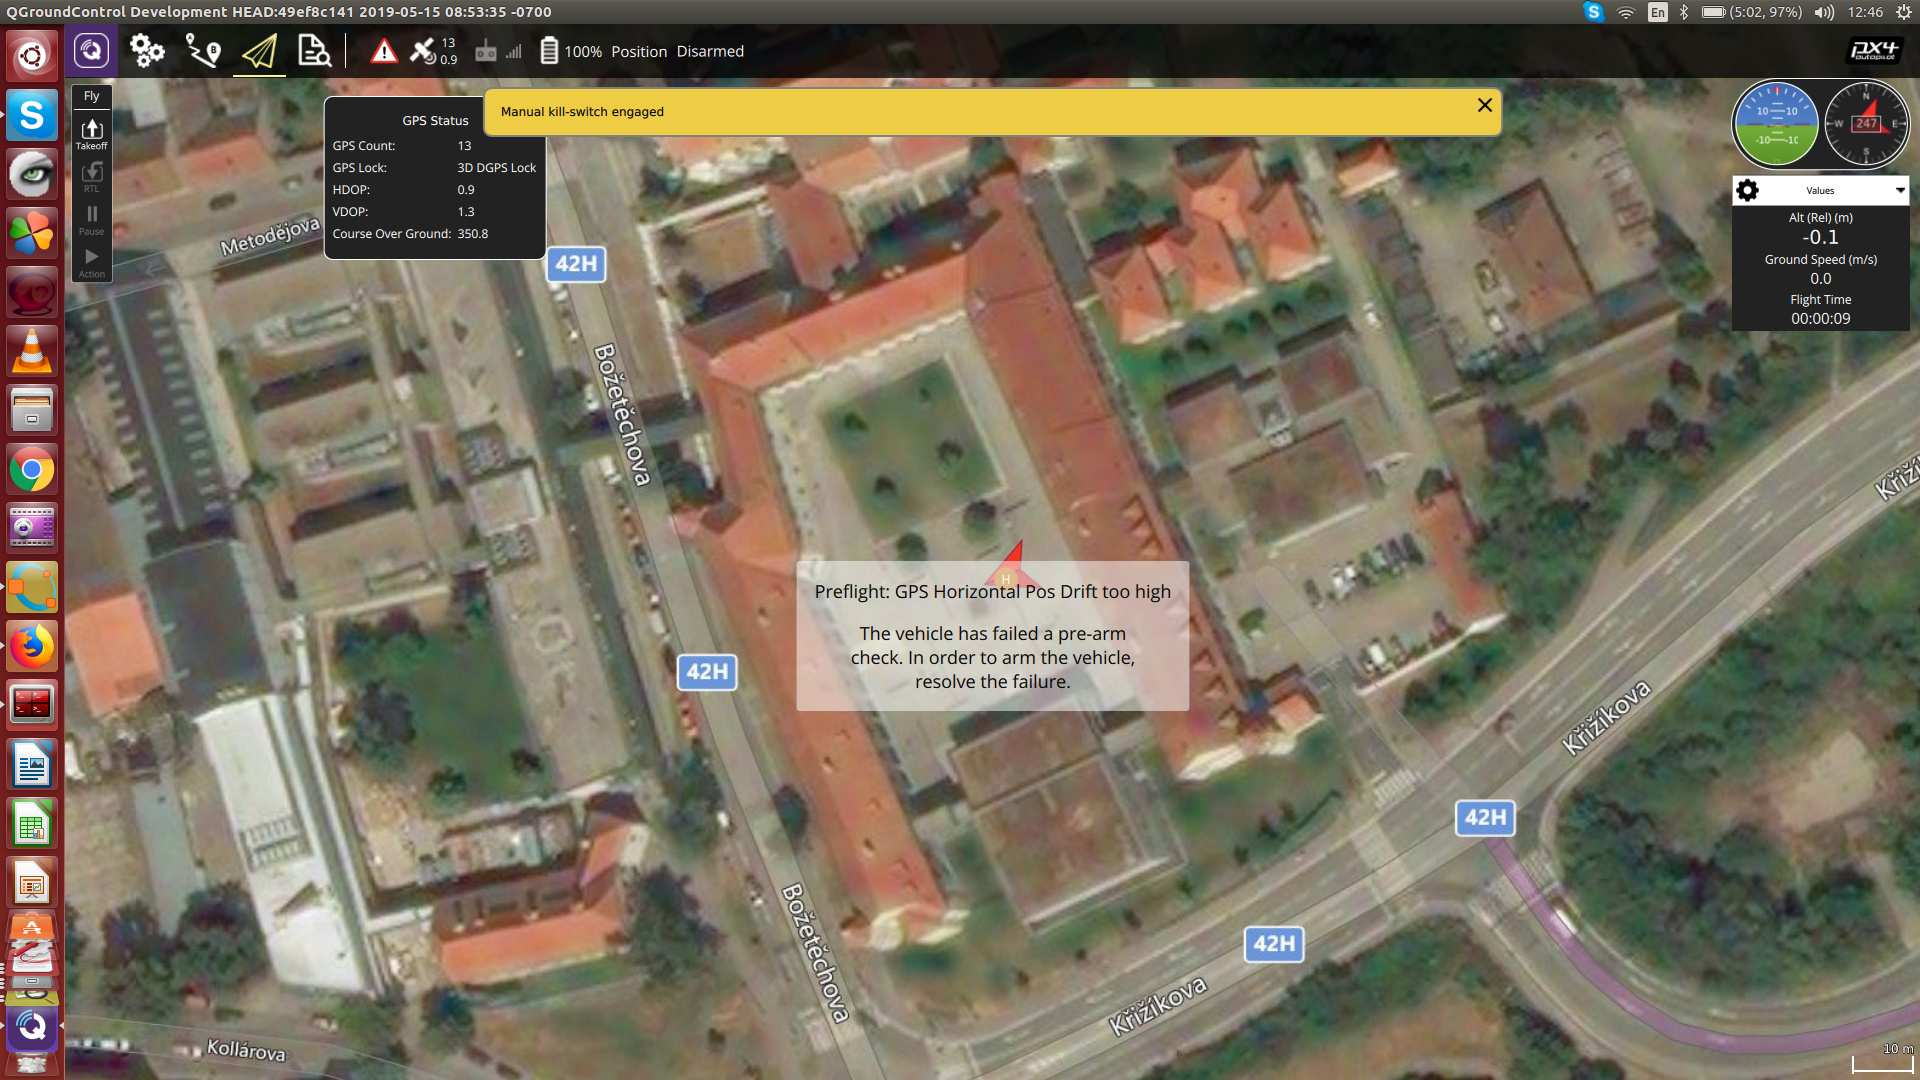
Fix GPS Drift Ruining Your Mapping Accuracy
Symptoms: Images offset >1 meter from intended positions
Root causes:
– Magnetic interference near power lines
– Poor GPS constellation
– Compass calibration drift
Solutions:
– Use RTK base station within 10km
– Recalibrate compass away from metal objects
– Check mag field variance <30% before flight
Prevent Battery Shortfalls That Abort Missions
Symptoms: Emergency RTH before mission completion
Calculation:
Required battery = (Mission distance × 1.3) / average speed × power consumption

Add 30% reserve for wind
Mitigation:
– Test mission in simulator first
– Use eCalc mission planner for accurate estimates
– Plan intermediate landing/battery swap points for multi-battery missions
Resolve Geofence Violation Errors
Symptoms: Mission abort with geofence breach warning
Common causes:
– Incorrect altitude reference (AGL vs AMSL)
– Boundary polygon errors
– DSM elevation mismatches
Solutions:
– Import verified DSM data for terrain awareness
– Check polygon for duplicate points
– Set RTH altitude 30m above tallest obstacle
Field-Ready Flight Path Programming Checklist
Print and laminate this for mission success:
- [ ] Mission purpose defined with accuracy requirements
- [ ] Boundary imported and verified for duplicates
- [ ] LAANC authorization confirmed
- [ ] Weather within limits (wind ≤12 m/s, visibility ≥3km)
- [ ] Battery capacity ≥130% mission demand
- [ ] Emergency landing site identified
- [ ] Firmware and sensors calibrated
- [ ] Geofence parameters verified
- [ ] SD card formatted with sufficient capacity
- [ ] Test flight completed before full mission
Program Your First Professional Flight Path
Start with these proven steps for immediate success:
- Begin with simple grid mission for 2D orthomosaic practice
- Use 75% front/60% side overlap as baseline configuration
- Set altitude 60m AGL for optimal ground resolution (5cm GSD)
- Include manual RTH trigger as safety backup
- Fly short 5-minute test before full mission
Master these fundamentals before advancing to waypoint sequences, terrain following, or multi-drone operations. Remember: professional results come from precise flight path programming, not expensive equipment.
Your drone is only as capable as the flight path you program. Implement these techniques, and watch your mission success rate jump from 60% to 95% within your first week. The difference between amateur and professional drone operations starts with how you program your drone flight path—master this skill, and you’ll capture perfect data every time.


