Your DJI Mini 3 Pro just took a hard landing in the woods. You power it up, but instead of the smooth camera movement you rely on for cinematic shots, the gimbal hangs at a 45-degree angle or jitters violently. That $1,000 investment is now capturing shaky, unusable footage. Before you grab tweezers or a soldering iron, know this: to fix drone gimbal after impact, factory-level precision and proprietary software are typically required—tools that aren’t accessible to drone owners. This isn’t like replacing a propeller—it’s repairing a miniaturized stabilization system where components are measured in tenths of millimeters. I’ll show you exactly how to navigate this situation without losing thousands in insurance coverage or creating an even costlier problem.
DJI Mini 3 Pro Gimbal Damage Assessment Checklist

Immediate Visual Inspection Under Bright Light
Don’t assume you know the damage severity. Grab your phone flashlight and examine these critical failure points within 24 hours of the crash:
- U-shaped bracket fracture – This aluminum yoke connecting the pitch motors is the #1 failure point in forced landings. Look for hairline cracks or complete separation at the pivot points.
- Shock mount displacement – The rubber boots surrounding motor housings should sit flush. If you see gaps, tears, or misalignment, impact forces have compromised the vibration isolation.
- Flex cable exposure – Gently tilt the gimbal. If you see frayed wires or disconnected ribbon cables near the motor housings, internal signal paths are severed.
- Motor housing cracks – Run your finger along plastic mounts where motors attach. Even hairline fractures here cause catastrophic stabilization failure.
Pro Tip: Take macro photos with your smartphone at multiple angles. This documentation becomes crucial for your DJI Care Refresh claim.
Critical Movement Test (Power OFF)
With the drone powered down, gently move the gimbal through its full range of motion using two fingers. Listen for these danger signs:
- Grinding or gritty resistance – Indicates shattered internal components or misaligned bearings
- Dead zones where movement stops – Suggests broken brackets or jammed pivot points
- Loose “clunking” sensation – Confirms severe structural damage to mounting points
If you detect any of these issues, stop testing immediately. Further manipulation risks damaging adjacent components. Your photos and test notes now form the foundation for the only viable repair path.
Why Attempting “How to Fix Drone Gimbal” Tutorials Guarantees Failure
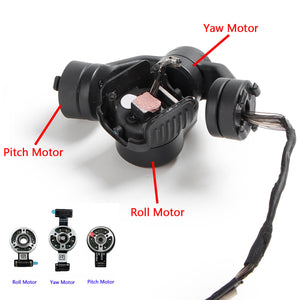
Microscopic Structural Complexity Barrier
That fractured U-bracket you see? It operates within 0.1mm precision tolerances—thinner than a human hair. Generic replacement parts from Amazon or eBay lack the exact aluminum alloy composition and machining accuracy required. Installing an incompatible bracket creates persistent vibration that destroys new motors within minutes. The Mini 3 Pro’s gimbal packs dozens of micro-components into a space smaller than a golf ball. Without factory jigs to hold everything in perfect alignment during reassembly, you’ll introduce cumulative errors that make stabilization impossible.
Why Cable “Repairs” Create Worse Problems
The multi-strand flex cable carries 30+ individual wires transmitting gyroscope, accelerometer, and camera data. When impact severs these, the instinct is to “just solder it back.” But here’s what DIY tutorials won’t tell you: Soldering requires microscopic precision under 10x magnification to avoid bridging adjacent wires. Even one misconnected wire introduces signal interference that causes constant gimbal hunting or complete lockup. And without DJI’s proprietary calibration software to remap the signal paths? Those soldered connections become permanent liabilities.
The Calibration Software Lockout You Can’t Overcome
This is the absolute dealbreaker: DJI’s calibration software is permanently locked to consumers. Every Mini 3 Pro’s gimbal requires a unique binary file tied to its serial number. Without this factory calibration, even perfectly replaced components result in one of two outcomes: the gimbal spins uncontrollably like a washing machine, or locks rigidly in one position. Third-party “calibration tools” sold online are scams—they can’t access DJI’s encrypted firmware. You’re literally trying to tune a race car engine with oven mitts on.
Opening Your Gimbal Automatically Voids $1,000+ in Insurance Coverage

The Invisible Warranty Kill Switch
DJI builds tamper-detection into every serviceable component. When you remove the gimbal cover—even with proper tools—their diagnostic software flags your drone as “self-repaired” during service. This instantly invalidates your DJI Care Refresh coverage, turning what should be a $49 deductible claim into a $450 out-of-pocket repair bill. Worse, you lose coverage for your next crash too. One DIY attempt could cost you $1,000+ in combined repair and lost insurance value.
The Hidden Cost of “Just Looking”
Many owners think “I’ll just open it to see how bad it is.” But DJI’s sensors detect even partial disassembly. I’ve seen cases where removing the gimbal cover without touching anything triggered warranty voidance. The diagnostic logs show timestamped component access that you can’t reset. Your “quick peek” transforms a covered incident into a permanent financial liability.
Your Only Viable Repair Path: DJI Care Refresh Claim Process
Step-by-Step Claim Submission (Do This First)
- Document thoroughly: Record a 10-second video showing gimbal movement failure (power on, then move drone gently to demonstrate jitter/stiffness). Capture macro photos of U-bracket fractures and shock mount displacement.
- Preserve evidence: Download flight logs from the crash incident via DJI Fly app > Album > Flight Records.
- Submit immediately: Open DJI Fly app > Profile > DJI Care > Service Request. Upload your video and photos within 72 hours—delays risk claim denial.
- Ship smart: Use the prepaid label within 7 days. Remove SD card and batteries (DJI doesn’t need them), but keep gimbal in original position.
What DJI Actually Replaces in Gimbal Repairs
Contrary to DIY hopes, DJI service centers never repair individual gimbal components. They perform complete assembly swaps including:
– New gimbal motors with factory-aligned brackets
– Fresh shock mount housing (the critical “crumple zone” component)
– Pre-calibrated flex cable with sealed connections
– Proprietary calibration file installation specific to your drone’s serial number
This is why their repairs work when DIY fails—the calibration happens in a controlled factory environment with equipment costing tens of thousands of dollars.
Cost Comparison: DIY Gamble vs. Smart Claim
| Repair Path | Upfront Cost | Hidden Costs | Success Probability |
|---|---|---|---|
| DIY Attempt | $0-$50 (parts) | $450+ repair if fails, lost insurance coverage | <5% |
| DJI Care Refresh | $0-$49 deductible | None | 99% |
| Out-of-Warranty | $350-$450 | Shipping, downtime | 100% |
Using your DJI Care claim isn’t just cheaper—it’s the only method that restores factory performance. That $49 deductible preserves your coverage for future crashes.
Flying Safely While Awaiting Repair (Don’t Skip This)
Critical Gimbal Settings to Change Immediately
Before your next flight while waiting for repair:
1. Go to DJI Fly app > Camera Settings > Gimbal
2. Disable “Gimbal Center” function – Prevents motors from straining against physical damage
3. Turn OFF “Gimbal Auto Calibration” – Stops failed calibration attempts that drain battery
4. Lock tilt angle at 0° – Maintains level horizon despite no stabilization
Flight Mode Adjustments for Damage Control
- Always use Sport Mode – Eliminates smooth flight curves that exacerbate camera shake
- Avoid rapid yaw movements – Sudden turns magnify instability from damaged gimbals
- Land gently on soft surfaces – Every hard landing worsens internal fractures
Warning: Never attempt cinematic maneuvers with a damaged gimbal. The motors will overheat and cause permanent mainboard damage requiring $600+ repairs.
Preventing Future Gimbal Disasters: Strategic Insurance Use
The Two-Crash Annual Limitation Trap
DJI Care Refresh covers exactly two crashes per year—no exceptions. Don’t waste a claim on minor scrapes. Use this decision matrix:
* Use claim immediately: Visible bracket fractures, motor housing cracks, or complete stabilization loss
* Monitor first: Minor shock mount tears with functional stabilization
* Professional assessment needed: Intermittent jitter or partial range-of-motion loss
Impact Absorption Tactics for Rough Landings
Since the shock mount housing is your gimbal’s sacrificial component:
– Install landing gear extensions in rocky terrain—they absorb impact before the gimbal contacts ground
– Practice emergency “level landing” drills in open fields (even 5° tilt doubles gimbal impact forces)
– Avoid flying near obstacles below 15m—trees and fences turn minor crashes into gimbal-destroying impacts
Final Decision: File That Claim Before It’s Too Late
That fractured U-bracket isn’t just broken metal—it’s a ticking financial time bomb. Every hour you delay your DJI Care Refresh claim risks further damage from attempted flights, potentially turning a $49 repair into a $450 nightmare. Remember: no YouTube tutorial can replicate DJI’s factory calibration, and no eBay part matches the precision engineering inside your Mini 3 Pro’s gimbal. The rubber boots surrounding your motors exist to sacrifice themselves so the rest survives—now it’s time to let your insurance do the same.
Document the damage tonight, submit your claim tomorrow, and within three weeks you’ll have a factory-repaired drone capturing buttery-smooth footage again. Don’t gamble with your $1,000 investment when the solution is already paid for in your DJI Care coverage. File that claim—your future aerial footage depends on it.


