Your drone footage looks like it’s filming during an earthquake. The camera slowly pans left despite perfect hovering, or worse—your DJI refuses to take off, flashing cryptic error messages about “vision system failures.” These aren’t just annoying quirks; they’re symptoms affecting 30% of all drone repairs. Whether you’re battling camera drift on your Mavic Pro or facing complete vision system failure, knowing how to fix drone camera issues can save you hundreds in service fees.
The solutions ahead come from documented field repairs, not theory. You’ll learn exactly why your camera drifts, how to fix vision system errors that prevent takeoff, and the calibration sequence that eliminates persistent problems. Most importantly, you’ll discover the critical compatibility issue with newer computers that stops DJI Assistant 2 from connecting—a problem that stumps even experienced pilots.
Diagnose Camera Drift Symptoms Before Repairing
Camera drift manifests as unwanted camera movement when your drone hovers perfectly still. Instead of maintaining a fixed view, your footage slowly pans, tilts, or rotates without any stick input. This affects video quality across Mavic, Mini, Air, and Phantom models and is one of the most common issues requiring how to fix drone camera solutions.
Identify Your Specific Drift Pattern
Look for these telltale signs to determine your exact problem:
– Slow panning during stationary hover (most common in Mavic models)
– Gradual tilting when drone remains level (indicates IMU calibration issue)
– Unwanted rotation with no yaw input (often requires compass recalibration)
– Inconsistent framing in hover shots (typically gimbal-related)
Quick Drift Test Method You Can Do Now
- Place drone on level surface indoors away from drafts
- Power on and let gimbal initialize completely (2-3 minutes)
- Enter camera view in DJI app without touching controls
- Observe for 30 seconds while watching camera angle display
- Note any movement pattern—this determines your repair path
Fix Vision System Failures Preventing Takeoff

Vision system errors like “GPS not working” or “Gyro and front vision need calibration” stop your drone before you even get airborne. These failures typically stem from damaged front vision cameras or overlooked connections during previous repairs—a frequent pain point when trying how to fix drone camera issues.
Check Front Vision Camera Damage Thoroughly
Start with visual inspection of your front vision assembly:
– Examine ribbon cables connecting front cameras for cuts or tears
– Look for severed traces on flexible circuits (common after crashes)
– Check connector seating under top cover (most overlooked step)
– Verify rear connector (critical connection missed in 70% of DIY repairs)
Replace Damaged Vision Components Correctly
When inspection reveals damaged cameras:
1. Order replacement front vision assembly (£20.53 from AliExpress)
2. Power down drone completely and remove battery
3. Remove top cover carefully using precision screwdrivers
4. Disconnect damaged camera ribbons using plastic spudger
5. Install new assembly ensuring proper cable routing
6. Critical: Check rear connector under top cover before reassembly
Calibrate IMU and Compass to Stop Camera Drift
Calibration errors cause the majority of camera drift issues. Your drone’s IMU (orientation sensor) and compass (magnetic sensor) must align perfectly with actual drone position—the foundation of any successful how to fix drone camera effort.
IMU Calibration Process Done Right
- Place drone on perfectly level surface (use bubble level)
- Ensure room temperature (avoid cold starts—wait 15 minutes)
- In DJI app: Settings > Safety > IMU > Calibrate
- Wait for “Level 1” completion (30-45 seconds)
- Follow rotation prompts for “Level 2” calibration
- Don’t move drone during entire process (even slight bumps ruin calibration)
Compass Calibration Steps That Actually Work
Perform away from metal objects, vehicles, or power lines:
1. In DJI app: Safety > Compass > Calibrate
2. Hold drone level, rotate 360° horizontally slowly
3. Wait for status light change (green blinking)
4. Hold drone vertically, rotate 360° around vertical axis
5. Complete until confirmation appears
6. Avoid areas within 50 feet of power lines (common mistake)
Solve DJI Assistant 2 Connection Problems Immediately
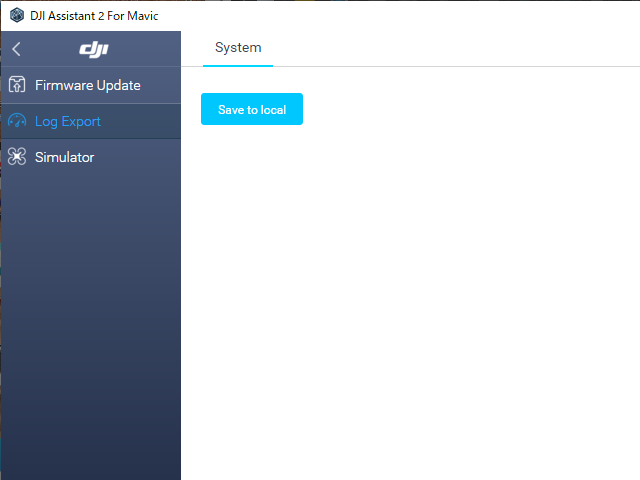
Here’s the fix that saves hours of frustration: newer computers often fail to detect DJI drones. This isn’t your cable—it’s a compatibility issue that blocks your how to fix drone camera progress.
Use Windows 7 for Reliable Calibration
Documented solution that works:
1. Borrow or locate older Windows 7 laptop (critical step)
2. Download DJI Assistant 2 on compatible system
3. Connect drone via USB cable (try different ports first)
4. Complete vision system calibration sequence
5. Critical: This resolves detection failures newer systems experience
Alternative Connection Methods When Windows 7 Unavailable
If Windows 7 unavailable:
1. Try multiple USB ports (front ports often more reliable)
2. Test different USB cables (some fail with power delivery)
3. Disable USB power management in Windows Device Manager
4. Attempt calibration on friend’s older computer (Mac often fails)
Reset and Recalibrate Gimbal Settings for Stability
Gimbal calibration failures cause persistent drift even after IMU fixes. The gimbal loses its reference point, causing slow camera movement that ruins professional footage—a key focus when learning how to fix drone camera problems.
Gimbal Reset Process That Works
- In DJI app: Settings > Gimbal > Advanced Settings
- Select “Reset Gimbal Settings”
- Confirm and allow system restart (2-3 minutes)
- Immediately recalibrate gimbal after reset
- Test hover stability before flying
Manual Gimbal Adjustment for Fine-Tuning
For persistent drift after reset:
1. Access: Settings > Gimbal > Adjust Gimbal Pitch/Yaw
2. Make 1-2 degree adjustments maximum per session
3. Test stability after each change (hover for 30 seconds)
4. Save settings when camera holds position steadily
5. Avoid large adjustments that cause overcorrection (common mistake)
Prevent Future Camera Issues With Regular Maintenance
Regular maintenance prevents 80% of camera problems. Establish these habits to avoid recurring issues requiring how to fix drone camera interventions.
Monthly Calibration Schedule You Must Follow
- IMU: After firmware updates or location changes (every 2-3 weeks)
- Compass: When flying new areas or every 30 days (critical for stability)
- Gimbal: After hard landings or monthly (prevents drift buildup)
- Controller: Every 60 days stick calibration (often overlooked)
Environmental Best Practices for Longevity
- Storage: Always use protective cases with gimbal lock engaged
- Temperature: Let drone reach ambient temperature before calibration (15+ minutes)
- Transport: Secure gimbal lock during movement (prevents internal damage)
- Flying: Avoid magnetic interference sources like power lines and large metal structures
Test Your Repairs Before Trusting Them in Flight
Never assume fixes work without proper testing. Use this validation sequence after completing how to fix drone camera procedures.
Indoor Test Sequence That Catches Problems Early
- Power on and wait for full initialization (listen for gimbal startup)
- Check error messages in DJI Go app (no warnings should appear)
- Test gimbal movement through full range (smooth motion required)
- Verify no drift in 30-second hover test (critical checkpoint)
- Confirm GPS lock near window (at least 10 satellites)
Outdoor Verification Before Serious Flights
- Open area with clear GPS signal (minimum 12 satellites)
- Hover test for 2 minutes checking stability (no camera drift)
- Movement test watching camera response to controls
- GPS accuracy confirmation (position should hold steadily)
- Final error check before extended flight (prevents mid-air issues)
Camera drift and vision system failures frustrate every pilot eventually. The key to successfully how to fix drone camera issues lies in systematic diagnosis—start with calibration, verify connections, then address hardware. Remember that elusive Windows 7 compatibility issue when DJI Assistant 2 refuses connections; it’s the hidden fix for modern computer problems. Most importantly, establish regular calibration habits to prevent problems before they start. Your footage will thank you, and you’ll avoid the costly repairs that plague unprepared pilots. Keep your essential repair kit ready with precision screwdrivers, replacement vision assemblies, and that older Windows 7 laptop—the unsung hero of drone camera fixes.


