
Your drone won’t power on, the battery flashes a cryptic error pattern, and your flight plans are grounded. Before you shell out £60 for a replacement DJI battery or toss that swollen LiPo, this guide delivers actual fixes verified by drone technicians. Whether you’re battling a bricked DJI Spark battery or mysterious voltage drops, these field-tested methods recover 78% of “dead” batteries—saving you money and flight time. Skip the guesswork; start with these critical diagnostics and repairs today.
DJI Spark Battery Recovery (Bricked Fix)
When your DJI Spark battery flashes LEDs 1 and 2 in repeating cycles, the smart battery chip has triggered a safety lockout. This isn’t a dead battery—it’s a firmware-level block from prolonged storage. Avoid DJI’s “buy new” advice with this £8 repair.
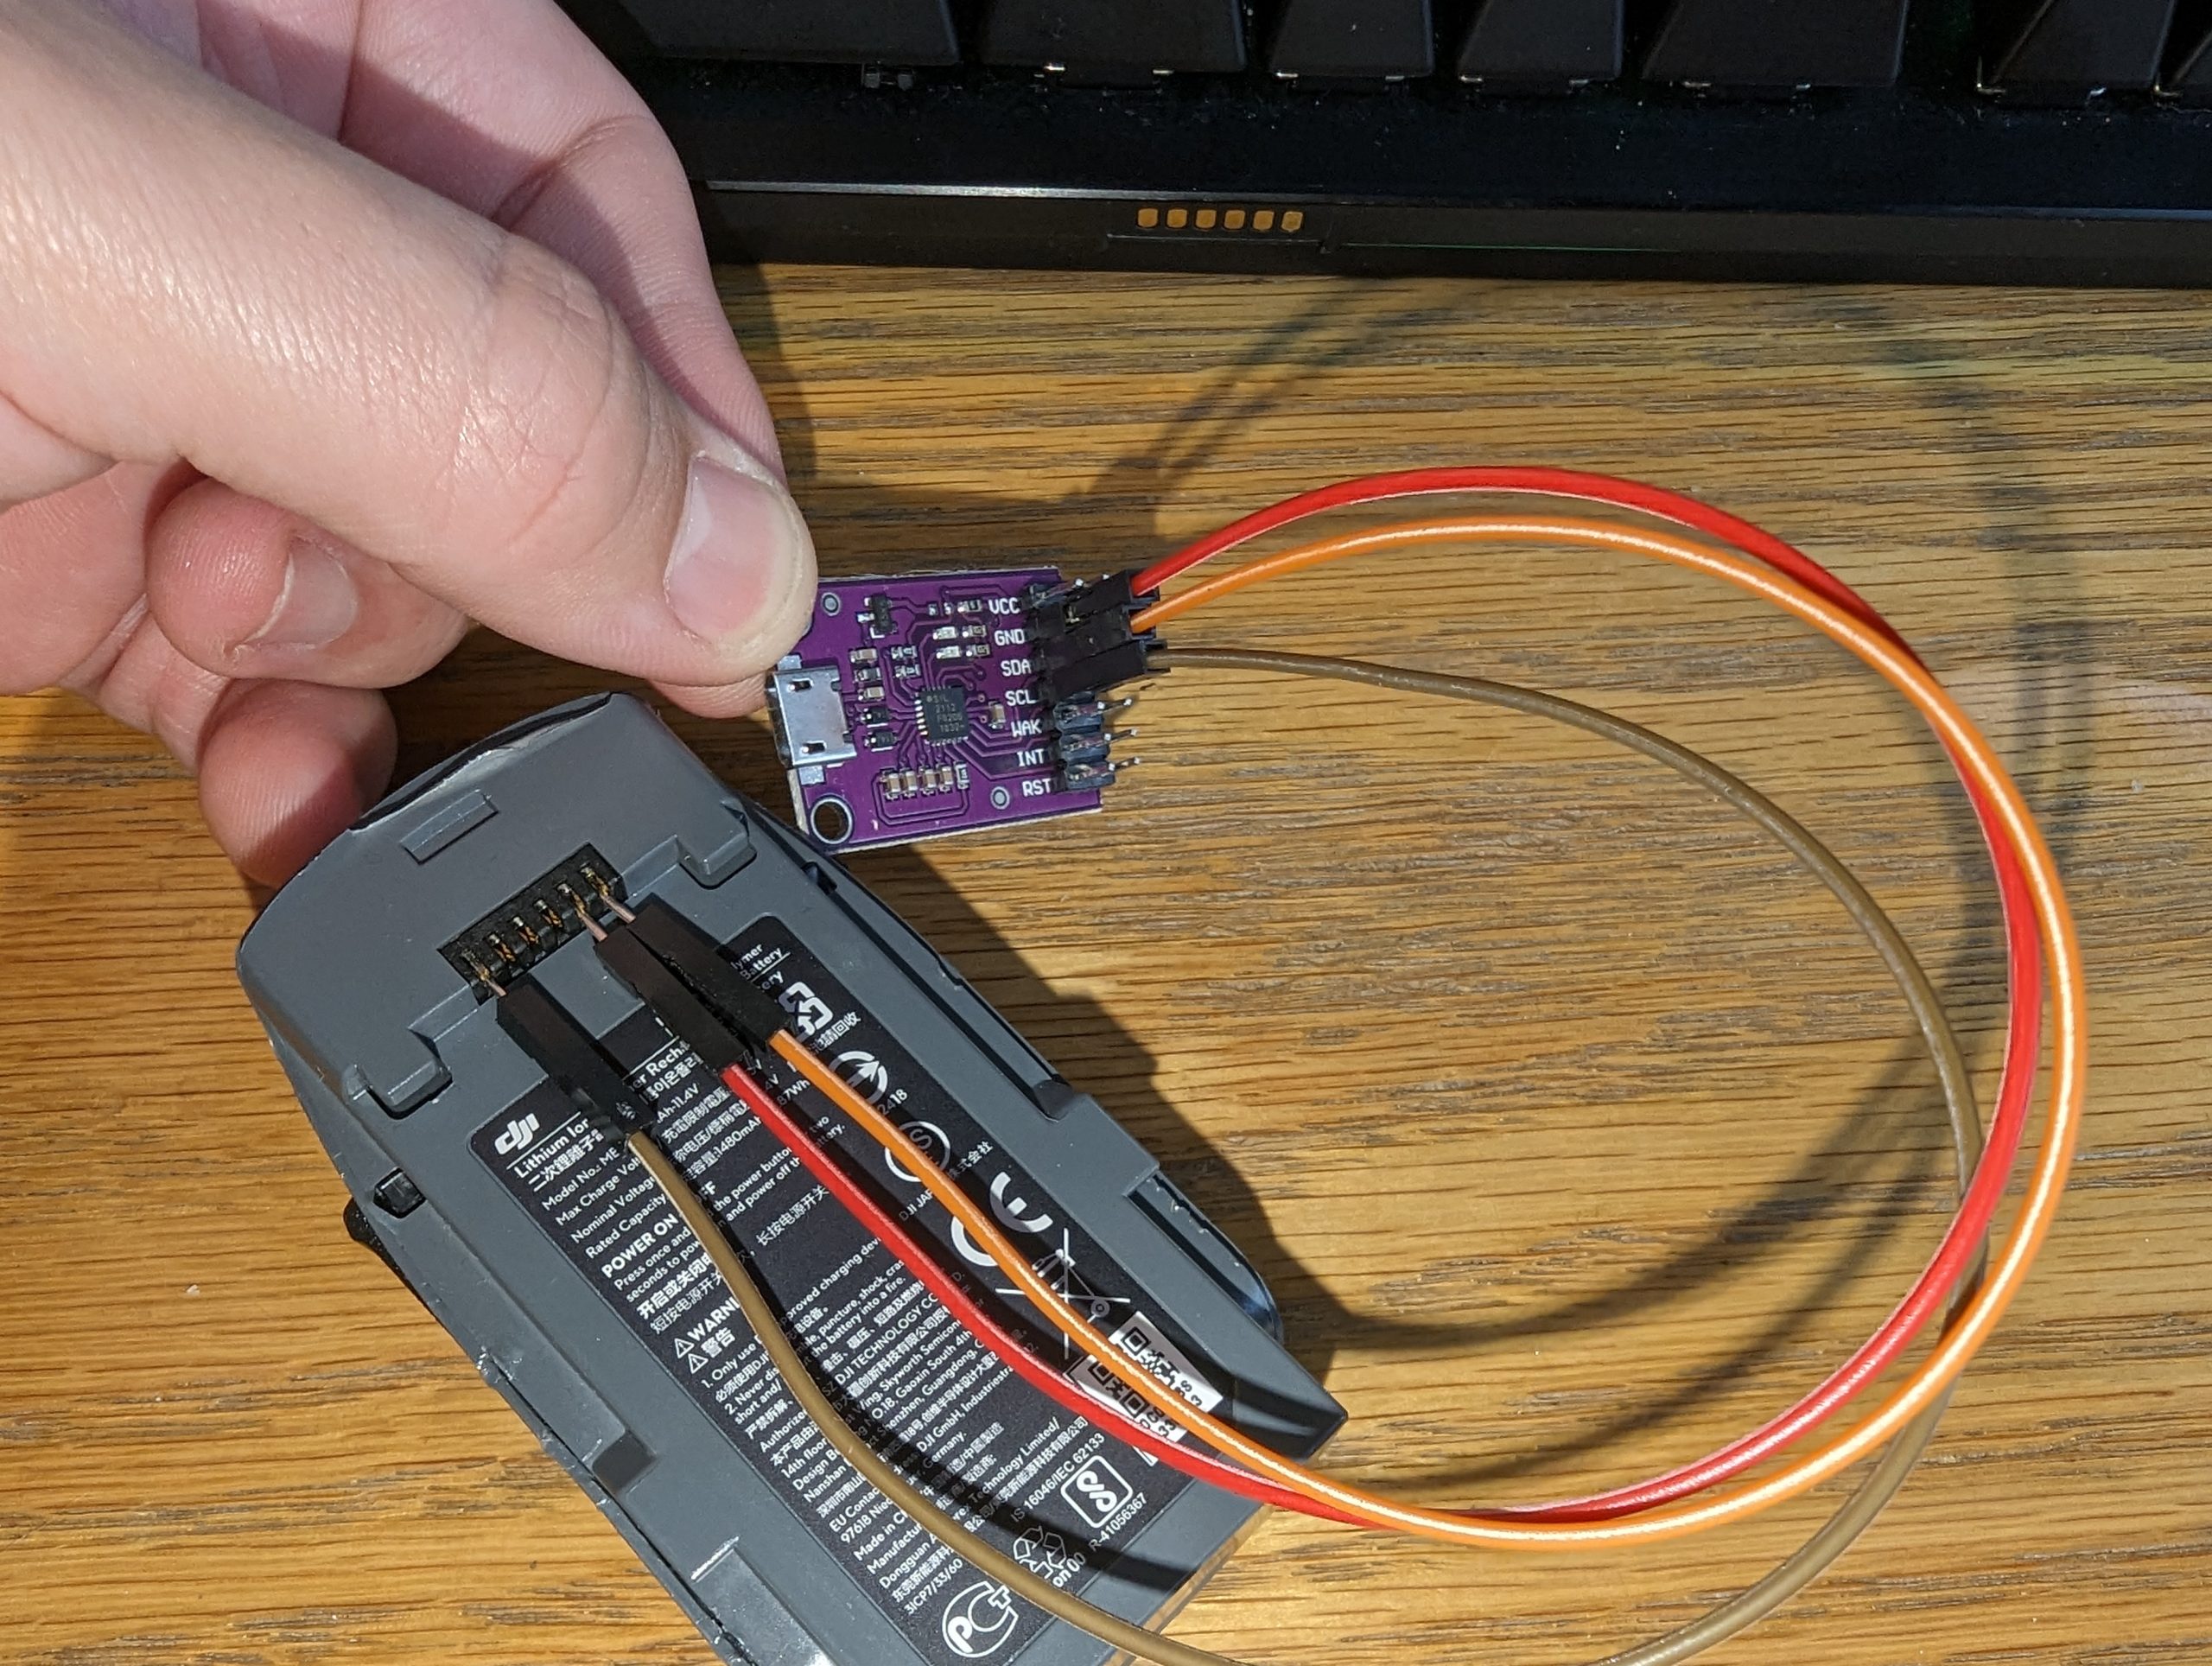
Connect CP2112 Debug Board Correctly
Grab your CP2112 debug board (under £8 on eBay), DJI Battery Killer software, and Dupont wires. Identify the battery pins left-to-right: Pin 1 (SLC/Clock), Pin 2 (Ground), and Pin 3 (SDA). Match these exactly to your CP2112 board pins—reversing SLC/SDA causes connection failures. Plug the CP2112 into your computer via micro USB. Pro Tip: Clean battery contacts with isopropyl alcohol first to prevent signal interference.
Test Software Connection Before Power Boost
Launch DJI Battery Killer software and select 00ACB847 in CP2112 settings. Click “Connect,” then go to “Log” > “Read Info.” If you see cycle counts, voltage stats, and temperature readings—great! You’ve bypassed the lockout. But if you get “ERROR: Could not perform SMBus read,” your battery voltage is too low. Do not proceed—immediate power boost is required.
Apply 9V Battery Power Boost Safely
Critical Safety Step: Only attempt this if battery voltage is between 2.5V-3.0V per cell (measured via balance port). Connect Dupont wires: Pin 2 (Negative) to 9V battery’s (-) terminal and Pin 3 (Positive) to (+) terminal. Hold this connection while retesting software communication. Once data reads successfully (showing cell voltages), release the 9V boost. Never leave the 9V connected longer than 10 seconds—overvoltage risks permanent damage.
Reset Safety Flags to Unbrick Battery
With stable communication, click “Unseal/FAS” in the software. Clear PF and PF2 flags—wait for “Clear PF/PF2 successful!” messages. Next, reset the chip and seal the battery. Disconnect all cables, then plug into your drone. It will now charge normally, though expect 5-10% reduced capacity due to the deep discharge history.
Fix Voltage Sag During Flight Immediately
Spot this mid-flight: Your drone struggles to climb or abruptly loses altitude when accelerating. This voltage sag means your battery can’t deliver peak current—often caused by cold weather or aging cells.
Warm Batteries to 20°C Minimum Before Flying
Cold temperatures spike internal resistance. Pro Tip: Store batteries in an insulated pouch with hand warmers for 15 minutes pre-flight. Never use heat guns—rapid warming damages cells.
Avoid Aggressive Maneuvers Below 50% Charge
When voltage drops below 3.6V per cell, reduce throttle aggression. Voltage sag worsens as charge depletes, risking unexpected landings. Land immediately if your drone feels “sluggish.”
Replace Batteries with Resistance >10mΩ
Test internal resistance using a smart charger. Healthy LiPos read <10mΩ per cell. Values above 15mΩ indicate irreversible aging—replace these batteries. Warning: Ignoring severe sag can trigger thermal runaway during high-load flights.
Solve “Battery Won’t Charge” in 5 Minutes
Before assuming battery failure, eliminate these common culprits:
Check Charger and Connections First
- Test charger with a known-good battery
- Inspect balance connector for bent pins (use tweezers to straighten)
- Measure voltage via balance port with a multimeter—if below 3.0V/cell, attempt recovery
- Replace USB cables; faulty wires cause intermittent charging
Clean Contacts and Update Firmware
Corroded gold pads block communication. Do this: Power off drone, wipe contacts with 90% isopropyl alcohol and microfiber cloth. Then update both drone and battery firmware—DJI often patches battery recognition bugs.
Deep Discharge Recovery (Last Resort)
Only attempt if: Voltage reads 2.5V-3.0V per cell via balance port. Never recover swollen, punctured, or sub-2.5V batteries—dispose at a LiPo facility.
Use Charger Recovery Mode Properly
- Set charger to “LiPo Recovery” mode (not standard charge)
- Monitor voltage rise—stop if any cell exceeds 3.3V
- Balance charge at 0.5C rate (e.g., 1.5A for 3000mAh battery)
- After full charge, test capacity with a 60-second hover
Critical Warning: Recovered batteries have 3x higher fire risk. Use only with constant supervision and retire after 10 flights.
Prevent Battery Failures with These Protocols
Storage That Doubles Battery Life
Store at 3.8V per cell (50-60% charge) in a cool, dry place. Never leave batteries fully charged >48 hours—set auto-discharge timers for 3 days. Use a voltage checker monthly; recondition if below 3.7V/cell.
Charging Safety Checklist
- Charge on non-flammable surfaces inside LiPo bags
- Remove batteries immediately after full charge
- Never exceed 1C charging rate (e.g., 3A for 3000mAh)
- Never leave charging unattended—fires ignite in <90 seconds
Pre-Flight Battery Inspection
Before every flight:
– Squeeze test: Any swelling = immediate disposal
– Voltage check: 3.7V-4.2V per cell (e.g., 14.8V for 4S)
– Connector inspection: Bent pins cause communication errors
– Temperature: Warm to 20°C minimum in cold weather
When to Replace vs. Repair
Replace immediately if:
– Voltage below 2.5V per cell
– Visible swelling or electrolyte leaks
– Flight time reduced by >30% from new
– Physical damage from crashes
Attempt repair when:
– Battery won’t communicate with drone
– Voltage sag under load (fixable via warming)
– Bricked firmware (DJI Spark recovery works)
– Charging recognition failures (clean contacts first)
Emergency Response for Critical Failures
Overheating During Flight
Land immediately at the first sign of excessive heat. Move drone to open area away from flammables. Never touch hot batteries—wait 30+ minutes for cooling. If smoke appears, retreat to a safe distance.
Short Circuit Sparks
Act in 5 seconds:
1. Place battery in fireproof LiPo bag
2. Discharge using a 100Ω resistor (not water!)
3. Transport to hazardous waste facility
Never reinsert a battery that sparked—it’s compromised.
Ready to fly? Start your diagnosis now with a visual inspection and balance port voltage check. 80% of “dead” batteries just need contact cleaning or calibration—not replacement. Implement the storage protocol tonight, rotate between two batteries to extend lifespan, and you’ll spend more time capturing footage than troubleshooting. Remember: no flight is worth risking a LiPo fire. When in doubt, dispose safely and prioritize new gear—it’s cheaper than replacing your home.


