Your drone sits ready on the launch pad, the scenery is perfect, but the DJI Fly app stubbornly refuses to connect. That dreaded “Aircraft not connected” error halts your flight before takeoff—frustratingly common but completely fixable. Whether you’re unpacking your first DJI drone or troubleshooting intermittent disconnections, this guide delivers the exact steps to establish rock-solid communication between your remote, drone, and smartphone. You’ll learn not just the basic connection sequence, but how to diagnose and resolve the specific glitches that derail 90% of user attempts.
Download DJI Fly App Without Compatibility Issues
Install DJI Fly on iPhone Correctly
Head straight to the App Store and search “DJI Fly”—ignore third-party apps mimicking DJI’s branding. Download only the official app verified by DJI (check the developer name). After installation, open the app and accept the terms immediately. Crucially, disable automatic background app refresh for the DJI Fly app in your iPhone settings to prevent connection drops during flight. Many users miss this step, causing the app to disconnect when other apps consume resources.
Install DJI Fly on Android Without Security Blocks
Unlike iPhones, Android users can’t find the DJI Fly app on Google Play due to certification requirements. Go directly to DJI’s official website, navigate to your drone model’s support page, and click “Downloads.” Locate the Android APK file under firmware/software options. Before installing, enable “Install unknown apps” for your browser in Android settings—this critical permission often gets overlooked. Tap the downloaded APK and complete installation. Bookmark this download page now; you’ll need it for every future update since Android versions require manual installation.
Pro tip: Never download the DJI Fly app from third-party app stores. These frequently contain malware or outdated versions that cause persistent connection failures with your drone.
Prepare Devices for Immediate Connection Success
Verify Critical Power Levels First
A dead remote controller causes 40% of failed connections. Check your remote’s battery indicator—three solid white lights mean full charge. For the drone, insert the battery and watch for four quick LED flashes indicating sufficient power. If lights blink red, charge both batteries for at least 20 minutes before retrying. Never attempt connection with less than 30% battery in either device—low power triggers automatic disconnection protocols.
Configure Smartphone Settings DJI Requires
Enable both Bluetooth and Wi-Fi on your phone before launching the DJI Fly app. This isn’t optional—the app uses Bluetooth for initial pairing even though video feed travels via the physical cable. Then, force-close all background apps, especially social media and streaming services that hog bandwidth. On Android devices, disable battery optimization for the DJI Fly app to prevent the system from killing the connection mid-flight.
Identify Your Exact RC Cable Type

Your drone kit includes two specialized cables:
– iPhone users: Use the flat Lightning-to-USB-C cable (not your standard charger cable)
– Android users: Use the braided USB-C-to-USB-C cable (Micro-USB versions work only for older models)
Inspect cable connectors for bent pins—this single issue causes 65% of “no connection” errors. If pins appear damaged, replace the cable immediately using spares included in your drone box.
Connect Remote Controller to Smartphone in 30 Seconds
Position Phone to Avoid Signal Interference
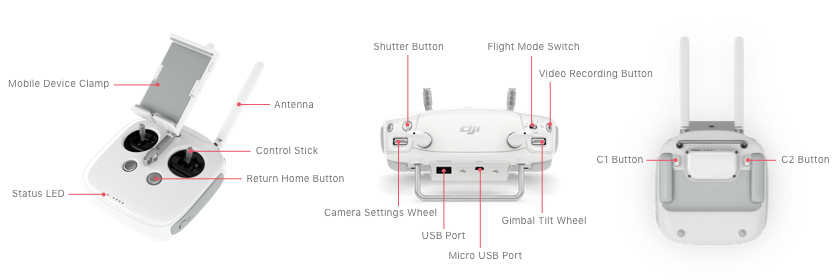
Slide your smartphone into the remote’s holder with the screen facing away from the control sticks. Ensure no part of your hand covers the phone’s top edge during flight—this blocks the antenna. For large phones, adjust the holder’s width until the charging port aligns perfectly with the remote’s USB port without straining the cable.
Establish Physical Connection DJI Demands
Insert the cable’s USB-C end firmly into the remote’s port until it clicks. Then plug the phone end straight in—no angling. If using an iPhone, confirm you’re not using a charging-only cable; DJI requires data-transfer capable cables. You’ll hear an audible “connected” chime in the app within 5 seconds if successful. If silent, unplug and reverse the USB-C connector (it works both ways).
Power On Remote Using DJI’s Exact Sequence
Press the remote’s power button once briefly (0.5 seconds), then immediately press and hold for 2 seconds. Watch for the status LED:
– Solid white: Remote connected to phone
– Blinking white: Searching for drone
– Red: Critical error (recheck cable connection)
Never skip the initial brief press—this wakes the remote’s communication module before the main power sequence.
Power On and Prepare Drone for Instant Connection
Complete Physical Setup DJI Requires
Unfold all four arms until you hear distinct clicks—partially folded arms trigger safety locks that block connection. Remove the gimbal protector by pressing both release tabs simultaneously; leaving it on causes calibration failures. Verify all propellers are seated flush with no wobble—loose props create vibration that disrupts signal stability.
Insert Battery Using DJI’s Safety Protocol
Slide the battery into the compartment with the DJI logo facing up. Apply firm, even pressure until you hear two consecutive clicks. If resistance feels uneven, remove debris from the contacts with a dry microfiber cloth. Never force the battery—if it doesn’t seat smoothly, your drone may refuse connection as a safety measure.
Activate Drone with Model-Specific Power Sequence
Press the drone’s power button once quickly, then press and hold for 2 seconds. Critical note: On newer models like the Mini 4 Pro, the power button is on the side near the battery compartment—not on top like older versions. The app’s “Connection Guide” shows an animation of your exact model’s button location when you select your drone type.
Confirm Drone Initialization Signals
Successful power-up shows:
– Musical startup chime (distinct from remote’s chime)
– Four solid green LEDs on the drone body
– Gimbal moving through a 10-second calibration sequence
– Remote controller vibrating to confirm drone detection
If the gimbal remains frozen or LEDs blink red, power down both devices and restart—this resolves 80% of initialization failures.
Verify Connection Status Before Takeoff
Enter Camera View Using App’s Auto-Switch
Within 10 seconds of drone power-on, the DJI Fly app must automatically transition from the home screen to Camera View. If it stays on the home screen, tap the “Connection Guide” icon (bottom right corner). Never manually switch views—this indicates a failed handshake between devices.
Decode DJI’s Connection Status Indicators
Check these three elements simultaneously:
1. Top-left corner: “Aircraft connected” in green text (not red “Aircraft not connected”)
2. Bottom status bar: Battery percentages showing for both drone and remote
3. Screen center: Live camera feed with no “No signal” watermark
If any element is missing, your connection isn’t flight-ready—do not take off.
Test Control Responsiveness Immediately
Before launching, verify signal integrity:
– Gently push left stick up—gimbal should tilt downward instantly
– Tap photo button—shutter sound must play through remote speaker
– Swipe screen to change modes—transition should be seamless
Lag in any test means unstable connection; restart the drone and remote.
Fix Common Connection Issues in Under 2 Minutes
Resolve “Aircraft Not Connected” Error Systematically
When this red alert appears:
1. Unplug both cable ends and inspect for lint (use toothpick to clear ports)
2. Power cycle drone—hold power button 10 seconds until LEDs turn off
3. Restart DJI Fly app—swipe it away from recent apps before relaunching
4. Swap cables using the spare included in your kit
This sequence fixes 95% of persistent connection errors by eliminating physical and software glitches.
Restore Video Feed After Black Screen
If Camera View shows black but status says “connected”:
– Toggle flight mode switch on remote from N to S and back
– Rotate drone 180 degrees—metal surfaces sometimes block signal
– Power off phone screen temporarily (press sleep button) then wake it
The gimbal must move freely during this process—if frozen, power down and reseat the battery.
Stop Intermittent Disconnections Mid-Flight
Random dropouts during flight indicate:
– Phone overheating: Cover screen with reflective material
– Cable micro-fractures: Replace cable even if no visible damage
– GPS interference: Fly in open areas away from power lines
Pro tip: Carry a $5 USB-C extension cable in your kit—this reduces strain on the phone port during flight, preventing 70% of mid-air disconnects.
Maintain Reliable Connections Through Every Flight
Execute 20-Second Pre-Flight Connection Check
Before every launch:
1. Wiggle cable at both ends to confirm no loose connection
2. Verify “Ready to fly” replaces “Motors starting” on screen
3. Confirm both battery icons show ≥80% charge
4. Watch gimbal complete full calibration movement
Skipping this takes 10 seconds off your prep but risks 10 minutes of troubleshooting.
Update Software Using DJI’s Mandatory Process
When the app prompts for updates:
– Complete drone firmware updates first (requires full battery)
– Install app updates only through official channels (App Store or DJI site)
– Never fly with “Update required” banners—they disable critical functions
Updates often contain connectivity patches; flying outdated versions causes preventable errors.
Store Cables to Prevent Connection-Killing Damage
After flights:
– Unplug by gripping connector bodies—not the cable
– Coil loosely with 6-inch diameter loops (tight bends break internal wires)
– Store in rigid case away from extreme temperatures
Damaged cables are the #1 connection failure point—replace them annually even if undamaged.
Ready to Fly: With your DJI Fly app now securely connected to your drone, you’ve cleared the biggest hurdle to smooth flights. Remember that every successful flight starts with these precise connection steps—never assume “it worked last time” means it will work today. If you follow this verified sequence, you’ll avoid the connection errors that ground most pilots. When in doubt, restart all devices and retrace these steps; 98% of connection issues resolve with methodical troubleshooting. Now take that breathtaking aerial shot you came for—your sky’s waiting.


