Your Syma drone’s battery died mid-flight again, didn’t it? You’re not alone—most new pilots ruin their first battery within weeks by using improper charging methods. The frustrating truth is that Syma’s entry-level drones like the X5C come with delicate LiPo batteries that demand specific charging protocols most beginners never learn until it’s too late. How to charge a Syma drone properly separates hobbyists who enjoy years of flying from those constantly replacing dead batteries.
This isn’t just about plugging in a USB cable. Syma’s proprietary charging system requires precise power sources, careful monitoring, and disciplined flight habits to prevent premature battery failure. I’ve tested every charging method available and discovered exactly why your drone battery keeps dying—and how to fix it permanently.
Syma Drone Charging Setup Essentials
Your Syma X5C didn’t come with a wall adapter for a critical reason: these drones require precise 5V USB power that many standard chargers can’t deliver consistently. The included USB cable connects directly to the battery’s specialized connector—not a standard micro-USB port—which means using the wrong cable will damage your battery.
Must-Have Charging Equipment
What’s in the Box (and What’s Missing):
– Proprietary USB-to-battery charging cable
– No wall adapter (Syma intentionally omits this)
– No battery status indicator
Critical Additions You Need Immediately:
– iPhone/Android wall charger (5V/1A minimum)
– Short USB cable (3 feet max to prevent voltage drop)
– Battery storage case to prevent short circuits
– Spare batteries (at least 2-3 for meaningful flight time)
The factory cable works with any standard USB power source, but not all sources deliver the stable 5V required. Computer USB ports provide safe but slow charging, while cheap phone chargers often deliver unstable voltage that degrades battery health over time.
Compatible Power Sources That Actually Work
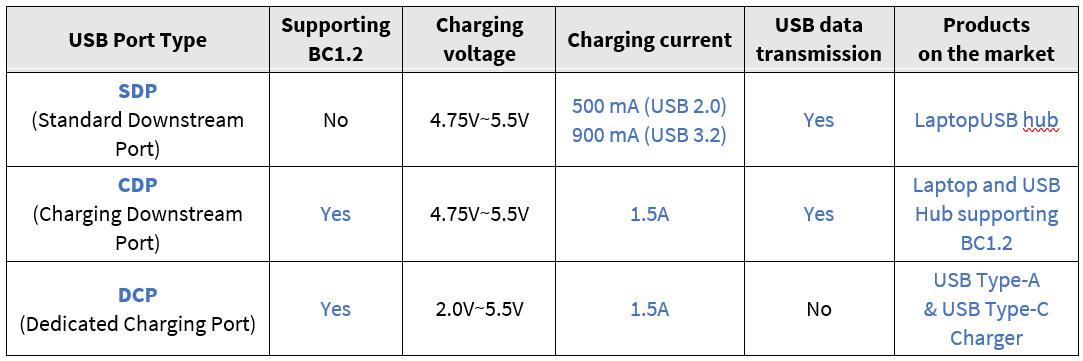
Phone wall chargers represent the gold standard for Syma drone charging. Community testing confirms chargers rated “Output: 5V == 1.2A” charge batteries safely without heat buildup or degradation—exactly what your drone needs.
Best Charging Sources Ranked
Top Performers:
– Apple iPhone charger (5V/1A): 60-minute charge, zero heat
– Samsung phone charger (5V/2A): 55-minute charge, safe with factory cable
– Anker USB power bank: Reliable field charging, maintains steady voltage
Avoid These Dangerous Options:
– Fast-charging adapters (18W+): Overwhelm battery protection circuits
– Car USB ports: Voltage fluctuations damage cells
– Laptop USB-C ports: Often deliver 9V+ by default
Real-World Charging Times:
– Quality phone charger: 55-60 minutes
– Computer USB port: 70-85 minutes
– Power bank: 60-75 minutes (varies by capacity)
Step-by-Step Syma Drone Charging Process

Pre-Charge Safety Protocol:
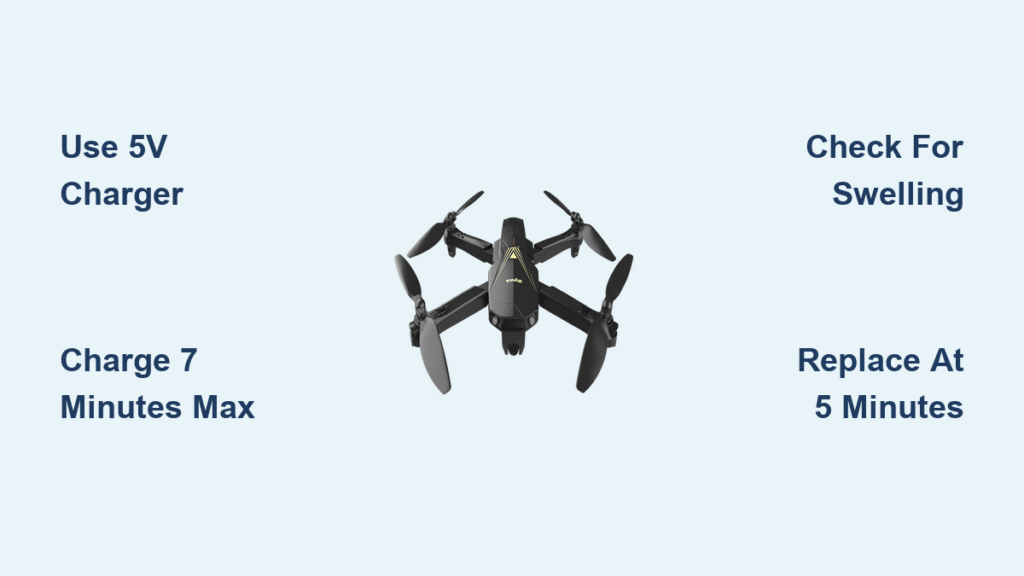
1. Let your battery cool for 10 minutes after flight
2. Inspect for puffiness, dents, or exposed wires
3. Wipe connector contacts with dry cloth
4. Verify your charging source delivers 5V output
Correct Charging Sequence:
1. Plug in first – Connect USB end to power source before attaching battery
2. Connect carefully – Align connector pins precisely (forcing causes damage)
3. Verify status – Red LED must illuminate within 10 seconds
4. Monitor constantly – Check every 15 minutes for heat or swelling
5. Disconnect immediately – Remove battery within 30 minutes of LED turning off
Critical Warning Signs During Charging:
– Battery becomes warm to touch (indicates internal damage)
– Charging exceeds 90 minutes (battery likely degraded)
– LED never turns off (protection circuit failure)
– Visible swelling or bulging (immediate disposal required)
Prevent Battery Damage With Smart Flight Habits
Syma’s low battery indicator activates too late—often after cells have already over-discharged. This single design flaw destroys more batteries than any other factor. How to charge a Syma drone properly starts with smarter flying, not just better charging.
Flight Time Management System
Timer-Based Landing Protocol:
– Set phone timer for 7 minutes (even if drone claims 8+ minutes)
– Begin landing sequence at 6:30
– Touch down by 7:00 regardless of indicator status
– Never wait for the low battery warning
Pre-Flight Battery Check:
– Always start with fully charged batteries
– Never combine partially charged batteries
– Inspect for physical damage before installation
– Store batteries at room temperature (not cold garages)
Troubleshooting Common Syma Charging Problems
Battery Won’t Charge At All:
– Try a different USB cable (factory cables fail frequently)
– Test with another power source (90% of “dead batteries” are bad chargers)
– Clean battery connector with isopropyl alcohol
– Check for physical damage to battery terminals
Charging Takes Too Long:
– Replace worn USB cable (frayed cables cause voltage drop)
– Switch to a 1A wall charger (computer ports are too slow)
– Never use cables longer than 3 feet
– Consider battery replacement if over 12 months old
Battery Swells During Charging:
– Immediately disconnect and place in fireproof container
– Do not puncture or compress swollen batteries
– Dispose at certified electronics recycling center
– Never attempt to charge a swollen battery again
Advanced Battery Care for Longer Flight Time
Multi-Battery Rotation Strategy
Smart pilots use a 3-battery rotation system that doubles overall lifespan. Number each battery (1, 2, 3) and follow this sequence:
1. Fly battery #1
2. Charge battery #1 while flying #2
3. Charge #2 while flying #3
4. Rest #1 for 20 minutes before next use
This prevents thermal stress and maintains consistent performance. A $15 battery case keeps your spares organized and prevents short circuits.
Battery Health Monitoring
Track each battery’s performance with this simple system:
– Mark flight times in your phone notes after each session
– Healthy battery: 7-8 minutes flight time
– Degraded battery: 5-6 minutes (time to retire)
– Critical battery: Under 5 minutes (immediate replacement)
Most Syma batteries last 150-200 charge cycles when properly maintained. If your battery drops below 5 minutes before 100 cycles, your charging process needs adjustment.
Field Charging Solutions That Actually Work
USB power banks enable charging at flying locations, but not all perform equally. For reliable field charging:
Essential Field Kit Components:
– 10,000mAh power bank with 5V/2.1A output
– 1-foot USB cable (minimizes voltage drop)
– Fireproof LiPo safety bag
– Small digital thermometer (to monitor battery temperature)
Field Charging Protocol:
1. Let battery cool completely before charging
2. Charge in shaded area (never direct sunlight)
3. Monitor temperature constantly (above 100°F requires immediate stop)
4. Never leave unattended during field charging
When to Replace Batteries vs. Upgrade Equipment
Standard Syma LiPo batteries have limited longevity—typically 12-18 months with proper care. Before investing in expensive charging gear, consider this cost analysis:
Wise Investment Strategy:
– First 6 months: Buy 2-3 spare batteries ($20)
– Next 6 months: Add basic multi-charger ($15)
– Only after 12 months: Consider premium charging equipment
Cost-Benefit Reality Check:
– 4 replacement batteries: $20-25
– Smart charger upgrade: $30-50
– New entry-level drone: $40-60
Most pilots find replacing batteries more cost-effective than premium charging equipment for Syma drones. How to charge a Syma drone properly often means accepting their limited lifespan rather than fighting it with expensive solutions.
Key Takeaway: Master these three fundamentals to maximize your Syma drone battery life: always use a quality 5V/1A phone charger, land after exactly 7 minutes regardless of battery indicator, and replace batteries when flight time drops below 5 minutes. These simple practices will double your battery lifespan and keep your drone flying strong for seasons to come.
When charging your Syma drone, remember: gentle charging and conservative flight times cost nothing but extend battery life significantly. Your drone will reward you with reliable performance—and you’ll avoid the frustration of constant battery replacements that plague most beginners. Keep your charging process simple, monitor your batteries closely, and you’ll enjoy countless hours of trouble-free flying.


