
Your Holy Stone HS720E sits grounded, batteries drained from yesterday’s flight session. You’ve got plans for aerial photography tomorrow, but those 2800mAh Li-Po batteries need serious time to reach full capacity. Unlike your phone that charges in an hour, these drone batteries demand 5-7 hours of careful attention.
This guide walks you through the exact steps to charge your Holy Stone drone safely while maximizing battery lifespan and avoiding common mistakes that leave pilots grounded. You’ll learn the proper connection sequence, how to interpret LED signals, and critical safety protocols that prevent fire hazards with Li-Po batteries.
HS720E Battery Charging Requirements
The HS720E uses a 2-cell Li-Po battery operating at 7.4 volts nominal, reaching 8.4 volts when fully charged. This isn’t your standard USB device—these batteries require specific voltage management and safety protocols.
Key specs you need to know:
– Capacity: 2800mAh providing 18-23 minutes flight time
– Charge time: 5-7 hours (yes, really)
– Weight: 223 grams per battery
– Compatibility: HS720E and HS720 models only
Never attempt to use these batteries in other Holy Stone models. The voltage configuration and connector design prevent cross-compatibility for safety reasons. While third-party sellers advertise 4700mAh “upgraded” batteries, these often deliver unstable power that can damage your drone’s electronics.
Essential Charging Equipment Check

Your drone package includes everything needed for safe charging. Before starting, verify you have:
- Original charging hub (handles 2 batteries max)
- USB-C to USB-A cable (provided)
- Wall adapter or power bank with USB-C capability
- Both battery packs (you received two with purchase)
Critical: Third-party charging hubs claiming faster charging or higher capacity batteries risk damaging your drone. Stick with original equipment only. The charging hub has three LED indicators—center red LED and two green LEDs marked I and II—that provide essential charging status information you won’t get with generic chargers.
Step-by-Step Charging Process
Remove Battery Safely
Press and hold the rear battery release button while pulling the battery straight out. Never force removal—this damages both battery and drone connectors. If you feel resistance, double-check you’re holding the release button completely. Damaged connectors create electrical resistance that leads to overheating during charging.
Setup Charging Hub Correctly
Open the charging hub lid to expose the metal charging pins. These pins must align perfectly with battery contacts for proper charging. Place the hub on a non-flammable surface like ceramic tile or metal sheet—never on wood, carpet, or near curtains. This precaution prevents fires if battery failure occurs.
Connect Power Source Properly
Plug the USB-C cable into your charging hub, then connect to either:
– Wall adapter (recommended for consistent power)
– Power bank (ensure 2A+ output)
LED indicators will activate immediately when power connects properly. If no lights appear, check that your power source delivers at least 2A output—many car chargers and older wall adapters provide insufficient current for drone batteries.
Decoding LED Charging Signals
Understanding these lights prevents charging mistakes and potential hazards:
- Fast blinking green: Battery actively charging
- Slow blinking green: Battery connected, waiting for turn
- Solid red: Hub powered and functional
- No lights: Check cable connections and power source
Sequential Charging Explained
The hub charges one battery at a time, not simultaneously. Battery position I charges first, then position II. Total charge time remains 5-7 hours regardless of how many batteries you connect.
Pro tip: Connect both batteries before bed, wake up to two fully charged packs. But never leave charging unattended—Li-Po batteries can ignite if defective or damaged. Set a 5-hour timer and check every hour for abnormal heat or swelling.
Critical Safety Protocols That Prevent Fires
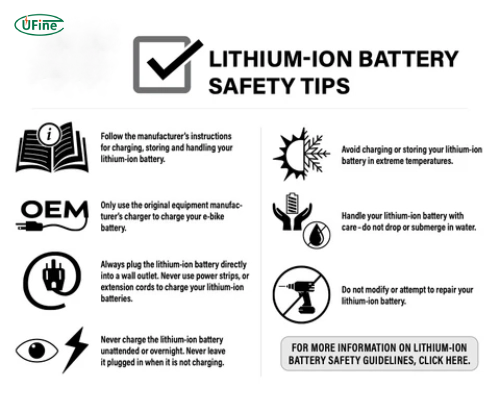
Li-Po batteries contain significant energy and require respect. Follow these non-negotiable rules:
Never leave charging unattended—set a 5-hour timer and check every hour
Avoid overnight charging—charge during waking hours only
Charge only at home where you can monitor the process
Keep away from flammable surfaces—use ceramic or metal charging stations
Water Damage Response
If your battery contacts water (crash landing, rain exposure):
1. Stop using immediately
2. Never attempt charging
3. Properly dispose at battery recycling center
4. Replace with new battery
Water-damaged batteries lack safety features and pose fire risks. Unlike smartphones with water detection, Holy Stone batteries have no automatic cutoff when exposed to moisture.
Maximizing Battery Performance
Realistic Flight Planning
Expect 18 minutes actual flight time, not the theoretical 23 minutes. Wind, temperature, and aggressive flying reduce capacity faster than specifications suggest.
Charge planning strategy: Start charging 7 hours before your flight session. With two batteries, you’ll achieve approximately 36 minutes total flight time. Always land when you reach 20% battery—pushing to the limit accelerates battery degradation.
Storage Best Practices
For long-term storage (2+ weeks):
– Store at 7.4 volts (partial charge, not full)
– Check voltage every 2-3 months
– Keep in cool, dry location
– Avoid direct sunlight
Warning signs for replacement:
– Battery swelling or deformation
– Flight time drops below 15 minutes
– Physical damage to casing
Troubleshooting Charging Problems
No LED Response
Check these immediately:
– USB cable firmly connected at both ends
– Power source providing adequate current (try different wall outlet)
– Battery properly seated in hub with contacts aligned
If issues persist, inspect the USB-C port for debris or damage. A bent pin inside the charging hub can prevent proper connection.
Rapid Red LED Blinking
This indicates potential battery fault. Disconnect immediately and inspect for:
– Physical damage
– Swelling
– Corroded contacts
If you notice any abnormalities, stop using the battery. Damaged Li-Po batteries can enter thermal runaway—a dangerous condition where the battery rapidly heats up and may catch fire.
Extended Charge Times
Batteries taking longer than 7 hours signal degradation. Consider replacement if charge times consistently exceed this duration. A healthy battery should reach full charge within the specified 5-7 hour window.
Maintenance Schedule for Optimal Performance
Weekly: Visual inspection for damage or swelling before each flight
Monthly: Deep discharge cycle (fly until low battery warning, then full charge)
Every 6 months: Replace batteries showing capacity loss
Pro maintenance tip: Label your batteries with purchase dates. Li-Po batteries typically last 200-300 charge cycles before significant degradation. When one battery shows reduced performance, replace both to maintain balanced power delivery.
Quick Reference Charging Checklist
Before every charging session:
1. Inspect battery for physical damage
2. Wipe contacts clean with dry cloth
3. Place hub on non-flammable surface
4. Verify power source delivers 2A+ output
Emergency charging options:
– Power bank with 2A+ output works in a pinch
– Car USB chargers often insufficient (check 2A rating)
– Hotel room charging: Use desk lamp USB ports with caution
Your Holy Stone drone delivers stunning aerial footage when batteries receive proper care. Master these charging fundamentals, and you’ll spend more time flying and less time grounded by preventable battery issues. Remember that proper charging isn’t just about convenience—it’s a critical safety practice that protects your investment and keeps you flying season after season.


