Your Tello drone suddenly veers left during hover or rockets off at a 45-degree angle on takeoff. These frustrating issues aren’t hardware defects—they’re calibration failures you can fix faster than making coffee. How to calibrate Tello drone properly eliminates 90% of stability problems by syncing its internal sensors with real-world conditions. This guide delivers the exact steps I’ve used to rescue countless drifting drones, including critical environmental tweaks most guides miss. You’ll learn when to run IMU versus Center-of-Gravity calibration, avoid overheating shutdowns, and verify success with a 10-second hover test—all in under five minutes.
Drift occurs because the Tello’s vision positioning system relies on precise sensor alignment. Without proper how to calibrate Tello drone procedures, its IMU (Inertial Measurement Unit) misreads gravity and motion cues. Many users waste time replacing props or motors when a simple recalibration would solve it. The good news? Ryze designed these processes to be user-friendly—if you know the hidden triggers and environmental landmines. Whether you’re a beginner battling first-flight chaos or an educator managing classroom drones, mastering these calibrations transforms your Tello from erratic to rock-steady.
When Your Tello Needs Immediate Calibration
Why Lateral Drift Means IMU Calibration Now
Ignore this sign at your peril: if your drone drifts sideways during hover despite centered controls, your IMU has lost alignment. This happens after firmware updates, hard landings, or even temperature shifts between storage and flight areas. Crucially, how to calibrate Tello drone for IMU issues requires props OFF—attempting it mid-flight causes crashes. Other urgent triggers include angled flight paths (flying “drunkenly” even with perfect stick input), first-time setup straight from the box, or that flashing “Calibrate IMU” warning in the app. Never skip this when adding accessories like cameras; their extra weight throws off sensor readings within minutes.
Stop 45-Degree Takeoffs With CoG Calibration
That jarring diagonal lunge on takeoff? Classic Center-of-Gravity failure. Unlike IMU issues, CoG problems persist after successful IMU calibration and manifest as consistent drift in one direction. You’ll need how to calibrate Tello drone for CoG when the app explicitly prompts “Center of Gravity Calibration,” after prop guard installation/removal, or when uneven motor wear creates vibration patterns. Critical insight: CoG calibration only works during stable hover—the Calibrate button stays greyed out on the ground. If your drone shoots off sideways within seconds of launch, this is your #1 priority before attempting any flight.
Set Up Your Calibration Zone Like a Pro

Lighting Secrets the Manual Doesn’t Mention
Your LED color tells the calibration story before you even open the app. Green LED? Vision system locked—perfect for calibration. Yellow LED? You’re in attitude-only mode, guaranteeing drift. To force green status: use bright overhead LED shop lights (not directional lamps), eliminate shadows across the floor, and choose textured surfaces like tile grout lines or carpet patterns. Solid-color floors like white linoleum sabotage calibration—add a newspaper or grid-pattern mat if needed. I’ve seen users solve “uncalibratable” drones simply by turning on two extra ceiling lights. Never calibrate near windows; natural light creates shifting shadows that confuse the vision system.
Temperature and Surface Landmines
Calibrate on a room-temperature surface—never on sun-warmed tile or heated floors. The IMU stores ambient temperature during calibration, and >5°C differences between calibration and flight cause immediate drift. Use a kitchen counter (not near the stove!) or cool tile floor. Crucially, ensure the surface is vibration-free: avoid placing the drone on refrigerators or near HVAC vents. And always check battery level first—how to calibrate Tello drone requires 50%+ charge or the process fails silently. Most users overlook cooling: Tello has no fan, so keep calibration under 5 minutes to prevent overheating shutdowns. Power off immediately after completing steps.
Pre-Calibration Hardware Prep Without Damage
Safely Remove Props and Guards for IMU Calibration

Never skip this step for IMU calibration: Power down completely before touching props. Pinch propeller guard clips inward and slide sideways to remove—yanking breaks the plastic tabs. For props, use the black removal tool shipped with your drone: insert between motor shaft and prop hub, then lever downward (not sideways) to avoid bending shafts. Note the elevation bumps on two props—they must match the marked arms later. Store props carefully; mixing orientations causes violent vibration. Place the bare drone on your prepped surface, then power on. Skipping prop removal risks catastrophic takeoff during IMU sequence.
Achieve Hover Stability for CoG Calibration
Unlike IMU, CoG calibration works with props ON—but you must nail the hover first. Launch and ascend to eye level (1m), then release sticks completely. Wait 10 seconds for the drone to stabilize; any drift >15cm means lighting or surface issues. Pro tip: If the Calibrate button stays greyed out, you’re either too low (<0.5m) or have stick input—even slight thumb pressure triggers hover instability. Practice neutral stick positioning first. Wind is the silent killer here: close windows and turn off fans. Once hovering perfectly still, proceed immediately—delays cause battery drain that triggers shutdowns.
Execute IMU Calibration Flawlessly
Navigate the Hidden App Menu in 10 Seconds
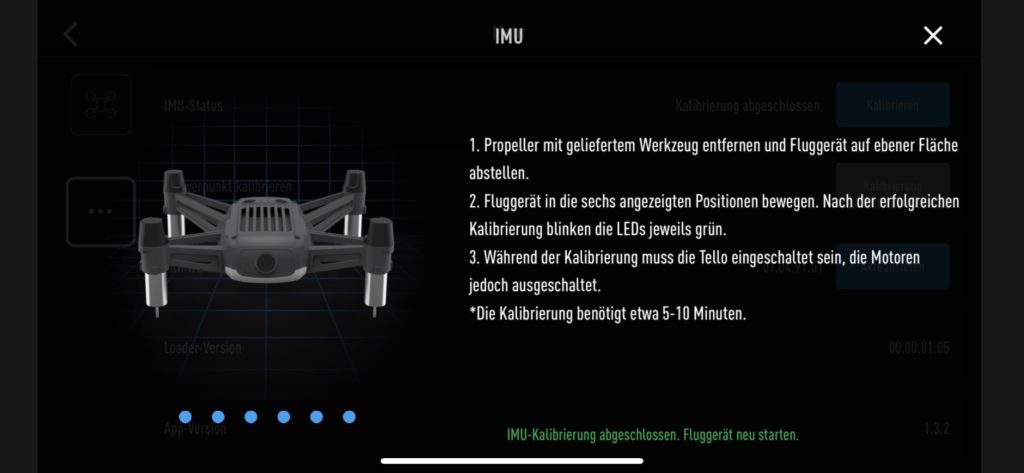
The calibration path is buried deeper than most guides admit: Open Tello app → Gear icon (⚙️) → Scroll down to “More” → Tap “…” (three dots) → Select “Calibrate.” If you see “Center of Gravity” instead, you’re in the wrong menu—backtrack to “More.” Tap Start with the drone motionless on your surface. Critical: The app shows abstract graphics for positions, but here’s what they mean:
1. Level (default position)
2. Nose pointed down at 45°
3. Nose up at 45°
4. Left side down
5. Right side down
6. Upside down (battery facing up)
Avoid Costly Positioning Mistakes
During each position, hold the drone perfectly still until the progress ring completes—bumping the surface fails calibration. Biggest error? Rushing the upside-down position; place a soft cloth underneath to prevent motor damage. If the drone vibrates during nose-up/nose-down poses, your surface isn’t level (use a spirit level app). After the sixth position, the app says “Restart aircraft”—power off completely, then on again. Never skip this reboot; residual data causes immediate drift. If failed, check for yellow LED (indicates vision system failure) and adjust lighting before retrying.
Fix Persistent Drift With CoG Calibration
Why the Calibrate Button Stays Greyed Out (and Fixes)
This triggers panic in 80% of users: the CoG button remains inactive despite hovering. The culprit is almost always unstable flight—you’re either too low (<0.5m) or have accidental stick input. Solution: ascend to 1.2m, release sticks for 15 seconds, then slowly descend to 0.8m before tapping Calibrate. If still greyed out, land immediately—your battery is likely below 40%, causing hover instability. Never force it: attempting calibration mid-drift corrupts data. Once active, tap Calibrate and watch for the LED sequence: rapid color flashes (red/blue/green) for 15 seconds. No flashes? Abort and reboot the drone—sensor communication failed.
Decode LED Flashes for Calibration Success
Those odd-colored LED patterns are your success meter. During CoG calibration, solid green flashes mean smooth sailing; flickering red indicates motor imbalance. If LEDs stop flashing before 15 seconds, overheating interrupted the process—land immediately and let the drone cool for 2 minutes. Post-calibration, verify with a vertical test: ascend straight up to 1m without stick input. If it drifts >10cm sideways, repeat CoG calibration with prop guards removed—they’re the #1 cause of residual drift. Never skip the power cycle after CoG; uncalibrated memory lingers in the system.
Reinstall Props and Verify Results
Match Marks to Prevent Violent Vibration
Reattaching props wrong causes terrifying shaking. Two props have a small elevation bump (or red dot in some kits)—these must align with the matching bumps on motor arms. Press props straight down until you hear a distinct snap; wobbling indicates improper seating. Warning: Forcing mismatched props can crack motor housings. Test seating by gently twisting—if it moves, reinstall. Snap guards back on by aligning clips with arm pegs, then press firmly until all four corners click. Skipping guard reattachment leaves motors vulnerable during test flights.
10-Second Hover Test That Never Lies
Your final verification: launch and hover at 0.5m for 10 seconds with zero stick input. In good light, drift should stay within a 10cm circle (size of a soda can). More than that? Repeat IMU calibration first—lighting issues often masquerade as sensor failure. If drift persists after double calibration, check for yellow LED: you’re likely on a uniform surface like polished concrete. Place a newspaper underneath for instant visual reference. Pro tip: Film your test hover—reviewing footage reveals subtle drift invisible to the naked eye.
Troubleshoot Failed Calibration Fast
Fix Overheating Shutdowns in 60 Seconds
Tello auto-shuts down after 5 minutes of ground idling—a frequent calibration killer. If it powers off mid-sequence:
1. Power down immediately (don’t wait for automatic shutdown)
2. Let cool for 2 minutes on a cool surface
3. Restart with 70%+ battery
Never attempt calibration after multiple failures—the IMU needs cooldown. For chronic overheating, calibrate in an air-conditioned room or early morning.
Eliminate Drift After Double Calibration
Persistent drift despite correct IMU/CoG means environmental sabotage. First, increase overhead lighting by 50%—most users underestimate required brightness. Second, change floor texture: add a grid-pattern mat or tape lines on solid floors. Third, ensure no reflective surfaces (mirrors, glass tables) confuse the vision system. If all fails, perform CoG calibration without prop guards—even tiny imbalances throw off weight distribution.
Final Note: Master how to calibrate Tello drone by running IMU calibration first on a cool, textured surface with props off, then CoG during perfect hover if drift remains. Always verify with the 10cm hover test in adequate light. For lasting results, recalibrate after every firmware update or accessory change—your drone will lock positions like it’s glued to the air. Keep this guide handy: one quick calibration session saves hours of troubleshooting and protects your investment from crash damage. Ready for flawless flights? Power up and recalibrate now—your steady-hovering Tello awaits.


