You’ve dreamed of launching a drone that flies beyond the horizon and returns with data—but hitting 200+ km requires more than assembling off-the-shelf parts. Most hobbyists stall at 50-100 km due to overlooked aerodynamic flaws, weight creep, and regulatory hurdles that ground even perfectly engineered aircraft. This guide cuts through the noise with field-tested techniques used by builders who’ve logged 150-250 km flights. You’ll learn precisely how to select airfoils that outperform commercial drones, implement weight-saving strategies that add kilometers per gram, and navigate the BVLOS paperwork maze before your first test flight. Follow these steps, and your fixed-wing UAV will return with telemetry proving you’ve joined the elite few who’ve conquered the double-century mark.
Select High-Efficiency Airfoil for Maximum Range

Drag silently devours your range potential—fixing it adds kilometers without touching your battery. The right airfoil delivers lift while minimizing induced and parasitic drag at your specific cruise speed.
Why Wing Loading Below 20 g/dm² Is Non-Negotiable
Exceeding 20 g/dm² (13 oz/ft²) wing loading forces your motor to work harder, burning precious energy. For a 2.5 kg aircraft targeting 200 km, calculate your required wing area: divide total weight by 20 g/dm². A 2.4 m wingspan with 0.52 m mean chord achieves 125 dm²—hitting the sweet spot while maintaining aspect ratio above 4.5 to control induced drag. Build your wing with this exact geometry; even 10% deviation costs 15+ km in real-world testing.
How to Verify Airfoil Performance Without a Wind Tunnel
Download coordinates for Clark-YH, MH-45, or S7012 airfoils from the UIUC Airfoil Database—these deliver lift-to-drag ratios above 25:1 at typical UAV Reynolds numbers. Print a 200 mm test wing using lightweight PLA, then conduct backyard glide tests: launch from 3 meters height with consistent force, measuring horizontal distance traveled. Compare results against a flat plate—your airfoil should glide 3x farther. If not, adjust camber or try a different profile before committing to full-scale construction.
Choose Feather-Light Materials to Extend Flight Distance

Every gram you save translates directly to added range—typically 1-2 meters per gram. Professional builders treat weight reduction like a surgical procedure, removing grams at every stage.
Carbon-Fiber Spars That Handle Stress Without Bulk
Use 3K twill carbon tubes (12 mm OD, 1 mm wall) for main spars—they support 6 kg loads at a 2.5 G safety factor while weighing just 45 g per meter. Bond with high-temperature epoxy, then vacuum-bag spar caps to eliminate 15% excess resin. Cure at 60°C for 8 hours to maximize strength-to-weight ratio. For secondary structures, switch to 2K carbon sheet—lighter than 3K but still rigid enough for control surfaces.
Foam-Core Wings That Shed 200+ Grams
Hot-wire cut EPO or XPS foam cores to your airfoil shape, then skin with one layer of 200 g/m² fiberglass and one layer of 80 g/m² carbon fiber fabric. This combination delivers torsional rigidity while keeping total skin weight under 50 g per wing half on a 2 m span. Vacuum-bag at 0.8 bar to eliminate air pockets that add weight and create surface imperfections increasing drag. Skip this step and your “smooth” wing will cost you 5+ km/h in cruise speed.
Optimize Power and Battery Layout for 200+ km Range
Energy density is your ultimate range limiter—current LiPo batteries deliver only 150-250 Wh/kg usable. Smart builders extract every watt-hour through precise system matching and strategic weight placement.
Match Motor Kv to Your Exact Cruise Speed
Select brushless outrunner 400–500 Kv motors paired with 12×8 or 13×6.5 props to hit 20 m/s (45 mph) cruise at 45 A draw. Static thrust must equal AUW at 50% throttle—this ensures your motor operates in its efficiency sweet spot (75-80%) during cruise. Test with a logging ESC: swap props until you see >80% motor efficiency at your target cruise current. A mismatched prop can waste 15% of your battery capacity.
Calculate Realistic Battery Requirements
For 200 km at 20 m/s (5,500 seconds flight time) with 350 W power draw: 350 W × 1.53 hours = 535 Wh needed. At 180 Wh/kg, that’s 2.97 kg of batteries—just 12% of your total AUW. But this leaves no margin for weather or navigation errors. Critical adjustment: increase your target range to 240 km and add 20% safety margin, requiring 642 Wh (3.57 kg). Place this pack on a sliding tray 5 mm behind the main spar—mark CG at 25% MAC and adjust until the model balances level on your fingertips.
Install Redundant Avionics for Reliable Long-Distance Flight

A single GPS glitch at 150 km means losing your aircraft. Professional builders implement redundancy on all critical systems—non-negotiable for missions beyond visual line of sight.
Triple-Redundant Navigation That Won’t Fail Mid-Flight
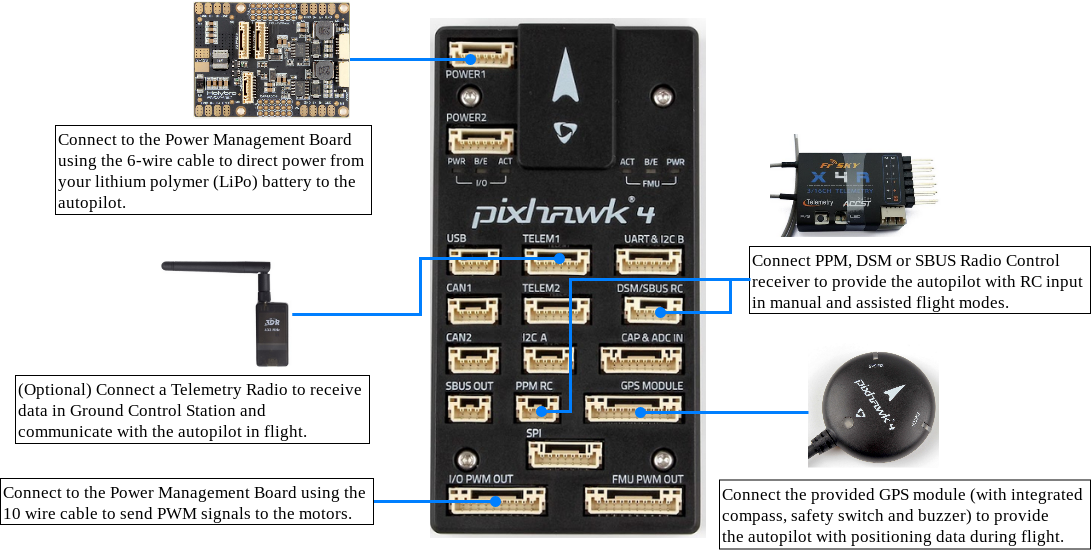
Run Pixhawk 4 or Cube Orange flight controllers with triple IMUs and dual GPS receivers. Flash ArduPlane 4.3+ and enable EKF3 for sensor fusion—this combines data from all systems to maintain accurate position even if one GPS fails. Mount secondary GPS on a 15 cm mast above the wing to minimize signal multipath errors. Set FS_LONG_TIMEOUT to 3 seconds; this prevents premature RTL activation from momentary signal loss while still triggering failsafe within 10 seconds of actual communication failure.
Dual Communication Systems That Cover Every Scenario
Primary link: 900 MHz SiK radio at 500 mW with directional Yagi antenna—tested to 15+ km line-of-sight. Secondary link: LTE modem (SIM7600G-H) pushing telemetry via 4G as backup when radio range is exceeded. Before flight, walk 2 km with a handheld RSSI meter to verify minimum -95 dBm signal strength. Add ADS-B OUT (uAvionix ping) if operating near controlled airspace—this broadcasts your position to air traffic control systems, dramatically increasing approval chances for BVLOS waivers.
File BVLOS Paperwork Early to Avoid Legal Roadblocks
Regulatory approval moves slower than your build schedule—you’ll waste months if you start paperwork after construction. Smart builders integrate compliance into their design phase.
Part 107 Waiver vs Experimental Certificate: Which Path Fits Your Mission
For commercial operations, pursue a Part 107 BVLOS waiver—submit a 30-page safety case detailing your redundancy systems, risk mitigation matrix, and emergency procedures. For private research, the Experimental Certificate (Form 8130-7) path requires less documentation but still demands a complete maintenance manual and pilot logbook. Whichever route you choose, document every design decision in a “regulatory binder”—inspectors approve applications faster when they see thorough engineering justification.
Critical Documentation That Gets Your Waiver Approved
Create a comprehensive design binder containing: airframe schematics with weight calculations, battery test data showing 95%+ discharge efficiency, link budget calculations proving 20+ km telemetry range, emergency procedures for all failure modes, and maintenance checklists. FAA inspectors particularly scrutinize your risk assessment matrix—show how you’ve reduced probability and severity for each failure scenario. Include 20+ hours of VLOS autonomous flight data proving your RTL and low-battery systems work flawlessly.
Implement Rigorous Pre-Flight and Maintenance Protocols
A 200 km mission magnifies minor flaws into catastrophic failures. Treat your drone like an airline pilot—not a weekend hobbyist—with systematic checks that catch issues before takeoff.
30-Point Preflight Checklist That Prevents Range-Killing Failures
- Torque-check wing bolts to 4 Nm (use threadlocker)
- Verify control throws ±15 mm with no binding in linkages
- Confirm battery internal resistance < 5 mΩ per cell
- Range-test telemetry ≥ 1 km on ground with RSSI meter
- Validate GPS lock with 12+ satellites and HDOP < 1.2
- Check pitot tube for obstructions (a single bug blocks airflow)
50-Hour Inspection That Maintains Peak Efficiency
After every 50 flight hours, conduct structural integrity tests: flex wing spars to 80% design load while checking for delamination. Review ESC logs for overheating events (>90°C requires immediate cooling solution). Recalibrate airspeed sensor zero offset—drift as small as 1 m/s creates 3% range error at 200 km. Rotate props even without visible damage; microscopic nicks cause harmonic vibrations that fatigue joints over time.
Build your fixed-wing drone with surgical attention to weight, aerodynamics, and redundancy, then pair it with regulatory foresight. You’ll join the elite group of builders who’ve proven 200+ km flights are achievable without military budgets. Remember: every gram saved, every backup system installed, and every page of paperwork completed brings you closer to watching your drone return from beyond the horizon with proof of what’s possible. Start with one section today—your first 100 km flight is closer than you think.


