Have you ever wondered how to build an FPV drone that perfectly matches your flying style? Building your first FPV drone from scratch might seem intimidating, but thousands of beginners have successfully completed their builds with zero prior experience. The process typically takes anywhere from a few hours to several days depending on your comfort level, but the payoff is enormous: complete control over your drone’s performance, deep troubleshooting knowledge, and the satisfaction of flying something you built with your own hands.
Unlike ready-to-fly drones, a custom build lets you hand-pick every component to match your flying style—whether that’s aggressive freestyle, smooth cinematic shots, or competitive racing. This guide walks you through the exact process for building a 5-inch freestyle drone using proven components that balance performance, reliability, and budget.
Exact Components Needed to Build Your First FPV Drone

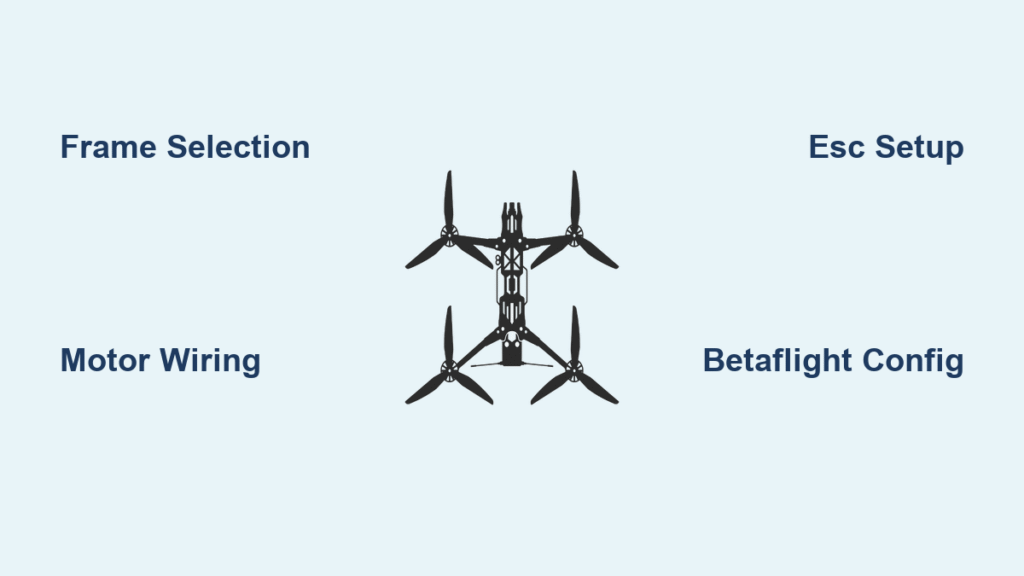
Your FPV drone consists of eight core components that work together as a complete system. Choosing the right combination determines your flying experience and durability.
Frame Selection That Won’t Fail Mid-Flight
The GEPRC Vapor frame stands out as the perfect beginner choice with its high-quality carbon construction and included 3D-printed accessories like antenna mounts and camera protectors. For 5-inch builds, carbon fiber frames dominate due to their exceptional strength-to-weight ratio—avoid aluminum frames that transmit more vibration to your camera.
Frame size directly impacts flight characteristics: larger frames offer stability and easier builds, while smaller frames prioritize agility and speed. Your frame choice dictates every other component selection, making it the foundational decision for your entire build.
Motor and Propeller Pairing for Smooth Flight
For this build, 2207-sized motors hit the sweet spot—powerful enough for aggressive flying without excessive weight. The 1900KV rating pairs perfectly with 6S batteries, delivering responsive performance while maintaining manageable power levels.
EMAX ECO II 2207 1900KV motors provide excellent value, offering reliable performance without premium pricing. These motors work seamlessly with HQ 5×4.3×3 V2S propellers, which deliver efficient thrust and smooth flight characteristics ideal for freestyle flying. Incorrect propeller selection creates vibration issues that ruin your video quality.
Must-Have Tools for Building an FPV Drone (No Experience Needed)

Soldering Equipment That Prevents Costly Mistakes
A quality temperature-controlled soldering iron set to 650°F (343°C) makes the difference between clean joints and frustrating failures. Lead-based solder flows more easily than lead-free alternatives, making it ideal for beginners despite environmental concerns.
Your multimeter becomes essential for troubleshooting shorts before they damage expensive components. Invest in quality wire strippers—cheap versions often nick conductors, creating weak points that fail mid-flight. A smoke stopper protects your electronics during first power-up by limiting current flow—this $10 device can save hundreds in damaged components.
Workspace Setup for First-Time Success
An anti-static mat prevents accidental discharge that can fry sensitive flight controllers. Organize your workspace with dedicated areas for different tasks: one for soldering, one for component storage, and one for final assembly.
Keep your workspace well-lit with a magnifying lamp—soldering tiny connections requires excellent visibility. Store small screws in compartmentalized containers to prevent loss. Never skip threadlocker application on motor screws—vibration will loosen them during flight without it.
Step-by-Step Frame Assembly for 5-Inch FPV Drones
Initial Frame Build Without Mistakes
Start by assembling your frame according to manufacturer specifications. The GEPRC Vapor typically arrives in separate pieces requiring systematic assembly. Tighten all screws firmly, but avoid over-torquing—carbon fiber cracks under excessive pressure.
Pay special attention to arm orientation and spacer placement. Incorrect assembly here creates headaches later when components don’t align properly. Double-check that all screws thread smoothly without cross-threading. Use the manufacturer’s assembly guide as your primary reference—don’t rely on memory.
Motor Mounting That Prevents Vibration
Mount motors using all four provided screws—never attempt weight-saving shortcuts. Apply threadlocker to each screw (unless pre-applied) and tighten evenly. Use 7mm screws for 5mm thick arms to ensure adequate thread engagement without bottoming out.
Verify screw length by checking that tips don’t contact motor windings. Too-long screws can puncture windings, destroying expensive motors. Proper motor mounting creates the foundation for smooth, vibration-free flight—vibration is the enemy of FPV video quality.
FPV Drone Wiring: Avoid These Costly Soldering Mistakes
ESC Installation Strategy for Clean Builds
Position your ESC stack using the provided long bolts, ensuring no contact with frame components. Rotating the ESC 180 degrees often improves battery lead routing, though this requires motor order remapping in software.
Route motor wires using one of three proven methods:
- Direct routing runs wires straight from motors to ESC—simplest for beginners but less clean
- Around-stack routing wraps wires around stack screws for improved appearance with minimal weight penalty
- Tight stacking creates the cleanest build but requires precise wire length calculation
Soldering Technique That Works First Time
Secure motor wires with tape before cutting to prevent accidental movement. Measure twice, cut once—leave 5-10mm slack for future adjustments. Strip 2mm from wire ends and pre-tin both wires and ESC pads for reliable joints.
Focus on creating shiny, volcano-shaped joints without cold solder or bridging. The XT60 power lead requires extra heat—use a higher temperature setting or larger tip. Never skip capacitor installation—it reduces voltage spikes that cause video interference.
Critical Electronics Tests Before Your First FPV Drone Flight
Pre-Power Safety Checks That Save Money
Before connecting your first battery, use a multimeter in continuity mode to check for shorts between positive and negative pads. This 30-second test prevents catastrophic failures during initial power-up.
Connect your smoke stopper for the first battery connection—this device limits current flow, protecting components from wiring mistakes. If the smoke stopper trips immediately, you’ve found a short circuit requiring investigation.
Motor and ESC Verification Process
Connect your flight controller to Betaflight Configurator and verify ESC functionality. Set the ESC protocol to DShot300 for reliable communication. Test each motor individually, listening for smooth operation without grinding or vibration.
Use Betaflight’s motor reordering tool to correct any rotation or position issues. Motors should spin in the correct direction when viewed from above—clockwise for motors 1 and 3, counter-clockwise for motors 2 and 4. Incorrect motor direction causes immediate crashes.
DJI O4 Pro and ELRS Setup: Perfect FPV Video Every Time
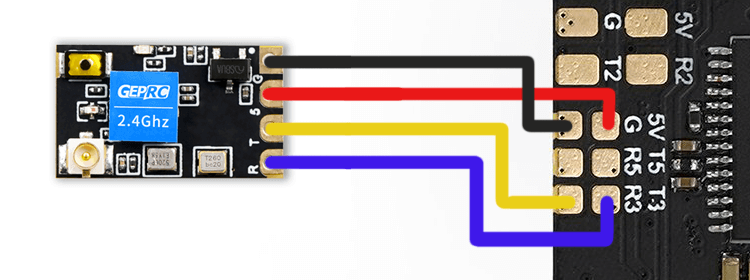
ExpressLRS Receiver Configuration Steps
Solder your receiver using the provided color coding: red for 5V, black for ground, yellow for TX (transmit from FC), and green for RX (receive to FC). Mount the receiver in the provided TPU holder for optimal antenna positioning.
Bind your radio following ExpressLRS procedures—typically involving button presses on both transmitter and receiver. Configure Betaflight to recognize your receiver by enabling “Serial RX” for the appropriate UART and setting the receiver mode to “CRSF.”
DJI O4 Pro Installation for Crystal Clear Video
Connect the DJI unit using the provided cable, removing SBUS and ground wires if using ExpressLRS. Mount antennas in the rear TPU mount for optimal signal transmission and reception.
Install your camera with the provided silicone dampers to reduce vibration-induced jello in footage. Begin with 10-15 degrees of camera tilt, increasing to 20-30 degrees as your flying skills develop. Incorrect tilt angle makes flying uncomfortable and affects your field of view.
Proper Propeller Installation: Prevent Crashes on Takeoff
Flight Controller Mounting for Vibration Control
Secure your flight controller with nylon nuts—hand-tighten only to avoid over-compressing vibration dampening gummies. The FC should have slight play for optimal vibration isolation while remaining secure during aggressive maneuvers.
Install the top plate and verify all components clear the frame without interference. Position your battery for proper center of gravity—the battery’s center should align with the motor’s geometric center for balanced flight characteristics.
Propeller Mounting That Won’t Shake Loose
Install props with correct rotation—CW props on motors 2 and 4, CCW props on motors 1 and 3. Use M5 nylon lock nuts and tighten until props cannot rotate by hand, but avoid overtightening which can damage motor shafts.
Double-check prop orientation by spinning each motor individually—props should generate downward thrust when spinning in the correct direction. Incorrect prop installation leads to immediate crashes on takeoff, potentially destroying your entire build.
Betaflight Setup: Configure Your FPV Drone in 10 Minutes
Essential Software Configuration Steps
Flash appropriate firmware for your specific flight controller, then configure board orientation to match your physical mounting. Calibrate the accelerometer on a level surface—this step is crucial for stable flight modes.
Set up flight modes using your transmitter’s auxiliary channels. Start with Angle mode for initial flights, adding Horizon mode as skills develop, and finally Acro mode for full manual control. Configure your arm switch and ensure it requires deliberate activation to prevent accidental arming.
ESC Firmware for Maximum Performance
Flash Bluejay firmware to your ESCs—this open-source alternative to BLHeli-S offers improved performance. Choose between 24kHz (better responsiveness and torque) or 48kHz (smoother flight) based on your flying style preferences.
Enable bi-directional DShot for RPM filtering, dramatically improving flight smoothness. This feature requires compatible ESC firmware and proper configuration in Betaflight—don’t skip this step for the best flying experience.
10-Point Safety Checklist Before Your Maiden FPV Drone Flight
Before your first flight, systematically verify every component:
- Propeller tightness and correct rotation direction
- All electrical connections secure and properly insulated
- Battery charge level and secure mounting
- Transmitter binding and switch functionality
- VTx powered and transmitting clear video
- OSD displaying correct battery voltage and flight time
- Receiver responding to all transmitter inputs
- Center of gravity properly aligned
- Flight modes correctly configured and tested
- Emergency procedures understood (disarm switch location)
Skipping even one safety check risks destroying your drone on its first flight. Take the extra 5 minutes—it’s worth saving hundreds in replacement parts.
Your First FPV Drone Flight: What to Expect and Avoid
Initial Flight Protocol for Success
Begin with low, controlled flights in a large open area. Focus on basic hover stability and gentle movements before attempting any aggressive maneuvers. Listen for unusual vibrations or motor sounds that might indicate tuning issues.
Start in Angle mode to learn basic controls—the flight controller actively corrects to level when you release sticks. Graduate to Horizon mode for gentle acro practice, then move to full Acro mode once you’re comfortable with manual control. Crashing is part of the learning process, but most beginners can achieve stable flight within their first few sessions.
FPV Drone Maintenance: Extend Your Build’s Lifespan 2X
Regular maintenance keeps your drone flying reliably and extends component life. After each flight session, check motor screws for tightness—vibration can loosen them over time. Inspect propellers for nicks or cracks that create dangerous imbalances.
Monitor battery health by checking individual cell voltages after flights. Store LiPo batteries at 3.8V per cell for maximum lifespan. Clean accumulated dirt from motors and electronics using compressed air or soft brushes. Building your first FPV drone creates a foundation for endless customization and improvement—the skills you develop transfer to future builds, making you a truly independent pilot.


