Your drone shouldn’t track you—build one without RFID components for complete control and privacy. When you learn how to build a drone without RFID, you eliminate mandatory identification systems that commercial models require, giving you freedom from tracking while maintaining full flight capabilities. Whether you’re creating a traditional RC-controlled quadcopter or developing an autonomous system with sensor-based navigation, this guide delivers every step you need for a successful RFID-free build.
Most commercial drones incorporate RFID for regulatory compliance, but your DIY project operates independently of these tracking systems. You’ll construct a machine that flies through direct radio control or autonomous programming without transmitting identifying signals. By following this guide, you’ll create a drone that maintains your privacy while delivering reliable performance for photography, racing, or exploration.
Why Skip RFID in Your Drone Build
Building a drone without RFID components gives you complete system control without mandatory identification protocols. Traditional drones broadcast identification signals that can be tracked, while your custom build operates without these transmissions entirely. This approach offers significant privacy advantages and eliminates potential signal interference from RFID systems competing with your flight controls.
Without RFID components, your drone becomes simpler with fewer electronic parts to fail. You’ll avoid the regulatory complexity of systems designed to comply with tracking requirements, focusing instead on core flight performance. This streamlined approach means less weight, reduced power consumption, and more reliable operation in challenging environments where RFID signals might cause interference.
Essential Tools for RFID-Free Drone Construction
Must-Have Assembly Equipment
Skip the unnecessary gadgets and focus on these critical tools for your RFID-free build:
- 60W soldering iron with fine tip for precise electronic connections
- .032″ rosin-core solder specifically designed for drone electronics
- Double-sided tape for vibration-dampening component mounting
- Velcro strips enabling quick battery swaps without connectors
- Zip ties in multiple sizes for secure cable management
- 3mm and 5mm heat shrink tubing to prevent short circuits at connection points
Pro Tip: Add a helping hands tool with magnifying glass to your kit—it keeps components stable during delicate soldering work and prevents frustration when connecting tiny flight controller pins.
Frame and Motor Selection Without RFID Tracking

Quadcopter Frame Configuration Guide
Start with a 250mm quadcopter frame for your first RFID-free build—it offers the perfect balance between stability and agility. This size accommodates standard components while providing enough space for clean wiring. Choose carbon fiber for maximum strength-to-weight ratio, or aluminum if you need better heat dissipation from your electronics.
Motor specifications made simple:
– 2205-2206 size for 250mm frames (22mm stator width, 5-6mm height)
– 2300KV rating for optimal balance of speed and torque
– CW and CCW versions required (two of each for quadcopter)
Critical motor mounting sequence:
1. Identify motor rotation direction (CW or CCW)
2. Solder bullet connectors to motor leads
3. Route wires through frame arms
4. Secure motors with included screws
5. Verify front-right and rear-left motors rotate clockwise
Propeller Selection Without RFID Constraints
Match your propellers to motor specifications using this simple rule: low KV motors need high-pitch props, high KV motors need low-pitch props. For a standard 250mm build with 2300KV motors, install 5045 props (5″ diameter, 4.5″ pitch). Always confirm propeller direction—clockwise props must mount on clockwise motors, counter-clockwise props on counter-clockwise motors.
Warning: Installing incorrect propeller direction creates immediate instability. Double-check before first flight—props should push air downward when motors spin.
Electronic Components for RFID-Free Operation
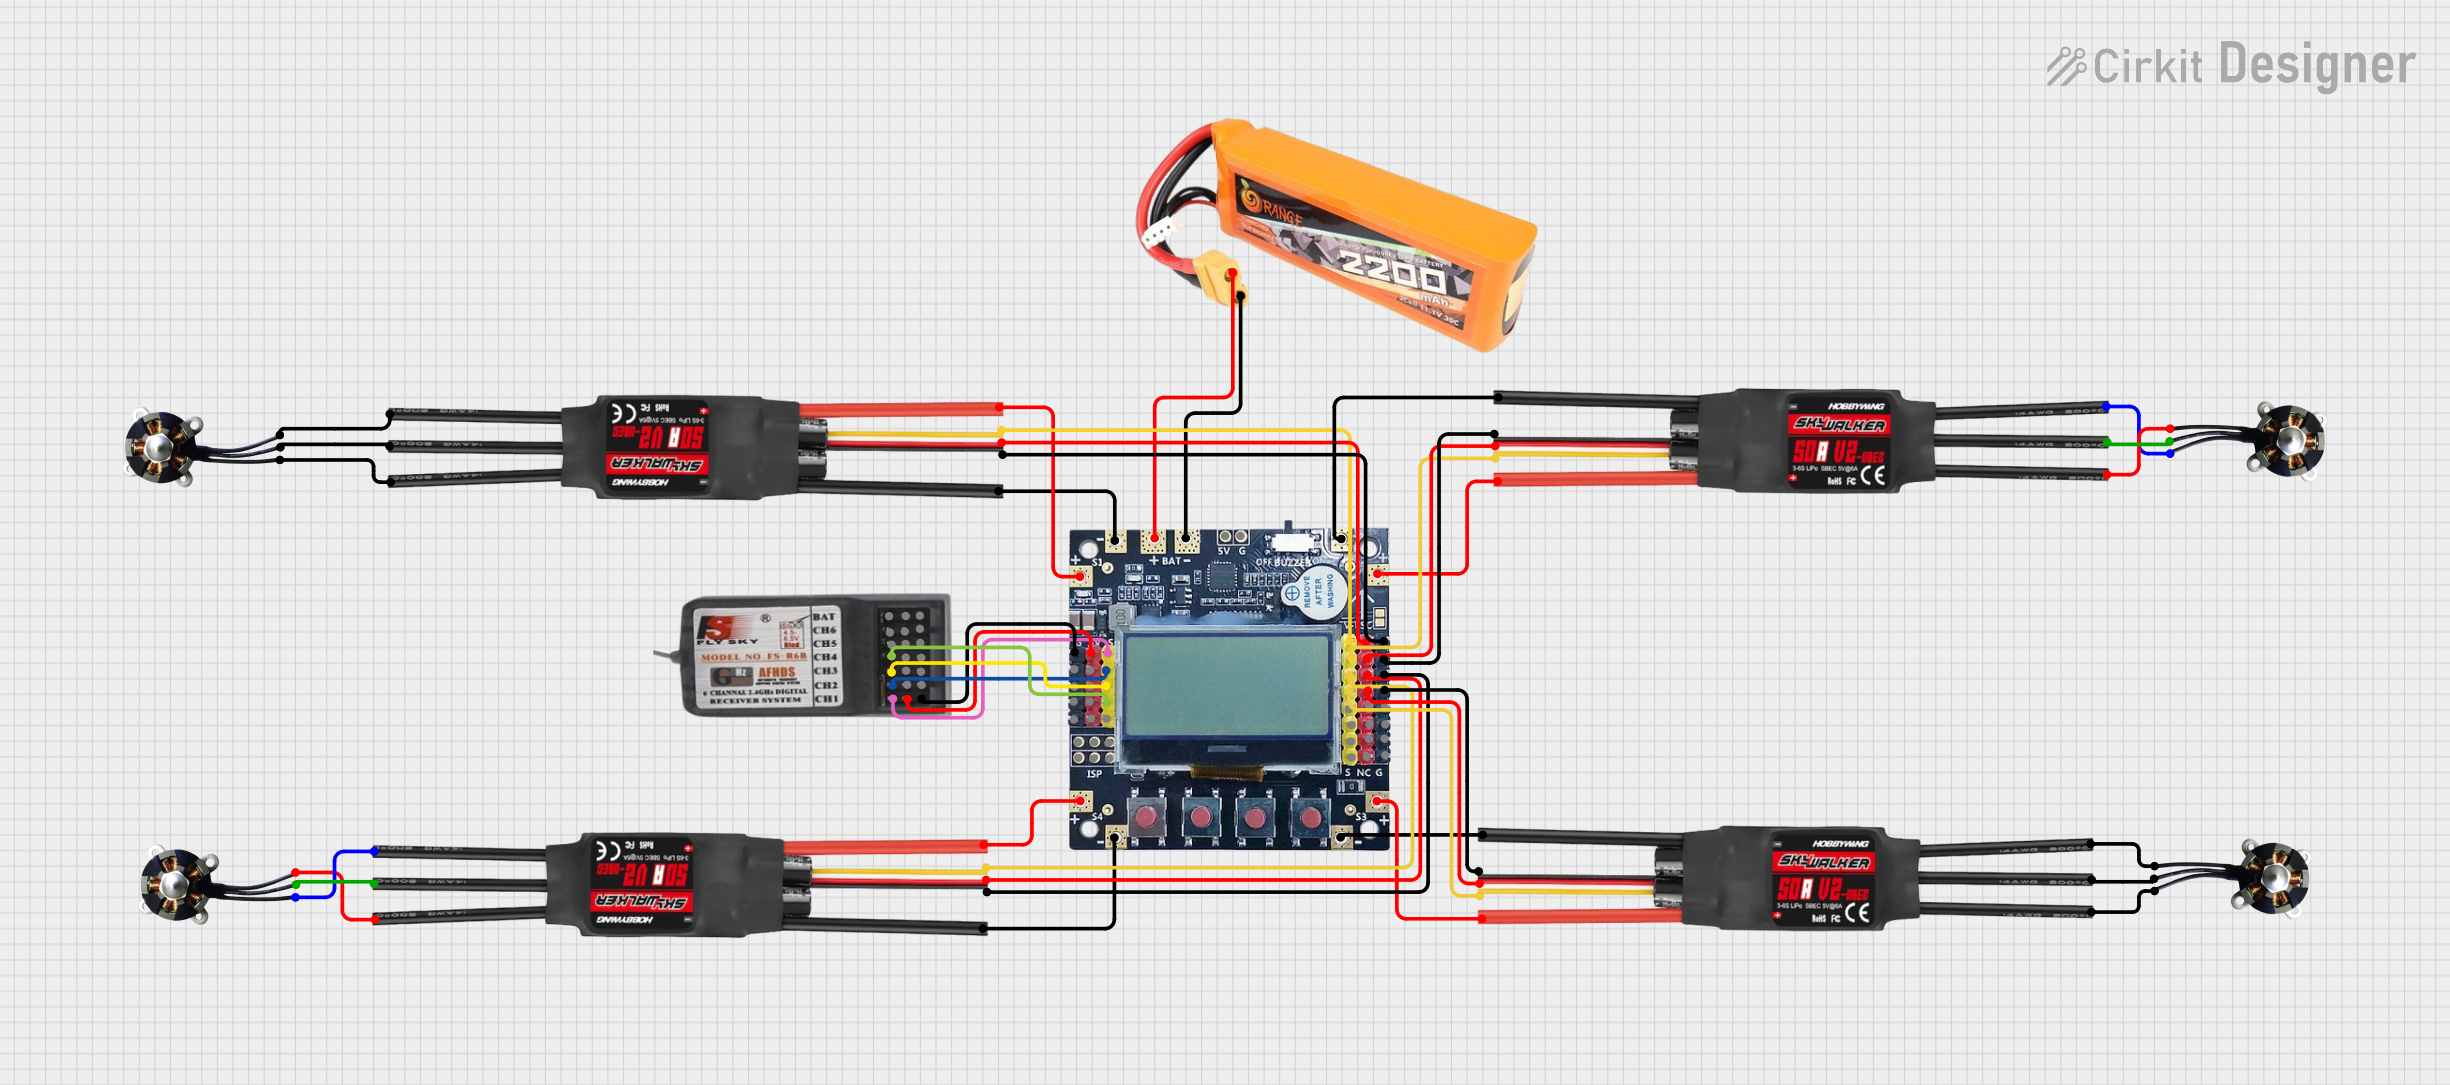
ESC and Power System Setup
Each motor requires its own ESC (Electronic Speed Controller). For a 250mm drone, select 20A ESCs with BLHeli firmware for smooth operation. When connecting your ESCs:
- Solder ESC power leads to PDB (Power Distribution Board) pads
- Connect battery via XT60 connector ensuring correct polarity
- Verify 5V BEC output for flight controller power
- Test continuity with multimeter before connecting battery
Critical ESC calibration steps (props removed!):
– Connect battery with transmitter at full throttle
– Listen for confirmation beeps
– Lower throttle to minimum
– Test each motor individually through flight controller
Flight Controller Configuration Without RF Tracking
Choose between Pixhawk 4 for advanced features or CC3D for racing applications. Your flight controller needs these essential connections:
- 4 ESC signal wires to motor outputs
- RC receiver to input pins
- GPS module to dedicated port (if used)
- External LED for status indication
Sensor calibration sequence:
1. Connect to Mission Planner via USB
2. Complete accelerometer calibration in all six positions
3. Perform compass calibration away from metal objects
4. Verify GPS lock if using position-hold features
Autonomous Flight Without RFID or RF Signals
Sensor-Based Navigation System
For true autonomous operation without any radio signals, implement this sensor suite:
- MPU6050 IMU for orientation and motion detection
- BMP280 barometer for altitude measurement
- u-blox M8N GPS (if absolute positioning needed)
- Downward-facing camera for visual positioning
Altitude hold algorithm essentials:
Read barometer → Calculate height error → Apply PID correction → Adjust motor speeds → Repeat at 100Hz
PID tuning sequence:
1. Start with P=1.0, I=0, D=0
2. Increase P until oscillation begins, then reduce by 30%
3. Add I term to eliminate steady-state error
4. Add D term to dampen oscillations
Reality check: Without external references, position hold degrades after 2-3 minutes due to sensor drift. Indoor operation yields best results for pure sensor-based autonomous flight.
Safety Testing for Your RFID-Free Drone
Progressive Flight Testing Protocol
Never skip these critical safety steps before first flight:
- Bench test with props removed to verify motor responses
- Tethered hover using 3-foot cord for initial stability testing
- Short hops of 1-2 feet in open area to assess control
- Gradual expansion of flight envelope as confidence increases
Common troubleshooting:
– Motor spinning wrong direction: Swap any two ESC wires
– Drone flips on takeoff: Verify motor order matches flight controller configuration
– Oscillating hover: Reduce PID gains and check for loose components
Emergency procedure: Program a physical disarm switch—when activated, all motors immediately stop regardless of flight mode.
Regulatory Compliance Without RFID
Legal Requirements for Non-Tracking Drones
Despite lacking RFID components, your drone must still comply with aviation regulations:
- Register with FAA if over 250g (weight threshold applies regardless of RFID)
- Follow no-fly zones using GPS data or physical maps
- Maintain visual line of sight during all RC operations
Critical limitation: Without remote override capability in autonomous mode, your drone cannot respond to air traffic control commands. This restricts autonomous operation to approved areas with no risk of interfering with manned aircraft.
Maintenance Schedule for Longevity
Essential Post-Flight Checks
After every flight session:
– Inspect props for nicks or cracks
– Verify battery connector security
– Check for loose screws or components
– Clean motors with compressed air
Monthly maintenance:
– Recalibrate sensors if flight performance degrades
– Replace worn props (even minor damage affects balance)
– Check motor bearings for smooth operation
When you learn how to build a drone without RFID, you gain complete control over your flying machine while maintaining privacy and simplicity. Start with a traditional RC-controlled build to master fundamentals before attempting autonomous flight. Always prioritize safety—test progressively and never fly beyond your skill level. With proper component selection and careful assembly, your RFID-free drone will deliver reliable performance while keeping your operations private and uncompromised.


