You’re racing your quadcopter across the park when suddenly one motor starts stuttering mid-flight. The drone drops like a stone, narrowly missing a tree. Understanding how drone motors work isn’t just technical trivia—it’s the key to preventing crashes, optimizing performance, and choosing the right components for your build. Every drone motor represents an intricate dance between electronics and physics, converting battery power into precise rotational force in milliseconds.
This guide breaks down exactly what happens inside those spinning wonders, from the moment your flight controller sends a command to when thrust lifts your drone skyward. Whether you’re troubleshooting a malfunction or building your first custom quad, knowing how drone motors work gives you the confidence to make informed decisions. You’ll learn the electromagnetic principles, component functions, and practical considerations that transform electrical energy into controlled flight.
Drone Motors: Your Flight Controller’s Final Actuator
Your drone’s motors serve as the critical link between digital commands and physical movement. When you move the control sticks, your flight controller calculates the exact thrust needed from each motor 250-1000 times per second. The electronic speed controller (ESC) then translates these digital commands into three-phase alternating current that powers your motor windings.
The complete signal chain in action:
– Flight controller computes thrust requirements based on your input
– ESC converts DC battery power to three-phase AC with precise timing
– Motor windings create rotating magnetic fields that drive the rotor
– Rotor spins propeller, accelerating air downward to generate thrust
– Gyroscopic sensors feed back data to the flight controller for adjustments
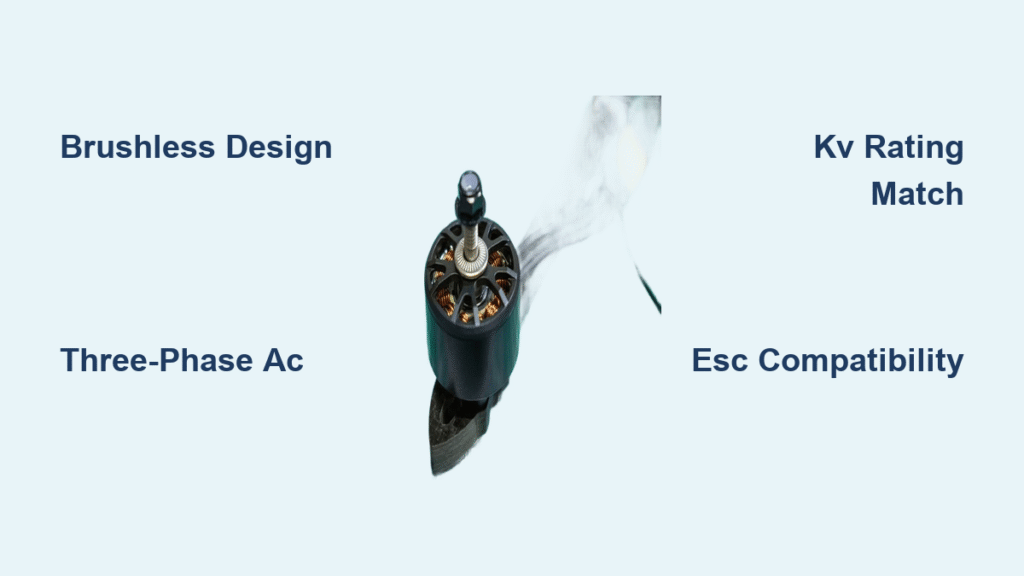
Unlike traditional brushed motors, modern drones use brushless technology that eliminates physical contact between moving parts. This design allows for the millisecond-level response required for stable flight, especially when correcting for wind gusts or performing complex maneuvers. The absence of brushes also means significantly less heat generation and longer operational life—critical factors when your drone needs to maintain position while capturing that perfect aerial shot.
Why Every Drone Uses Brushless DC Motors
Modern multirotor drones exclusively use brushless DC (BLDC) motors for compelling performance reasons. These motors eliminate carbon brushes entirely, instead using electronic commutation to switch power between windings. The result? A power-to-weight ratio of 2-5 kW per kilogram—far superior to brushed alternatives.
BLDC motors dominate drone designs because they deliver:
– Extended lifespan: 500-1000 hours of operation without brush wear
– Superior efficiency: 70-90% power conversion rates versus 50-70% for brushed motors
– Instant torque response: Millisecond-level adjustments critical for stability
– Higher power density: More thrust from smaller, lighter packages
Traditional brushed motors simply cannot match these specifications. The brushless design allows for higher speeds, greater efficiency, and instantaneous torque control—critical factors when your drone needs to correct its position 400 times per second. This responsiveness is why even entry-level consumer drones use BLDC technology, while brushed motors remain relegated to toy-grade models.
Inside Your Drone Motor: Component Breakdown
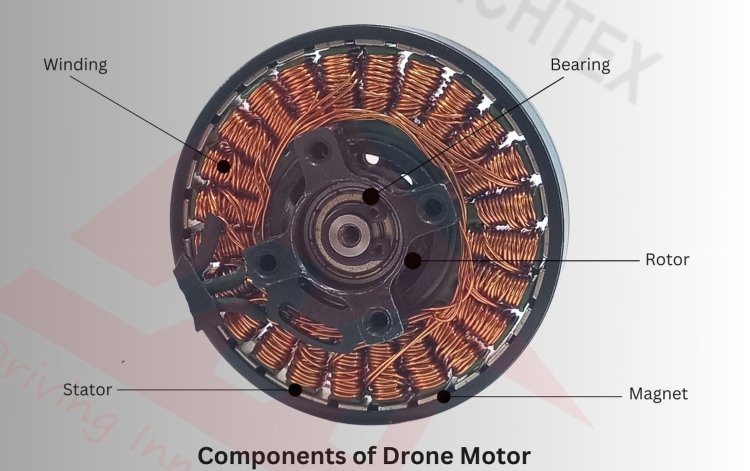
Peering inside a drone motor reveals precision engineering that must withstand extreme rotational forces while maintaining perfect balance. The stator forms the stationary core with laminated silicon-steel wrapped in enameled copper windings. Slot counts (typically 9, 12, or 15) determine torque smoothness and electrical characteristics, with more slots providing smoother operation at the cost of maximum RPM capability.
The rotor bell—the spinning outer shell—uses CNC-machined 7075-T6 aluminum housing powerful neodymium permanent magnets. Pole counts (12, 14, or 16 magnets) balance smooth operation against maximum RPM capability. This bell design places magnets outside the stator, creating the outrunner configuration that dominates multirotor designs for its torque advantages.
Critical components you should inspect before installation:
– Shaft straightness (must be within 0.01mm tolerance to prevent vibration)
– Bearing smoothness (should rotate silently without rough spots)
– Mounting hole pattern (9×9mm to 19×19mm spacing must match your frame)
– Phase wire integrity (three silicone-insulated wires handling 200°C+ temperatures)
Step-by-Step: How Electromagnetism Creates Flight
Your drone motor operates through a precisely timed six-step electromagnetic sequence that happens thousands of times per second. First, your flight controller outputs PWM or DShot signals at 1-32 kHz frequencies, commanding specific RPM targets for each motor. The ESC’s MOSFET bridge then converts DC battery voltage into three-phase AC with 120-degree electrical separation between phases.
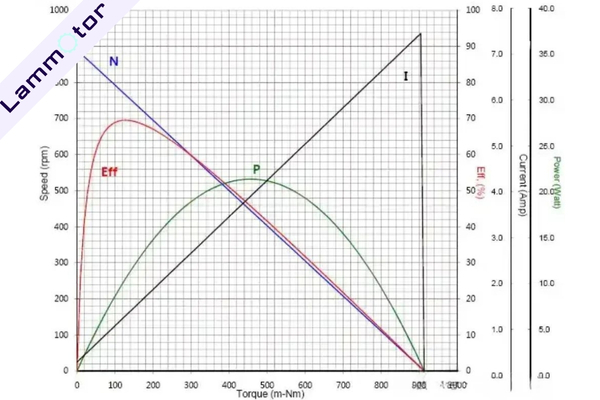
As stator coils energize in sequence (U→V→W→U pattern), they create a rotating magnetic field that the rotor’s permanent magnets follow. This generates mechanical torque calculated as τ ≈ Kt × I, where Kt relates to your motor’s KV rating. Simultaneously, the spinning rotor creates back-EMF voltage that the ESC monitors to time the next commutation step—preventing the dreaded “desync” that causes motor stuttering.
The final step converts this rotation into thrust as the propeller accelerates air downward. Thrust follows the equation T ≈ C_T ρ n² D⁴, where n represents RPM and D is propeller diameter. This explains why small increases in RPM yield disproportionately large thrust gains—critical knowledge when tuning your drone’s performance.
Decoding Motor Specifications: KV, Thrust, and Efficiency
Understanding your motor’s specifications prevents costly mismatches and performance issues. The KV rating—measuring RPM per volt applied—is perhaps the most misunderstood spec. High KV motors (2000-3000) suit small props and high speeds, while low KV motors (500-1000) provide torque for large props. Choose based on your propeller size and desired flight characteristics.
Critical specs to check before purchase:
– Maximum continuous current (5-60A typical) must match your ESC rating
– Internal resistance (0.03-0.2Ω) determines efficiency and heat generation
– Torque constant (Kt) indicates thrust per ampere of current
– Efficiency peaks at 40-60% throttle—explaining why cruising flight lasts longer
Real-world testing reveals how these specs translate to performance. For instance, a SunnySky V3508 (700 KV) on 6S battery with 12×4 prop generates 2800g thrust using only 42A, reaching 4.9g/W efficiency at 45% throttle—ideal for extended flight times. Meanwhile, a T-Motor F60 Pro III (1950 KV) on the same battery with 5×4.3×3 prop produces 1610g thrust at 48A draw, achieving 3.8g/W efficiency at 60% throttle—perfect for racing applications.
Perfect Power System Matching: Motor, Prop, and ESC
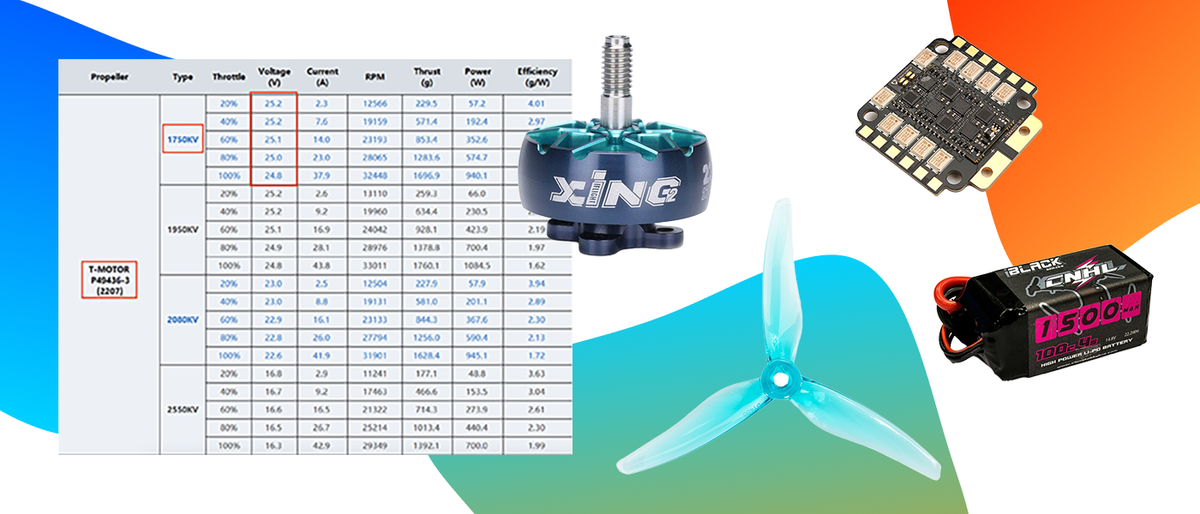
The most common cause of motor failure isn’t the motor itself—it’s improper component matching. Follow these critical pairing rules to prevent crashes and extend component life:
Motor ↔ Propeller Pairing
– High KV motors (2000+): 3-5 inch props maximum
– Medium KV motors (1000-1500): 5-7 inch props optimal
– Low KV motors (<1000): 7+ inch props for efficiency
Motor ↔ ESC Compatibility
Always select ESCs with continuous ratings 20-50% above motor peak current. Undersized ESCs overheat during aggressive maneuvers, leading to desync and potential crashes. For example, if your motor draws 30A peak, use at least a 36A ESC.
Battery Considerations
Your battery’s C-rating must support total motor current draw. Calculate required capacity using: Battery C × mAh ≥ total motor peak current. Insufficient C-rating causes voltage sag during acceleration, resulting in power loss when you need it most.
Installation Checklist: Mounting Your Drone Motor Correctly
Proper installation prevents premature failure and vibration issues. Before mounting, inspect shaft straightness by rolling on a flat surface and test bearing smoothness through hand rotation. Apply medium-strength Loctite 243 to M3 screws, torquing to 0.8-1.0 N·m—over-tightening distorts the bell, while under-tightening causes screws to back out mid-flight.
Solder three-phase wires to ESC pads with clean joints, ensuring no cold solder spots. Swap any two wires to reverse rotation direction as needed for your configuration. Always test rotation direction using your flight controller’s motor tab without props first—confirm counter-rotating pairs match your frame layout.
Check for excessive vibration using gyro FFT analysis, targeting less than 0.1g RMS above 100Hz. Jello in video footage often results from dynamic imbalance or bent motor bells. Use an IR thermometer after test flights to verify temperatures stay below 80°C—higher readings indicate over-propping or poor ventilation.
Troubleshooting Common Motor Failures and Fixes
High temperature (>80°C)
This usually indicates over-propping or poor ventilation. Reduce prop size or increase cooling airflow. Monitor with an IR thermometer after flights—consistent high temps shorten motor life significantly.
Screeching noises or rough spinning
These symptoms point to bearing failure. Replace affected motors immediately to prevent mid-flight failures. Hand-spin tests should reveal smooth, silent rotation without rough spots.
Motor stuttering
Most commonly caused by ESC timing issues. Update ESC firmware and adjust timing parameters through your flight controller. Persistent problems may require ESC replacement—never ignore this symptom as it can lead to sudden desync and crashes.
Jello in video footage
Indicates vibration problems often from dynamic imbalance. Use FFT analysis to identify motor-specific vibration frequencies, then rebalance or replace affected motors. Check for bent shafts or cracked bells that compromise structural integrity.
Your drone’s motors are precision instruments that transform electrical commands into flight reality. Understanding how drone motors work—from electromagnetic principles to practical troubleshooting—empowers you to optimize performance, prevent failures, and make informed component choices. Whether you’re building a racing quad or heavy-lift platform, these fundamentals remain constant: proper matching, careful installation, and regular maintenance ensure reliable flight performance. Keep your motors clean, properly cooled, and correctly matched to your props and ESCs, and they’ll deliver the responsive, reliable power that keeps your drone safely in the air.


