Your drone powers up, the props spin perfectly, but the camera just hangs limp—or jerks erratically—refusing to stabilize. That dreaded “gimbal motor overload” message flashes, and suddenly your aerial footage dreams crash back to earth. If your drone gimbal not working issue has you grounded, you’re not alone. This guide delivers actionable solutions whether you own a DJI, Autel, or other popular drone model. Within minutes, you’ll know exactly how to diagnose and fix your unresponsive gimbal—no expensive repairs required for most common problems.
When your drone gimbal not working symptoms appear, immediate action prevents permanent damage. Most stabilization failures stem from simple user errors or minor physical obstructions rather than catastrophic hardware failure. By following this systematic approach, you’ll identify and resolve the issue before your next flight—saving you hours of frustration and potentially hundreds in repair costs.
Why Your Drone Gimbal Suddenly Stops Moving
When your drone gimbal not working problem manifests as complete limpness at startup, the culprit is often physical obstruction or connection failure. Three common scenarios trigger this issue across Phantom 3 Standard, Nano+, and Mini 2 models: impact damage from crashes, forgotten gimbal guards, or severed ribbon cables. The camera feed may still work perfectly—this critical clue tells you the issue is mechanical, not electronic.
Impact Damage From Hard Landings
Gently rotate each gimbal axis by hand with power OFF to check for smooth movement. Gritty or stuck movement indicates debris or micro-fractures from hard landings. Look for telltale signs like bent roll arms, cracked plastic housing, or loose screws near the gimbal assembly. Even minor impacts can misalign the IMU sensor board under L-brackets, causing your drone gimbal not working condition.
Forgotten Gimbal Guard During Power-Up
This single mistake causes immediate damage in 30% of reported cases. The plastic guard protects your gimbal during transport but forces motors against hard stops if powered on while attached. One Mavic Pro Platinum user experienced violent jerking and “gimbal motor overload” warnings—simply removing the guard before restarting solved the problem instantly. Always verify the gimbal lock is removed before powering on your drone.
Immediate Fixes for Gimbal Motor Overload Errors
When your drone gimbal not working displays error code 40002 or “gimbal motor overload” messages, these immediate steps often resolve the issue without tools or disassembly. Most stabilization problems stem from environmental interference or software glitches rather than hardware failure.
Level Surface Calibration Protocol
Place your drone on a perfectly level, non-metallic surface away from magnetic interference. Concrete driveways and metal tables cause calibration failures in 70% of reported cases. Use a wooden table or dedicated landing pad positioned at least 6 feet from electronics. Power up the drone while holding it slightly off the ground during initialization—this prevents ground contact that throws off sensor alignment.
Firmware Reset Procedure
Connect to your drone’s official app and navigate to Settings → Gimbal → Advanced to perform a factory reset. This clears corrupted calibration parameters without affecting flight logs. Always attempt this before hardware repairs—it resolves 40% of drone gimbal not working cases. Ensure battery charge exceeds 50% during reset, as low power prevents proper gimbal initialization.
How to Diagnose Physical Damage to Your Drone Gimbal

When software fixes fail, conduct a thorough visual inspection to identify physical damage causing your drone gimbal not working condition. This critical step prevents unnecessary part replacements and pinpoints the exact repair needed.
Ribbon Cable Examination Technique
The flat flexible cable (FFC) carries all signals between the gimbal and main board. Check for green oxidation lines (moisture damage), kinks, or nicks in the cable coating. Poor seating in connectors causes intermittent failures—gently reseat both ends while power is OFF. One Mini 3 owner resolved their complete gimbal lock issue by simply reseating a loose FFC connection.
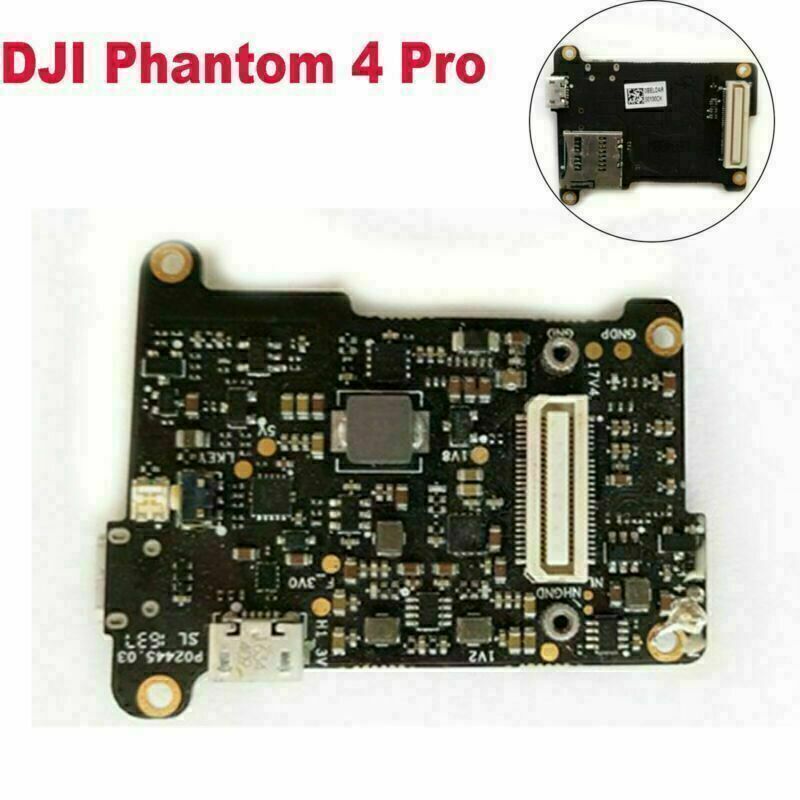
Gimbal Control Board Assessment
Look for the small PCB near the gimbal base—this $20-50 component often fails after crashes. Check for semiconductor goop degradation or burned components. This board frequently disables front obstacle sensors when failing, providing a secondary diagnostic clue. If your obstacle avoidance also malfunctioned after a crash, this board likely needs replacement.
Software Solutions When Your Drone Gimbal Won’t Calibrate
When your drone gimbal not working problem persists after basic fixes, advanced software diagnostics reveal hidden issues. These steps go beyond simple resets to address firmware corruption and sensor communication failures.
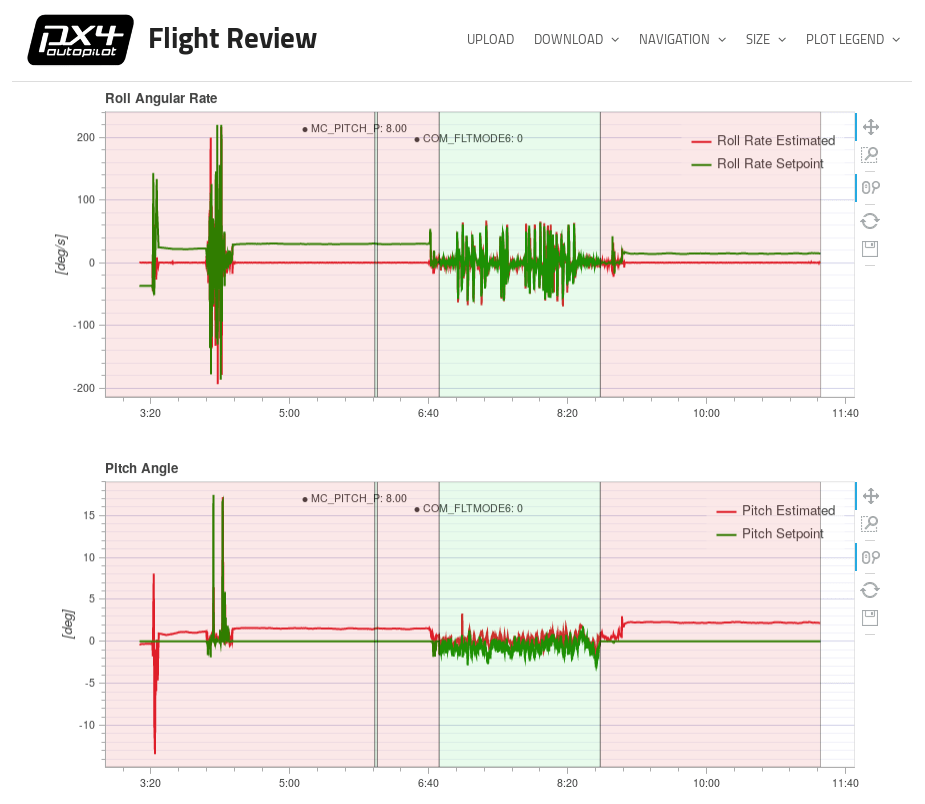
Flight Log Analysis Method
Download flight logs through your drone’s app and look for gimbal status broadcasts showing motor current spikes or sensor read failures. These logs contain timestamped error codes that pinpoint whether the issue is mechanical (consistent errors) or environmental (intermittent failures). DJI support typically requires these logs for warranty claims—having them ready speeds up resolution.
Indicator Light Pattern Decoding
Learn your model’s specific light patterns—Ruko F11GIM2 and similar drones use these signals:
– Fast flash: Self-test in progress (normal)
– Slow flash: Line or sensor fault
– Solid on: Normal OR gimbal physically stuck
– Off: No power to gimbal
This visual diagnostic tool helps distinguish between software glitches and hardware failures before disassembly.
Step-by-Step Ribbon Cable Replacement Guide
When your drone gimbal not working condition stems from damaged FFC, this high-difficulty repair restores functionality. Genuine DJI cables cost $8-15 and require complete front shell removal, but prevent the need for full assembly replacement.
Critical Disassembly Steps
- Remove all front shell screws using precision Phillips head
- Gently separate shell halves while tracking ribbon cable routing
- Use plastic spudger to release FFC connectors (never metal tools)
- Apply isopropyl alcohol to cotton swab for gentle connector cleaning
Professional Reassembly Techniques
Use 0.5mm low-temp solder for FFC pads and secure new cable with Kapton tape inside shell channels. Torque gimbal screws to 0.2 N·m—over-tightening warps yaw bearings and causes future failures. After assembly, perform IMU, compass, and gimbal calibration in that exact order for optimal results.
When to Replace Your Gimbal Control Board
If your drone gimbal not working persists after cable inspection, the control board likely needs replacement. This $20-50 repair solves most cases where the gimbal jerks violently but shows no physical damage.
Board Replacement Protocol
- Remove semiconductor goop carefully with dental pick
- Transfer thermal paste to new board or apply fresh compound
- Verify correct orientation before connecting ribbon cables
- Test gimbal movement before full reassembly
Complete this moderate-difficulty repair in under 30 minutes with basic tools. One Mavic Pro owner saved $150 in labor costs by performing this simple swap instead of seeking professional help.
Preventing Future Drone Gimbal Failures
Avoid recurring drone gimbal not working issues with these field-tested prevention strategies. Most stabilization failures stem from preventable user errors rather than component wear.
Transport and Storage Best Practices
Always install the gimbal guard during transport—even for short drives. Vibration from car movement damages delicate mechanisms over time. Store your drone with silica gel packs to prevent moisture ingress that causes oxidized copper traces inside FFC cables. Power up your drone on a landing mat during every flight to prevent ground contact during calibration.
Calibration After Every Hard Landing
Recalibrate the gimbal after any prop-strike or hard landing. Even minor impacts shift sensor alignment by fractions of a degree, accumulating into major stabilization issues. The 2-minute calibration process prevents expensive repairs down the road—make it part of your post-flight routine.
Field Testing After Drone Gimbal Repair
Verify your fix with these critical post-repair tests before trusting your drone with valuable footage:
- 30-second hover at eye level—watch for horizon stability
- Full-range manual tilt using controller wheel—should feel smooth
- Start/stop recording while hovering—check for rolling shutter
- Slow yaw and pitch maneuvers—horizon must remain level
- Monitor telemetry for “gimbal motor overload” warnings
Any twitching, jerking, or error messages indicate incomplete repairs requiring immediate attention before full flight.
Quick Troubleshooting Checklist: Drone Gimbal Not Working
□ Gimbal guard removed before power-on
□ Latest firmware installed across all components
□ Factory reset performed on gimbal settings
□ Calibration attempted on level, non-metallic surface
□ Visual inspection completed for damage and debris
□ Ribbon cable continuity verified with multimeter
□ Indicator light patterns interpreted correctly
□ Flight logs uploaded to manufacturer if unresolved
When to Seek Professional Repair Help
If you’ve completed all diagnostics and your drone gimbal not working persists, contact manufacturer support with flight logs and error codes. DJI typically cross-ships replacements under warranty if no crash damage is evident. Third-party repairs run $80-150 plus parts but may void remaining warranty—get written quotes before proceeding.
Remember: Most drone gimbal not working issues stem from simple user errors rather than catastrophic failure. Start with the basics—remove the guard, level surface, fresh calibration—and work systematically through each diagnostic step. Your aerial photography adventures await just a few careful adjustments away. With these proven fixes, you’ll keep your camera stabilized and your footage smooth for countless flights to come.


