Crash-proof your drone hobby by learning how to make a drone with 3D printer—no aerospace engineering degree required. Modern desktop printers let you create custom frames that outperform commercial models in repairability and customization. Whether you’re building a racing machine or photography rig, this guide delivers the exact steps to transform digital designs into functional aircraft. You’ll discover why printed drones now rival DJI units in performance while costing half as much and teaching invaluable engineering skills.
Skip the frustration of incompatible parts with this proven workflow: define your mission first, select the right printing technology, design for crash resilience, and assemble electronics like a pro. Your first flight is just a few prints away.
Choose Your 3D Printing Technology
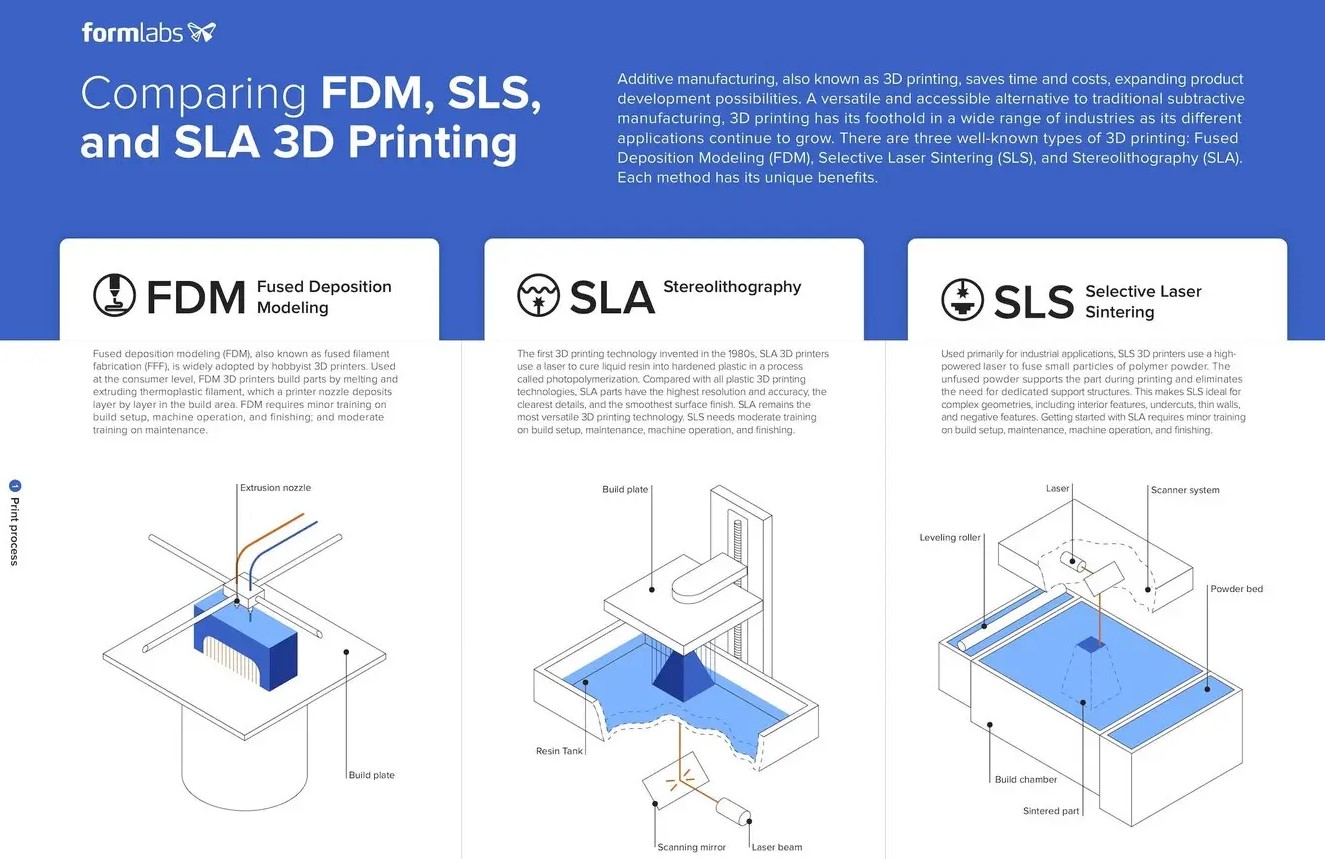
FDM vs SLA vs SLS for Drone Frames
FDM printers under $300 handle most drone builds with PLA for indoor models or ABS/PETG for outdoor durability. Print motor arms at 50% infill and 3-4 perimeters for crash resistance—critical since your first drone will likely hit something. The layer adhesion weakness? Design snap-fit joints that break cleanly on impact rather than shattering the entire frame.
SLA printers shine for precision components like vibration-damping camera mounts. Use Tough 2000 Resin for gimbal parts requiring ABS-like stiffness or Silicone 40A for waterproof seals around electronics. Expect 30 minutes of post-processing per part (washing and UV curing), but the watertight results prevent moisture damage during outdoor flights.
SLS printers create end-use frames impossible with other methods. Nylon 12 Tough powder produces isotropic parts that withstand crashes better than injection-molded plastic. A complete 250mm quadcopter frame costs just $8 in materials, and the lack of support structures means you can print complex ducted prop designs without cleanup.
Material Selection Matrix
For racing drones:
– Nylon 12 CF rotor arms (carbon-filled for stiffness)
– TPU 90A camera mounts (vibration damping)
– Nylon 12 Tough main plates (crash resistance)
For lightweight photography rigs:
– Tough 2000 Resin gimbal components
– Silicone 40A weather seals
– PETG prop guards
Design Your Mission First
Define Flight Requirements Before Hardware
Start with your end goal. Mapping a construction site requires GPS, long-range telemetry, and a stabilized gimbal—automatically pushing you toward a 450mm+ frame. Indoor racing? Optical flow sensors and shorter arms work better than GPS, which loses signal indoors.
Pro tip: Choose motors first, then work backward. A 2204 2300KV motor pairs with 5-inch props, dictating a 250mm wheelbase. This prevents the common mistake of designing a beautiful frame that can’t lift itself.
Component Selection Table
| Mission Type | Required Hardware | Frame Size |
|---|---|---|
| Long-range FPV | 5.8GHz VTX, GPS, 6S battery | 250-300mm |
| Indoor photography | Optical flow, LiDAR, small gimbal | 150-200mm |
| Payload delivery | Drop mechanism, reinforced arms | 350mm+ |
| Racing | High-KV motors, minimal weight | 220-250mm |
Frame Geometry Decisions

X vs H vs Deadcat Configurations
X-frames dominate racing for good reason—they’re compact, predictable, and crash well. The symmetrical layout makes tuning straightforward, though internal space gets cramped. Design your X-frame with modular mounting boards to swap components without redesign.
Deadcat configurations solve the camera obstruction problem by pushing motors forward, keeping props out of your shot. The trade-off? Slightly less efficient flight characteristics requiring PID tuning adjustments.
Ducted frames add safety at the cost of performance. Perfect for indoor photography or training new pilots, the ducts add 20% weight but prevent most prop strikes. Print ducts in flexible TPU for impact absorption.
Parametric Design Principles
Design your frame parametrically from day one. Change one dimension (arm length) and watch the entire model update—motor mounts shift, wire channels realign, and battery placement adjusts automatically. This prevents the nightmare of manually updating 50 individual parts when you decide 250mm works better than 220mm.
Print Your Components
Essential Print Settings
For FDM frames:
– 0.2mm layers for speed, 0.1mm for precision fits
– 3-4 perimeters minimum for crash resistance
– 50% infill for arms, 100% around motor mounts
– Support material only on overhangs >45°
For SLS parts:
– No supports needed—powder acts as natural support
– 0.1mm layer height standard
– Living hinges and snap-fits work beautifully in Nylon 12
Critical detail: Print spare arms immediately. A 3-hour print now saves a week of downtime when (not if) you crash.
Assembly Workflow
Mechanical Build Sequence
- Motor arms to base plate: Start loose, verify alignment visually, then torque M3 screws with Loctite 243
- ESC mounting: Isolate with 3mm nylon spacers for airflow
- Flight controller: Vibration-isolate with soft gummies, orient arrow forward
- Power distribution: Route 12AWG silicone wire cleanly, never over arms
- Antenna placement: GPS on rear post, VTX antenna rear-right, RC antenna rear-left
Electronics Integration Order
Soldering sequence matters. Tin ESC pads first, then motor wires, then XT60 pigtail. This prevents heat damage to sensitive flight controller components.
Wire management hack: Route motor wires inside printed wire channels along arms. This prevents prop strikes and looks professionally built.
Software Setup & First Flight
Betaflight Configuration
- Flash latest firmware matching your board target
- Motor direction test (props OFF!) using motor tab
- ESC protocol set to DShot600 for modern ESCs
- Receiver test – verify all channels respond correctly
- Failsafe setup – critical for flyaways
Maiden Flight Protocol
First flight checklist:
– GPS lock acquired (outdoor flights)
– Battery voltage verified with multimeter
– Props installed correctly (CW/CCW pairs)
– Range test radio at 50 feet before takeoff
– Hover test at 30% throttle for 30 seconds
Pro tip: Start with 3-inch props on a 5-inch frame. This reduces power and makes the drone more forgiving during initial tuning.
Regulatory Compliance
USA Requirements by Weight
| Drone Weight | Requirements | Certification |
|---|---|---|
| <250g | TRUST test, no Remote ID | Recreational only |
| 250g-55lbs | Part 107 or TRUST + Remote ID | Commercial/recreational |
| >55lbs | Part 107 + waiver required | Commercial only |
Remote ID tip: Modern flight controllers include Remote ID modules. Solder to 5V/GND pads, configure in Betaflight—done.
Cost & Performance Breakdown
Complete Build Cost Analysis
Budget 250mm FPV build:
– Frame (SLS Nylon 12): $8
– Motors (4x 2205 2300KV): $60
– ESC (4-in-1 40A): $45
– Flight controller (F7): $60
– Camera + VTX: $80
– Misc hardware: $40
– Total: $293
This outperforms a $600 DJI unit in agility and repairability while teaching you valuable skills.
Advanced Design Techniques
Multi-Material Optimization
Combine Nylon 12 Tough frame arms with TPU 90A landing gear in one print. The rigid arms handle flight loads while TPU gear absorbs hard landings—impossible with traditional manufacturing.
Field Repair Strategy
Print a “crash kit” before your first flight:
– 2x spare arms
– 1x camera mount
– 1x antenna mount
– Various TPU spacers
Store these in your flight bag. When you crash (and you will), repairs take minutes instead of days.
Community Resources
Ready-to-Print Designs
T4 Quadcopter (Thingiverse #2483941):
– 250mm wheelbase
– Full GoPro compatibility
– 51 successful builds documented
– No supports required
TinyTina 90mm (Thingiverse #3728492):
– Comprehensive build guide
– $300 total BOM
– Indoor/outdoor capable
– Perfect first build
Hovership 3DFLY:
– 100mm micro drone
– 100×100mm bed compatible
– Basic soldering skills required
Final Build Tips
Start small. A 90mm indoor build teaches fundamentals without the intimidation factor. Once you’ve mastered soldering, tuning, and crashing (inevitable), scale up to your dream machine.
The beauty of 3D printing drones isn’t just cost savings—it’s the ability to crash, learn, improve, and print again. Each iteration makes you a better pilot and designer. Your third build will fly circles around any off-the-shelf unit while costing half as much.
Ready to start printing? Your spare bedroom just became a drone factory. Print your first frame tonight, and you could be flying your custom creation by weekend. The only thing stopping you from learning how to make a drone with 3D printer is hitting “start” on your slicer software—so what are you waiting for?


