Your drone hovers above a mountain ridge as thousands watch your live stream hit 5,000 concurrent viewers. Suddenly, the feed stutters – the crowd vanishes into buffering circles. This nightmare ends today. Mastering how to live stream from a drone transforms shaky footage into reliable broadcasts for events, security, or viral content. Forget generic tutorials; this guide cuts through the noise with battle-tested workflows verified across DJI’s 2024 lineup. You’ll learn exactly what hardware prevents mid-stream failures, configure platforms for sub-2-second latency, and avoid FAA fines that cripple new streamers.
Whether you’re covering weddings or wildfires, success starts with matching your drone to streaming demands. Skip this step, and even the priciest gear fails when wind hits 10 m/s. Let’s fix that now.
Select a Drone Built for Live Streaming

Must-Have Hardware Features for Uninterrupted Broadcasts
Your drone needs three non-negotiable components: a 3-axis gimbal eliminating vibration blur, 4K/30 fps minimum camera (4K/60 fps preferred), and OcuSync 4.0 or newer transmission. Without these, expect dropped frames when flying beyond 100 meters. Battery life is equally critical – target 30+ minutes per battery to avoid mid-stream crashes. The DJI Air 3 delivers 46 minutes of flight time, while the Mini 4 Pro squeezes 34 minutes into a sub-250g package perfect for travel creators.
Crucially, verify RTMP/RTSP support in firmware settings. Many users discover too late their drone’s software disables these protocols after updates. Always test this pre-flight by attempting to enter custom stream keys in your app.
Top 3 Streaming-Ready Drones Ranked for 2024
DJI Mini 4 Pro ($759) dominates for mobile creators needing portability. Its 4K/60 fps camera and 10km OcuSync 4.0 range work within FAA sub-250g limits. DJI Air 3 ($1,099) is the workhorse for professionals – dual 4K cameras handle vertical/tele shots while 46-minute flight time covers full events. For cinematic projects, Mavic 3 Pro ($2,199) delivers Hasselblad quality with triple lenses, though its weight requires Part 107 certification.
Avoid the trap of choosing based on camera specs alone. The Avata’s ducted design makes it the only safe choice for indoor streaming, while Mavic 3 Classic offers budget-friendly single-camera reliability at $1,599.
Build Your Drone Streaming Field Kit
Power and Storage Essentials That Prevent Mid-Stream Failure
Never rely on two batteries. Pack minimum 4 intelligent flight batteries – 6 for multi-hour events. Pair these with a 20,000 mAh USB-C power bank charging controllers, phones, and hotspots simultaneously. A single drained hotspot kills your stream, so test this chain before takeoff.
ND filters are non-optional for daylight streams. Without ND16-ND32 filters, midday sun blows out highlights instantly. For 60 fps streaming, lock shutter speed at 1/120s using these filters – skipping this violates the 180° rule and creates unnatural motion.
Signal Boosters That Eliminate Buffering Woes
Your internet connection makes or breaks the stream. Invest in a 5G hotspot with dual-SIM failover and external antenna mounts. For fringe areas, add parabolic antenna boosters gaining 2-4 dB signal strength. When streaming exceeds 1km, this prevents the dreaded “buffering” screen.
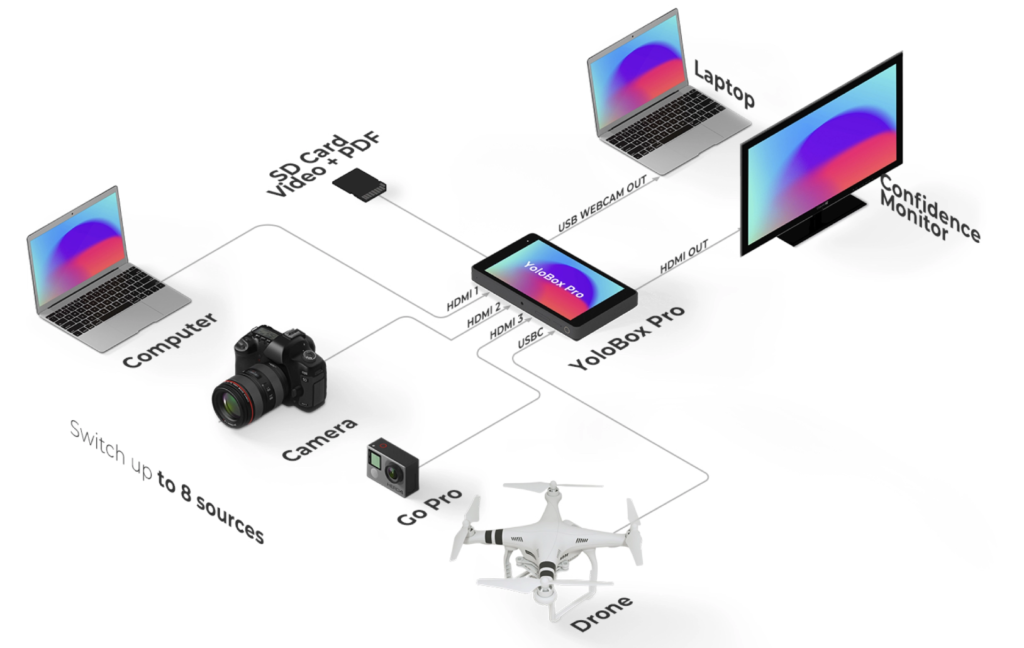
For professional 4K output, carry an Elgato Cam Link 4K. This HDMI capture card enables OBS streaming when using controllers like DJI RC PRO with HDMI output – bypassing the Fly app’s 1080p limit.
Configure Streaming Before Takeoff
Platform Settings That Guarantee Sub-2-Second Latency
Start with platform configuration. Set YouTube or Facebook to 1080p/60 fps at 6-8 Mbps CBR (constant bitrate). Enable ultra-low latency mode – this reduces viewer delay to 1.8 seconds versus standard 6+ seconds. For strong 5G connections, push to 4K/30 fps at 12-15 Mbps, but always have 720p/30 fps as fallback.
Critical step: Paste your RTMP URL and stream key into a notes app before takeoff. Chasing these mid-flight causes rushed errors. Test the connection with a 2-minute hover – verify signal strength stays above -70 dBm and latency under 150ms.
Camera Lockdown Tactics for Broadcast-Quality Footage
Mid-stream exposure shifts ruin streams. Lock white balance at 5600K for daylight or 3200K for artificial light – never use Auto. Set shutter speed to 1/120s for 60 fps streams and ISO ≤ 400 to avoid noise. Apply D-Log M color profile for maximum dynamic range, then use OBS filters to apply LUTs in real-time.
Upload KML flight paths to your controller and set RTH altitude 10 meters above tallest obstacles. Always file LAANC authorization for controlled airspace – getting fined mid-stream isn’t worth the shortcut.
Connect Your Drone Feed Without Buffering
Stream Directly Using DJI Fly App (7-Minute Setup)
For quick social streams, use native RTMP:
1. Open DJI Fly → tap antenna icon → “Live”
2. Select “Custom RTMP” and enter platform URL/key
3. Choose 1080p/30 fps (or 720p for weak signals)
4. Tap “Go Live” and monitor latency overlay
Pro warning: This method caps at 1080p regardless of drone capability. Test thoroughly – firmware updates sometimes disable RTMP access requiring reconfiguration.
Professional 4K Streaming via HDMI and OBS
For events needing overlays or 4K:
1. Connect controller HDMI to Elgato Cam Link 4K
2. In OBS: Add “Video Capture Device” at 1920×1080 60 fps
3. Set encoder to NVENC H.264 CBR 8 Mbps (GPU-accelerated)
4. Route audio through controller line-in for clean sound
This bypasses app limitations but requires DJI RC PRO or RC Plus controllers. Always carry spare HDMI cables – coiled 1.5m versions prevent tangles mid-stream.
Avoid Legal Disasters and Safety Risks
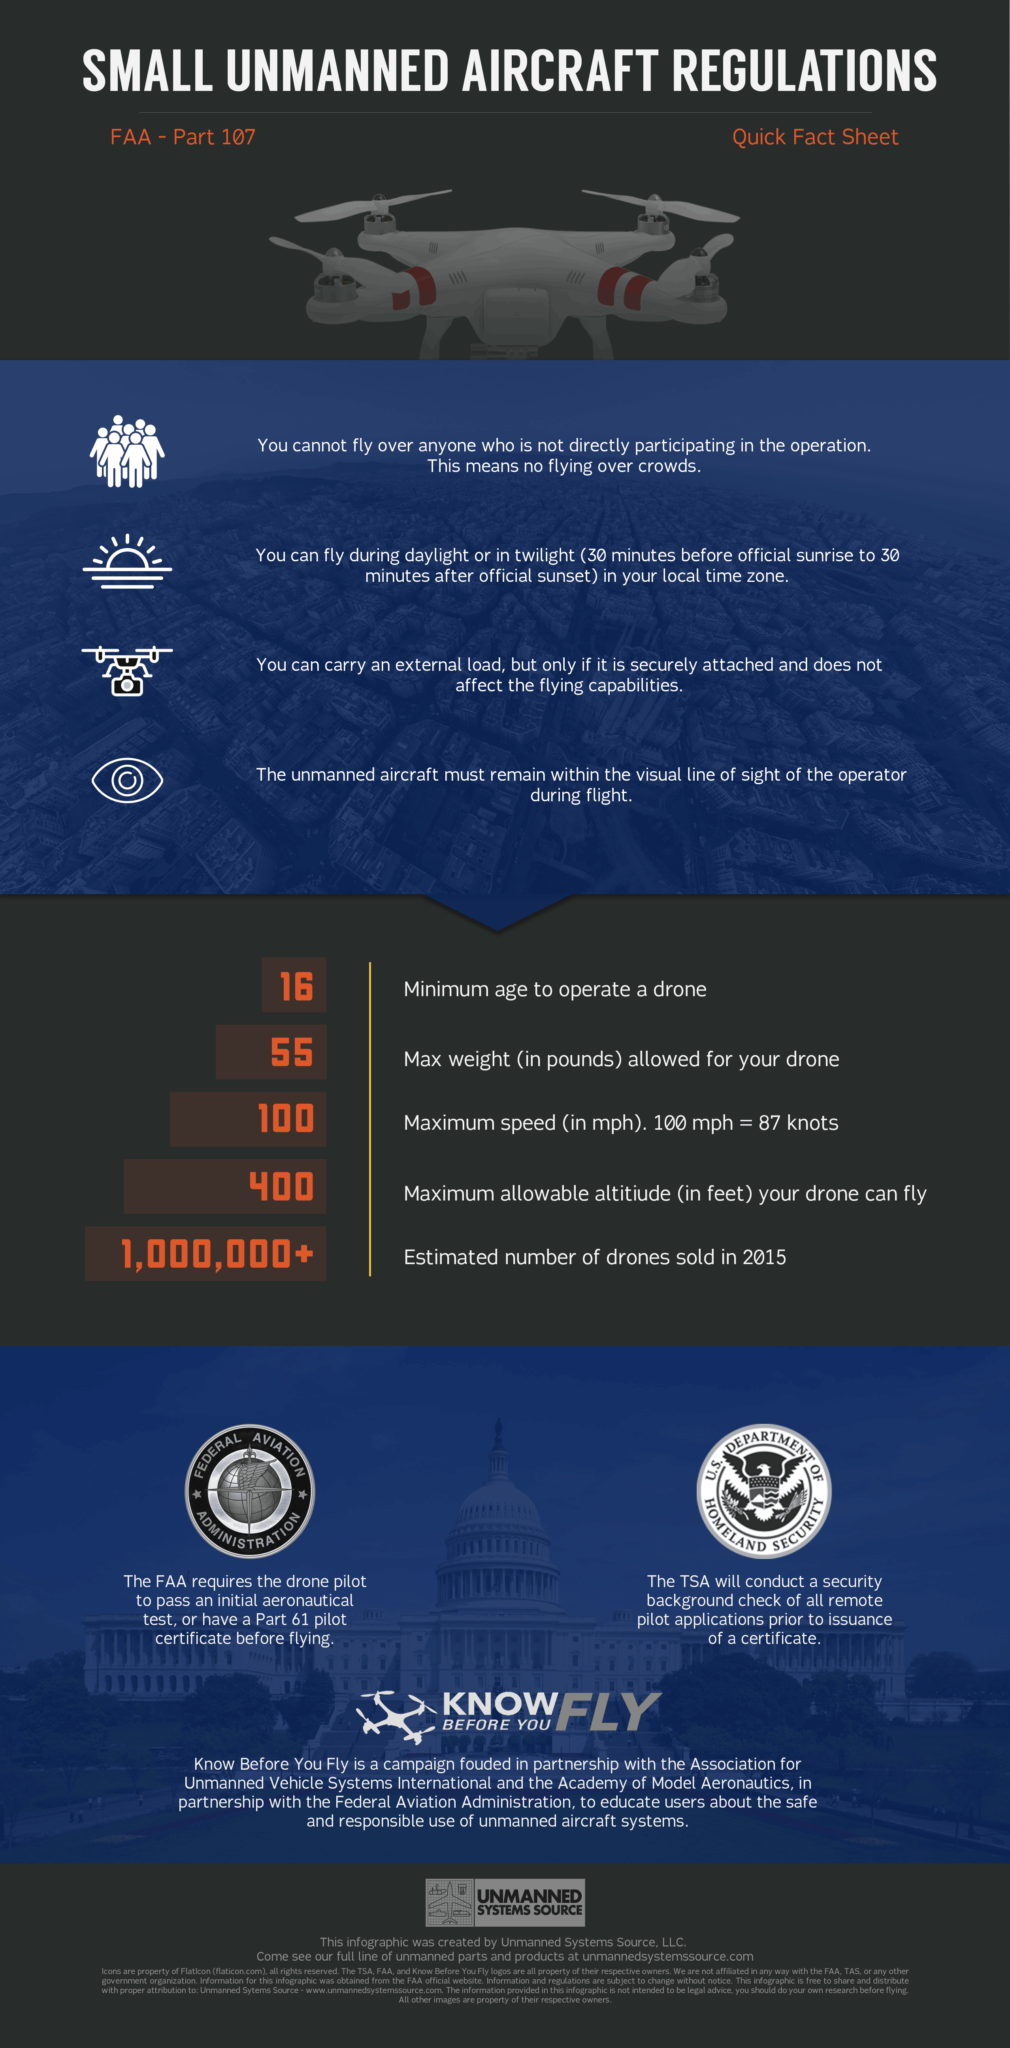
License Requirements That Prevent $32,666 FAA Fines
Commercial streaming demands Part 107 certification in the US or EU Open category licensing. Recreational use requires the free TRUST test, but monetized streams count as commercial. Crucially, streaming itself needs no broadcast license – but selling footage triggers media regulations.
Red flag: Flying within 5 miles of airports without LAANC authorization risks immediate fines. Always check NOTAMs pre-flight using the B4UFLY app.
Privacy Consent Tactics That Stop Lawsuits
GDPR fines hit €20 million for mishandling EU viewer data. Always:
– Obtain written consent from property owners
– Display visible “LIVE” indicators on ground stations
– Avoid capturing faces/license plates without releases
For crowd events, position your drone at 120m altitude – this naturally anonymizes individuals while complying with FAA height limits.
Fix Streaming Emergencies Mid-Flight
Stop Stuttering and Frame Drops in 60 Seconds
When viewers report buffering:
1. Drop resolution to 720p/30 fps immediately
2. Enable adaptive bitrate in platform settings
3. Switch from CPU to NVENC encoding in OBS
This reduces bandwidth needs by 40%. If wind exceeds 10 m/s (Mini 4 Pro limit), land immediately – no stream is worth a crash.
Correct Overexposure Without Landing
Blown-out skies destroy streams. If you forgot ND filters:
1. Lock shutter speed at 1/120s
2. Lower ISO to 100
3. Tilt camera downward 15 degrees to use terrain as shade
This buys 2-3 minutes of usable footage while you land to install filters. Never fly toward the sun – it overwhelms sensors instantly.
Indoor and FPV Streaming Protocols
Safe Indoor Streaming Setup for Confined Spaces
Indoor streams require radical adjustments:
– Reserve 6×6 meter minimum clearance
– Mandatory propeller guards (Avata’s ducted design excels here)
– 500+ lux LED lighting to prevent fluorescent flicker
– Optical flow sensors enabled for precise hovering
Always use a spotter with physical kill switch – one wall collision costs more than your entire stream revenue.
Minimize FPV Latency for Real-Time Control
DJI Goggles 2 introduce 30-40ms latency – acceptable for most streams. For critical timing like racing:
– Set OBS sync offset to +200ms
– Enable low-latency mode in platform settings
– Record onboard simultaneously as backup
This ensures your live feed matches the drone’s actual movements, preventing disorientation during complex maneuvers.
Final Pre-Stream Checklist You Must Complete
– [ ] Firmware updated on drone, controller, and batteries
– [ ] Stream key tested with 2-minute hover
– [ ] ND filters matched to lighting conditions
– [ ] LAANC authorization filed for controlled airspace
– [ ] Spotter assigned with visual line of sight
Live streaming from a drone separates amateurs from professionals when executed correctly. Start with DJI Fly app streams to master fundamentals, then progress to HDMI/OBS workflows for 4K broadcasts. Remember: consistent success comes from treating your drone as a broadcast rig, not a toy. Update this checklist before every flight, and your streams will deliver the cinematic reliability your audience demands. When wind hits 12 m/s or batteries dip below 25%, land immediately – no viral moment is worth a crash. Now power up, stream smart, and watch your audience grow with every frame.


