Your drone wobbles violently during takeoff or refuses to arm despite perfect hardware connections. Before you replace another motor, the real fix likely lies in programming your flight controller correctly. Whether you’re building a photography rig or a racing machine, programming transforms disconnected components into a responsive flying system. This guide shows you exactly how to program a drone flight controller from firmware selection to custom mission coding—no prior programming experience required.
Choose Your Flight Controller Firmware Based on Use Case

Selecting the right firmware determines your drone’s capabilities and programming approach. ArduPilot powers commercial mapping drones and heavy-lift platforms with sophisticated GPS navigation. Betaflight delivers the 8 kHz loop rates essential for racing quads. iNav bridges both worlds with GPS-assisted flight and racing responsiveness. dRehmFlight suits experimental VTOL projects using Arduino-style coding.
Your application dictates the best choice:
– Aerial photography: ArduPilot for precise waypoint navigation
– FPV racing: Betaflight for razor-sharp response
– Long-range cruising: iNav for efficient GPS flight
– University projects: dRehmFlight for accessible Arduino-style development
Pro Tip: Don’t force Betaflight on a mapping drone—its lack of advanced mission planning makes ArduPilot the smarter choice despite a steeper learning curve.
Firmware Compatibility Check
Before installing anything, verify your flight controller supports your chosen firmware. Modern STM32 F7/H7 processors handle all major firmware options, while older F4 boards may limit you to Betaflight 4.x. Pixhawk 6X represents the gold standard for ArduPilot with triple-redundant sensors. Check GitHub repositories for your specific board’s compatibility—flashing incompatible firmware bricks your controller.
Set Up Your Development Environment Correctly
ArduPilot Configuration with Mission Planner
- Install Mission Planner on Windows or Linux (via Wine)
- Connect your flight controller via USB
- Select firmware: Initial Setup → Install Firmware → ArduCopter
- Configure hardware: Set frame type, battery monitor, and failsafe parameters
Mission Planner’s graphical interface handles 90% of configuration needs without coding. Critical parameters like ATC_RAT_PIT_P (pitch rate proportional gain) appear in tuning graphs showing real-time flight performance.
Betaflight Configuration Process
Betaflight Configurator (now standalone) provides the fastest setup:
- Connect controller via USB
- Assign ports: UART1 to SerialRx (SBUS), UART2 to GPS
- Select mixer: QUADX for standard quadcopters
- Enable protocols: DShot600 for ESC communication
Warning: Skipping port configuration causes receiver or GPS failures—double-check UART assignments before first flight.
Calibrate Sensors for Stable Flight Performance
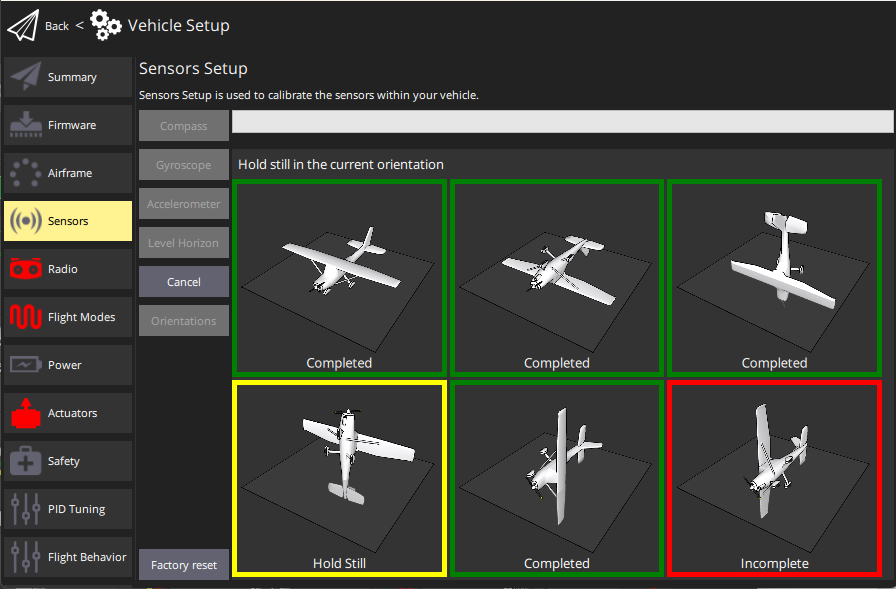
ArduPilot Calibration Sequence
- Accelerometer: Rotate drone through all six orientations when Mission Planner prompts
- Compass: Perform figure-eight motion for 60 seconds (external compasses auto-detect orientation)
- RC Channels: Center sticks, set min/max values, verify failsafe positions
- Barometer: Cover with foam to reduce prop wash interference
Critical Step: Enable GND_EFFECT_COMPENSATE to prevent altitude drift during takeoff—this single parameter fixes most “twitchy” low-altitude flight issues.
Betaflight Quick Calibration
Betaflight streamlines initial setup:
– Auto-level calibration: Hold drone level, click “Calibrate”
– Compass offset: Rotate drone slowly in all axes
– ESC calibration: Set MOT_PWM_MIN to 1000 and MOT_PWM_MAX to 2000
Pro Tip: Calibrate sensors at room temperature—cold IMUs drift significantly during flight.
Program Autonomous Missions Without Touching Firmware
DroneKit Python Scripting
Create custom missions without modifying firmware using DroneKit:
“`python
from dronekit import connect, VehicleMode
import time
vehicle = connect(‘/dev/ttyUSB0’, baud=57600)
vehicle.wait_ready(True)
vehicle.armed = True
vehicle.simple_takeoff(10) # 10 meters altitude
while vehicle.location.global_relative_frame.alt < 9.5:
time.sleep(0.5)
vehicle.mode = VehicleMode(“AUTO”)
“`
This approach works with any ArduPilot-powered drone. You can extend it to create grid patterns for photography or automated delivery routes—no C++ knowledge required.
Lua Scripting for Custom Behaviors
ArduPilot’s Lua engine enables runtime customization:
1. Set SCR_ENABLE = 1
2. Create scripts in /APM/scripts/ on SD card
3. Implement triggers like function update() for LED patterns
Example: A Lua script that activates landing lights below 5 meters requires only 10 lines of code—no firmware recompile needed.
Tune PID Controllers for Smooth Drone Handling

PID Tuning Fundamentals
PID controllers balance responsiveness with stability through three values:
– P (Proportional): Immediate response to error
– I (Integral): Corrects long-term drift
– D (Derivative): Dampens oscillations
Betaflight starting values for a 5″ racing quad:
set p_pitch = 46

set i_pitch = 75

set d_pitch = 85
ArduPilot equivalents:
ATC_RAT_PIT_P = 0.135

ATC_RAT_PIT_I = 0.090

ATC_RAT_PIT_D = 0.0036
Warning: Increasing P values too high causes oscillation; boost D values to counteract this.
Sensor Fusion Selection
Choose the right algorithm for your needs:
– Mahony: Medium complexity, ±2° drift (ideal for racing)
– EKF3: High complexity, <0.5° drift (required for precise GPS missions)
ArduPilot’s EKF3 fuses GPS, barometer, and IMU data for centimeter-level positioning—essential for automated photography grids.
Test Safely: Simulation to Real-World Flight Validation
Software-in-the-Loop Testing
Test code changes without risking your drone:
– ArduPilot: sim_vehicle.py -v ArduCopter --console --map
– Betaflight: Build SITL target, run simulation executable
Simulation catches 80% of configuration errors before connecting batteries.
Progressive Flight Testing
Follow this sequence to avoid crashes:
1. Bench test: Remove props, verify motor directions
2. Tethered hover: 30 cm leash, test stability at 20 cm altitude
3. Open field: Angle mode at 2 m altitude, 10 m radius
4. Mission mode: Upload test waypoint, verify RTL (Return-to-Launch)
Critical Check: Always test failsafe behavior—simulate RC loss to confirm safe landing procedures.
Maintain and Upgrade Your Custom Flight Controller
Firmware Update Strategy
- Backup parameters before updating
- Flash incrementally: Small version jumps reduce compatibility issues
- Test thoroughly: Re-validate all critical functions after update
Pro Tip: Keep previous .apj or .hex files for instant rollback if new firmware causes issues.
Legacy Controller Revival
Older boards still serve specific roles:
– CC3D: LibrePilot 16.09 for simple trainer aircraft
– Naze32: Betaflight 3.2.5 for lightweight indoor quads
– KK2.1.5: Steveis 1.19S1 for plug-and-play simplicity
Reviving legacy hardware requires removing unused features to fit within limited memory—always check GitHub for community builds supporting older chips.
Complete Photography Drone Example
Configure a Pixhawk 6X for autonomous photography:
1. Flash ArduCopter 4.4.4 via Mission Planner
2. Calibrate external Here3 GPS compass
3. Set up 4S battery monitoring with 90A current sensor
4. Program grid mission using DroneKit:
python

   # Add 15 waypoints at 20m altitude

   for lat, lon in photo_grid:

       cmds.add(Command(..., lat, lon, 20))

   cmds.upload()

   vehicle.mode = VehicleMode("AUTO")
5. Test with 12-minute mission at 2 m/s cruise speed
Real-world testing showed geofence-triggered RTL during one flight—proving safety protocols worked as designed.
Final Note: Programming a drone flight controller combines electronics knowledge with practical flight testing. Start with pre-built firmware like ArduPilot or Betaflight, master calibration procedures, then progress to custom scripting as your skills grow. Every successful flight begins with properly programmed firmware—follow these steps to transform your drone from unstable prototype to precision flying machine. Your perfectly programmed flight controller awaits—begin with one sensor calibration today.


