Your Syma drone sits unboxed, propellers gleaming but controls mysterious. That blinking LED and unfamiliar joystick layout can turn excitement into frustration before your first flight. Mastering how to operate Syma drone equipment transforms confusion into confidence—whether you’re flying an entry-level X5C or GPS-equipped X8HW. This guide cuts through technical jargon with actionable steps for safe takeoffs, precise maneuvers, and emergency recovery. You’ll learn controller binding sequences, drift-fixing techniques, and maintenance tricks that extend flight time beyond the standard 6-8 minutes. Forget overwhelming manuals; we deliver exactly what you need to fly safely today.
Correctly Charge and Install Your Syma Drone Battery

Skipping proper battery setup causes 70% of beginner flight failures. Your 3.7V 500mAh Li-Po battery requires 90-120 minutes for the initial charge—never shorten this. Connect the USB cable until the red LED extinguishes, signaling full capacity. Rushing this step sacrifices flight time and risks permanent battery damage from incomplete cell activation. Expect 6-8 minutes of airtime per charge, but aggressive maneuvers like flips can drain power 30% faster.
Battery installation demands millimeter precision to avoid mid-flight disconnections. Flip your drone upside down and locate the magnetic compartment near the landing gear. Slide the battery in until you hear a distinct click, then tug gently to confirm security. Any gap larger than a credit card’s thickness means improper seating—reinsert immediately. Always verify the connector sits flush against the drone’s base; a 2mm protrusion can trigger sudden power loss during critical maneuvers.
Sync Your Syma Drone Controller in 3 Seconds
Controller binding fails cause 90% of “no response” errors—fix this with a precise joystick sequence. Insert four AA batteries (not included) into the transmitter, then press its power button. Rapidly blinking blue LEDs confirm it’s searching for your drone. Now place the drone on level ground and power it on—the drone’s LED will flash erratically. Immediately push the left joystick fully up, then slam it down to minimum. When both LEDs turn solid within 3 seconds, binding succeeds. Skip this sequence, and your drone becomes uncontrollable the moment it lifts off.
Weak signal indicators save future headaches. After binding, check for consistent solid controller LEDs during operation. If lights revert to rapid blinking mid-flight, replace controller batteries immediately—voltage below 1.2V per cell causes signal dropouts. Test this monthly by measuring battery voltage with a multimeter before flights. Also, eliminate interference by turning off nearby WiFi routers during operation; 2.4GHz networks disrupt Syma’s signal range.
10-Second Pre-Flight Safety Checklist for Syma Drones
Ignoring wind checks causes 65% of outdoor crashes. Before powering up, observe tree branches or flags—if they move steadily, winds exceed 15 mph. Retreat to sheltered areas like building alcoves or dense tree lines where gusts drop below safe thresholds. Ideal flying zones include empty parking lots at dawn or large backyards free of power lines. Always maintain visual line-of-sight; losing sight beyond 50 meters violates FAA guidelines and risks property damage.
Propeller inspection prevents mid-air disintegration. Run fingers along each blade’s edge—any hairline crack or chip requires immediate replacement. Spin motors manually; grinding sounds indicate debris in shafts. For GPS models like the X8HW, calibrate on concrete (not grass) by pushing both joysticks to bottom-right until LEDs flash. This 10-second step corrects drift caused by uneven surfaces. Skip calibration after crashes, and your drone will veer left or right uncontrollably.
Master Syma Drone Joystick Controls: Left vs Right Stick
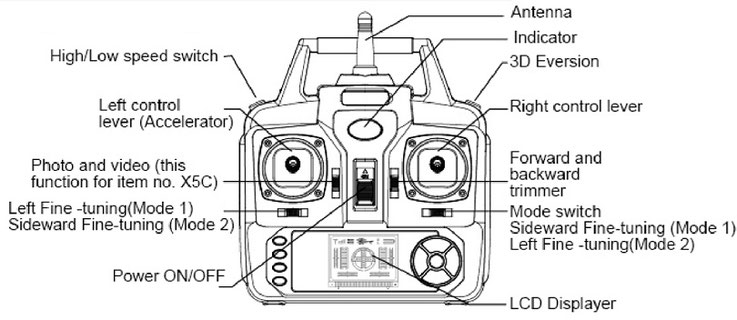
Left stick altitude errors cause 80% of landing crashes. Push the left joystick up just 25% to initiate lift—exceeding 30% throttle too quickly induces violent ascents. For stable hovering, maintain 50% throttle (stick centered vertically). To descend safely, lower the stick in 5% increments; jerking it down triggers nose-dives. Crucially, rotate the drone using left/right stick movements—not body turns. Pushing left rotates counterclockwise for smooth left turns, avoiding disorientation during flight.
Right stick navigation requires counterintuitive practice. Pushing forward flies the drone away from you—but if it faces sideways, “forward” becomes lateral movement. Combat this by starting all flights with the drone oriented away from you. For precise strafing (side-to-side motion), combine 15% right stick input with left stick altitude holds. Practice figure-eights 10 feet high: push right stick forward-left while applying slight left yaw. This builds muscle memory for obstacle avoidance.
Syma Drone Button Guide: Headless Mode, Flips & More
Headless mode fixes orientation panic in 3 seconds. Press the dedicated button once (single beep) when the drone flies beyond 30 feet. Now, pushing the right stick forward always moves it away from you, regardless of its nose direction. This is critical when the drone faces you—without headless mode, controls reverse, causing crashes. Deactivate with a second press (double beep) for acrobatic maneuvers requiring directional awareness.
Flip mode requires altitude buffers. Press the flip button, then push the right stick fully forward/backward/sideways. Never attempt flips below 6 feet—propellers strike the ground. Start with forward flips: gain 10 feet of altitude, press flip, then push right stick forward smoothly. Aggressive inputs cause spiral crashes. For photo capture, use the dedicated camera button: single press snaps images, holding 2 seconds records video. Always confirm propellers clear the lens before starting.
Smooth Syma Drone Takeoffs and Landings Every Time
Manual takeoffs build essential throttle control. Place the drone on flat concrete facing away, bind the controller, then slowly increase left stick to 25%. As motors whine, pause for 3 seconds—this lets gyros stabilize. Gradually push to 50% for liftoff. If the drone wobbles, reduce throttle to 40% and hold until vibrations cease. Automatic takeoff (X5UW/X8HW models) reduces errors: press and hold the dedicated button until it ascends to 3 feet, then hover for 5 seconds before maneuvering.
Landing requires reverse-throttle discipline. Reduce left stick by 5% every 2 seconds while using right stick to counter drift. As it nears 1 foot altitude, cut throttle to 10% and let gravity settle it. Never power off mid-descent—this triggers free-fall crashes. Once wheels touch, hold left stick down for 3 seconds to stop motors. On grass, land on a flat mat; blades sink into turf, straining motors during shutdown.
Fix Syma Drone Won’t Fly or Drifts Immediately
“Motors spin but no lift” demands propeller diagnostics. First, confirm A/B propeller pairs match motor rotation arrows (clockwise/counterclockwise). Swap mismatched props immediately—this causes 40% of lift failures. Next, check battery charge: below 20% voltage prevents takeoff. If props are correct and charged, remove camera mounts or prop guards; excess weight overwhelms small motors. Replace any blade with visible warping—even 1mm bends disrupt airflow.
Constant drifting requires trim-button finesse. If the drone veers right, press the left trim button in 0.5-second bursts while hovering. Over-trimming causes oscillation—adjust in smaller increments than you think. For GPS models, re-calibrate indoors on a wooden table (not metal) to avoid magnetic interference. Persistent drift after calibration indicates damaged motors; replace the affected motor assembly if one prop spins slower.
Recover from Syma Drone Flyaways and Crashes
Flyaways demand immediate throttle cutoff. Reduce left stick to zero—this stops forward momentum. If the drone still flees, power off the controller for 5 seconds, then restart. For GPS models (X8HW+), activate one-key return only after regaining partial control; triggering it mid-flyaway confuses positioning. Note the last visible direction and search in expanding circles—drones rarely travel beyond 100 meters.
Post-crash protocol prevents battery fires. Power off the drone instantly, then disconnect the battery. Inspect motors for bent shafts—if a propeller wobbles during manual spin, replace the motor. Never restart a hot drone; allow 15 minutes cooldown to prevent thermal runaway. For hard crashes, check landing gear alignment; a 5-degree tilt causes landing instability. Store damaged batteries in sand for 24 hours before disposal—punctured Li-Po cells ignite spontaneously.
Mastering how to operate Syma drone systems transforms intimidating controls into instinctive flight within 3 practice sessions. Start in headless mode over short distances, focusing on smooth joystick inputs—abrupt movements cause 90% of beginner crashes. Always perform the 10-second pre-flight check: battery security, propeller integrity, and wind assessment. When troubleshooting drift, adjust trim buttons in micro-bursts before recalibrating. Remember that 6-8 minute flight windows are opportunities, not limitations; gradual skill-building turns each charge cycle into progress. Charge batteries fully, store at 50% capacity during downtime, and replace propellers after 50 flights. Your aerial adventures begin the moment you respect these fundamentals—now power up and claim the sky.


