Your octocopter drone build delivers unmatched lift capacity and critical motor redundancy—essential when carrying expensive cameras or operating in remote areas. Unlike quadcopters, eight motors maintain controlled flight even after a single motor failure, providing vital safety margins. This guide reveals exactly how to make an octocopter drone that lifts a 280g Panasonic GX-1 camera for 21 minutes using proven components and configurations. You’ll learn the frame choices, wiring tricks, and firmware tweaks that transform raw parts into a professional-grade aerial platform.
Forget theoretical designs—this process is battle-tested. A Swedish builder successfully flew this exact V-frame octocopter in 2015-2016, achieving 2.836 kg maximum takeoff weight with stable hover times. Whether you’re capturing cinematic footage or hauling survey gear, these steps prevent costly mistakes during your build. Let’s get your eight-rotor machine airborne safely.
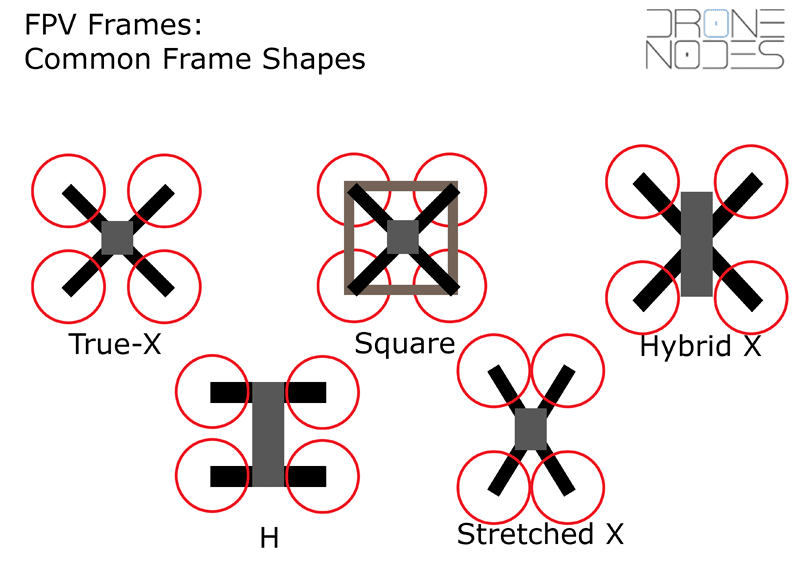
Choose Between V-Frame and Symmetrical X8 Layouts
Why V-Frame Geometry Requires Custom Code for Camera Work
The AscTec Falcon 8-inspired V-frame positions motors at 14° angles, creating unobstructed forward visibility for camera gimbals. But this patent-protected design demands ArduPilot source code modifications—you can’t fly it with stock firmware. When building this octocopter drone, you’ll replace the default motor mixing table in AP_MotorsMatrix.cpp with custom roll/pitch factors. Motors 1 & 7 need ±1.0 roll and ±1.0 pitch values, while motors 4 & 8 require ±0.5 roll and ∓1.0 pitch to maintain torque balance. Expect to spend 45 minutes editing and recompiling code using make px4-v2-octa before flashing.
X8 Symmetrical Layout: Plug-and-Play Simplicity for First Builds
Skip coding headaches by choosing the coaxial X8 configuration. Motors align directly opposite each other horizontally, allowing standard “Octocopter X8” firmware in Mission Planner—no source code edits needed. This layout uses identical propellers on all arms, simplifying spare parts inventory. First-time builders gain immediate flight capability while still lifting 2.8 kg payloads. The trade-off? Reduced front camera visibility due to overlapping prop arcs. If your priority is reliability over perfect sightlines, the X8 frame cuts assembly time by 3+ hours.
Source Proven Components for 2.8 kg Payload Capacity
Don’t gamble with untested parts. Your octocopter drone requires these exact components to replicate the 21-minute hover time:
- Motors: T-Motor MT2208-18 (1100kV) handling 260W max on 3-4S batteries
- ESCs: Afro Slim 20A with BLHeli/SimonK firmware pre-flashed
- Props: T-Motor 9×3 carbon-reinforced blades (balanced to 0.1g tolerance)
- Battery: Multistar 4S 10,000mAh (25-50C burst) as the main power source
- Flight Controller: HKPilot32 (Pixhawk 1 clone) running ArduCopter
Crucially, use a separate 3S 460mAh LiPo for video systems. Wiring the OSD and transmitter to your main battery causes voltage spikes that crash flight controllers mid-flight. The 4S 10,000mAh pack must deliver 14V during hover—anything below 13.6V triggers premature low-voltage alarms.
Wire Your Octocopter’s Power Distribution Correctly

Main Battery Circuit: 4S 10,000 mAh to 8 ESCs
Connect components in this exact sequence:
1. XT90 connector from 4S battery → power module
2. Power module → PDB (power distribution board)
3. PDB → 8× ESC inputs (20A each)
4. PDB 5V/3A BEC → flight controller’s power port
Pro Tip: Solder ESC ground leads directly to the flight controller’s signal ground pin. This creates a noise-reduction path that prevents erratic compass readings. Check for <0.1G vibration on all axes using Mission Planner’s HUD before flying.
Isolate Video Circuits to Prevent Flight System Noise
Dedicate your 3S 460mAh pack solely to video:
– Battery → step-down voltage regulator → OSD board
– OSD video input → camera feed
– OSD video output → transmitter
This physical separation stops 5.8GHz video noise from corrupting GPS signals. Never power video equipment from your main flight battery—a single voltage sag could disable both systems simultaneously.
Flash Firmware for X8 or Modify Code for V-Frame
One-Click X8 Setup in Mission Planner (No Coding)
For symmetrical X8 frames:
1. Install Mission Planner on Windows
2. Connect flight controller via USB
3. Select Firmware > Octocopter X8
4. Click Load Firmware and wait for completion
This takes 90 seconds. The stock firmware handles motor mixing automatically—no coding required. Confirm correct setup by checking the Motor Test tab shows motors 1-8 spinning in sequence.
Edit ArduPilot Source for V-Frame Motor Mixing
V-frame builders must modify code:
1. Clone ArduPilot repository: git clone https://github.com/ArduPilot/ardupilot.git
2. Checkout stable version: git checkout Copter-3.3.1
3. Edit AP_MotorsMatrix.cpp with custom values:
– Motors 1 & 7: Roll ±1.0, Pitch ±1.0
– Motors 2 & 6: Roll ±1.0, Pitch ±0.835
4. Compile with make px4-v2-octa
5. Flash via Mission Planner’s Firmware tab
Warning: Incorrect values cause violent flips during first flight. Verify all 8 motors spin in the correct CW/CCW pattern before attaching props.
Assemble Your Octocopter Frame in 5 Critical Steps
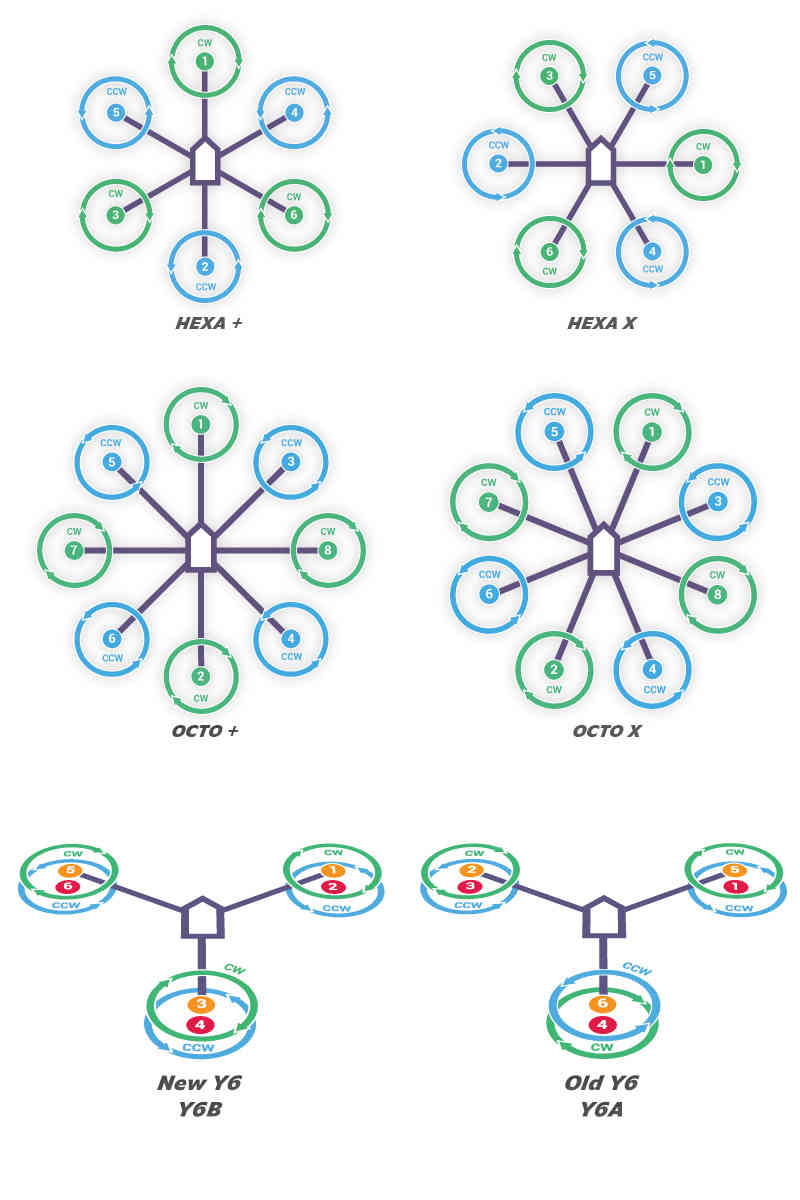
Mount Motors with Correct Rotation Order to Cancel Torque
Install motors in this sequence to prevent yaw drift:
1. Front V-arms: Motor 1 (top-left, CW), Motor 2 (top-right, CCW)
2. Rear V-arms: Motor 7 (bottom-left, CCW), Motor 8 (bottom-right, CW)
3. Middle arms: Alternate CW/CCW around the frame
Apply Loctite 243 to all motor screws—vibration loosens standard threads within 10 flights. Route wires inside carbon booms to reduce drag and prevent snags.
Vibration-Isolate Flight Controller with Gel Dampeners
Mount the flight controller on Kyosho Zeal gel pads:
1. Attach double-sided tape to frame center
2. Press gel pads onto tape (2mm thickness)
3. Secure flight controller to gel
This absorbs high-frequency vibrations that corrupt IMU sensors. Test by powering motors at 30% throttle—Mission Planner’s vibration graph should stay below 0.1G on all axes.
Execute Your First Flight Safety Checklist
Pre-Flight Motor Test Without Props
Never skip this step:
1. Remove all propellers
2. Arm motors via transmitter
3. Open Motor Test tab in Mission Planner
4. Verify each motor spins in correct direction:
– Motors 1, 4, 5, 8: Clockwise (CW)
– Motors 2, 3, 6, 7: Counter-clockwise (CCW)
If any motor spins backward, reverse two of its ESC-to-motor wires.
Tune PID Gains After Initial Hover Test
On your first flight:
1. Hover at 1m altitude for 30 seconds
2. Activate Autotune flight mode on calm days
3. If the drone climbs during yaw turns, reduce ATC_RAT_YAW_P by 20%
4. Review logs in Mission Planner to adjust notch filters
Critical: Tune yaw gains first—excessive values cause “rocket climbs” that crash new builds.
Fix Common Octocopter Flight Issues in Minutes
| Symptom | Immediate Fix |
|---|---|
| Violent flips on takeoff | Recheck motor spin order in Motor Test tab |
| Persistent oscillations | Balance props with tape; reduce Roll P-gain by 15% |
| Hover time under 15 minutes | Switch to 8×4 props; check battery voltage sag |
| Yaw-induced altitude gain | Decrease ATC_RAT_YAW_P parameter in Mission Planner |
If flight time drops below 18 minutes with a 10,000mAh pack, your octocopter drone is likely over-propped. Install smaller 8×3.8 props to reduce current draw—this typically adds 3-5 minutes of flight time.
Maintain Your Octocopter for 100+ Flights
Torque-check all screws every 10 flights using a 0.7Nm wrench—vibration loosens connections faster than you’d expect. Monthly, spin each motor by hand while listening for grinding bearings; replace any unit with detectable play. After crashes, recalibrate the compass by rotating the drone along all three axes. Store LiPos at 3.8V/cell and cycle them every 90 days to prevent capacity loss. Always backup flight parameters before firmware updates—a single bad flash can brick your controller.
Skip Coding with These Alternative Flight Controllers
If ArduPilot modifications intimidate you, switch to plug-and-play solutions:
– DJI A3 Pro: GUI-based motor mixer with camera stabilization
– LibrePilot: Built-in V-octocopter profiles (no source editing)
– KDE Direct UAS: Proprietary tuning tools for heavy payloads
These systems cost 25-40% more but save 5+ hours of coding and debugging. For professional operators prioritizing flight time over tinkering, they’re worth the investment.
Your octocopter drone build delivers professional results when you follow these exact specifications. The V-frame excels for cinematography with its clear forward sightlines, while the X8 layout offers reliability for beginners. Either configuration handles 2.8 kg payloads with motor-failure redundancy—critical when flying expensive gear over inaccessible terrain. Start with the symmetrical X8 if you’re new to multirotors, then graduate to custom V-frame builds once you master the fundamentals. Now power up your flight controller and make that first hover count.


