Your drone’s powerful rotors transform innocent grass patches into debris launchpads every time it lands. Those swirling blades send dirt, pebbles, and grass flying straight into sensitive motors and camera gimbals—potentially causing hundreds in repair costs. Creating a custom landing zone isn’t just convenient; it’s critical protection that costs less than a single propeller replacement. Whether you’re flying a DJI Mini 3 or professional-grade equipment, learning how to make a drone landing pad ensures your investment stays safe while giving you a consistent, professional-looking launch zone. This guide reveals budget-friendly methods using household materials, so you can build reliable protection for under $10 in under an hour.
Select Your Optimal Landing Pad Design
Commercial vs DIY: Value Comparison
Pre-made landing pads offer weatherproof nylon and weighted edges but come with premium pricing—basic STARTRC models start at $17 for 22×22 inch double-sided pads. Professional Hoodman versions cost $40-$429 depending on size, featuring integrated ballast for windy conditions. While commercial pads deliver instant convenience, DIY alternatives provide identical core protection at virtually zero cost. Key differentiator: Commercial pads excel for frequent business use where professional appearance matters, while DIY solutions shine for hobbyists needing quick, customizable protection. Most pilots save $15-$400 by crafting their own version without sacrificing functionality.
Precise Sizing for Your Drone Model
Skip oversized commercial pads—most camera drones need only 24 inches of landing space. Measure your drone’s diagonal width (from motor to opposite motor), then add 12 inches on all sides for safety margins. Critical sizing guide: DJI Mini series drones thrive on 18-inch pads, while Mavic Air 2 or Phantom models require 24-30 inch surfaces. Larger pads create unnecessary bulk during transport without improving safety. Remember: A 30-inch square provides ideal coverage for 95% of consumer drones while remaining backpack-friendly.
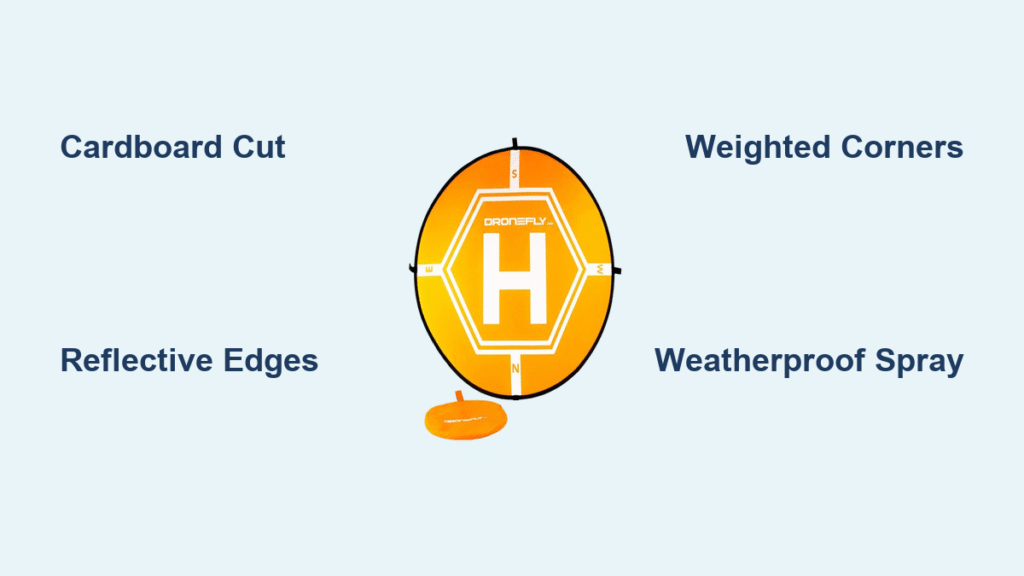
Build a Cardboard Landing Pad in 4 Steps

Essential Materials Checklist
Gather these household items before starting:
– Large cardboard sheet (appliance box panels work perfectly)
– Sharp utility knife (for precise cuts—scissors create ragged edges)
– Bright acrylic paint (orange or yellow for maximum visibility)
– Reflective tape (safety vests or bike tape work great)
– Measuring tape (ensure symmetrical 24×24 inch dimensions)
– Anchor weights (small rocks or books for temporary use)
Step-by-Step Construction Process
Step 1: Cut a perfect 24×24 inch square from cardboard using measured guidelines. Score edges lightly with a knife before full cuts to prevent tearing. Pro tip: Round corners slightly to reduce wind catching during landings.
Step 2: Paint a bold “H” pattern in the center with contrasting colors—this creates visual landing guides while adding professional flair. Allow 20 minutes drying time between coats.
Step 3: Apply reflective tape strips along all edges. This prevents tripping hazards and makes your pad visible during twilight flights when natural light fades.
Step 4: Punch small holes 1 inch from each corner. Thread zip ties through these anchor points to secure the pad with tent stakes or heavy objects.
Effective Weatherproofing Techniques
Cardboard fails instantly in rain without protection. Solution: Spray both sides with three light coats of clear acrylic sealer (10 minutes between coats). This creates a water-resistant barrier while maintaining rigidity. For impromptu rain protection, keep a plastic grocery bag in your drone kit—drape it over the pad and weigh corners with rocks. Always store your cardboard pad flat between flights to prevent warping that causes unstable landings.
Craft Professional-Grade Fabric Pads
Waterproof Nylon Construction
Materials needed:
– Recycled nylon fabric (old tents or backpacks work perfectly)
– Fabric paint markers (permanent for outdoor durability)
– Grommet kit ($5 at hardware stores)
– Nylon cord (for anchoring)
Cut a 30×30 inch square from waterproof material. Fold edges 1 inch twice and stitch to prevent fraying—this doubles pad longevity. Install grommets at 2-inch intervals along all edges for secure anchoring. Paint concentric circles using fabric markers: a 6-inch inner circle for precision landings, surrounded by 12-inch and 24-inch rings. Total time investment: 45 minutes with $8 in materials if repurposing old gear.
Built-In Weighting System
Sew a 2-inch wide channel around the pad’s perimeter using scrap fabric. Fill with clean sand (1.5 pounds total) through small openings, then hand-stitch closed. This creates commercial-grade wind resistance without $40 price tags. Critical adjustment: Distribute weight evenly—test by lifting one corner; if it sags more than 1 inch, redistribute contents. This weighted edge prevents dangerous pad flips during takeoff that could send your drone into obstacles.
Optimize Pad Placement and Security
Strategic Location Selection
Your landing pad’s effectiveness hinges on placement. Always choose the flattest surface available—even 5-degree slopes cause unstable landings and potential tip-overs. Avoid loose gravel or tall grass that could interfere with downward sensors. Concrete provides ideal smoothness but becomes dangerously hot above 90°F; grass cools landing gear but requires short mowing. Minimum clearance rule: Maintain 10 feet between your pad and any obstacles (trees, buildings, power lines) to allow recovery space during wind gusts.
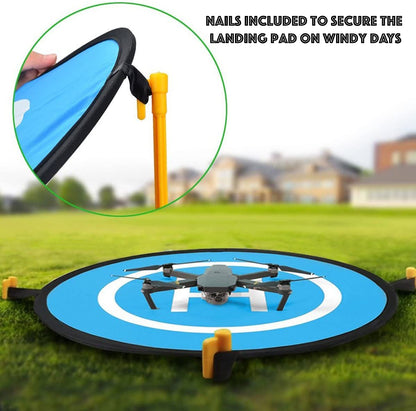
Reliable Anchoring Solutions
For light winds (5-10 mph): Place four 1-pound rocks on corners—test by gently tugging pad edges. Strong winds (15+ mph): Drive 6-inch tent stakes through grommets at 45-degree angles away from pad center. Emergency fix: Loop bungee cords from pad grommets to nearby fixed objects like fence posts. Pro move: Keep four mini-sandbags (filled with rice) in your drone bag—they weigh ounces but provide instant anchoring anywhere.
Maintain Pad Longevity Through Proper Care
Post-Flight Cleaning Protocol
Debris removal prevents embedded dirt that damages drone components. Fabric pads: Wipe with damp microfiber cloth—never use solvents that degrade waterproof coatings. Cardboard pads: Shake vigorously to dislodge particles; never wash with water. Critical check: Inspect for embedded pebbles after beach use—they can scratch drone landing gear during takeoff.
Storage Best Practices
Roll fabric pads loosely around a 3-inch diameter tube to prevent permanent creases. Store cardboard pads flat under books or between mattress layers—never fold, as creases create unstable landing surfaces. Seasonal tip: In humid climates, place silica gel packets inside storage containers to prevent moisture warping. Always inspect for tears or loose grommets before each flight—compromised pads increase accident risks.
Cost-Saving Breakdown: DIY vs Commercial
DIY Investment Analysis
- Cardboard method: $0 (using household items) + 30 minutes labor
- Fabric upgrade: $5-$10 (recycled materials) + 45 minutes
- Weighted fabric: $8 (sand + grommets) + 60 minutes
Commercial Value Assessment
- STARTRC basic pad: $17 (includes stakes/pouch) but identical to DIY fabric version
- Hoodman weighted pad: $40 for professional build quality
- Custom logo pads: $49+ (justified only for business branding)
Real-world ROI: One prevented motor repair ($200+) pays for 12+ DIY pads. Even the cheapest commercial pad pays for itself after two avoided debris incidents. For hobbyists, DIY delivers equal protection at 90% lower cost.
Avoid Critical Landing Pad Mistakes
Incorrect Size Selection
Too small: Pads under 18 inches risk drone drift-off during landings—especially with GPS inaccuracies. Too large: 36+ inch pads become unwieldy in backpacks without safety benefits. Fix: Match pad size to your specific drone model using the “diagonal + 12 inches” formula.
Inadequate Anchoring
Unsecured pads cause 70% of landing accidents in winds over 10 mph. Warning: Lightweight pads can flip into spinning props during takeoff, causing catastrophic crashes. Always verify security by attempting to lift pad corners—zero movement indicates proper anchoring.
Climate-Inappropriate Materials
Desert flyers: Avoid dark-colored pads that absorb heat—white or reflective surfaces prevent landing gear melting. Beach users: Rinse salt spray immediately with fresh water; salt crystals degrade fabrics and corrode grommets. Rainy climates: Cardboard fails after 10 minutes of drizzle—always upgrade to fabric with acrylic sealer.
Creating your own drone landing pad delivers professional protection at pocket-change cost. Whether you spend 30 minutes crafting a cardboard version or invest in a reusable fabric pad, this simple accessory prevents costly debris damage while creating consistent flight operations. Start with the cardboard method today—your drone’s motors and camera will perform better for years. For ongoing protection, upgrade to a weighted fabric pad that withstands real-world conditions. Remember: Every flight begins and ends on this critical foundation, so build yours right using these proven techniques.


