Ever felt frustrated with commercial drone controllers that don’t match your flying style? Building your own drone controller gives you complete control over responsiveness, ergonomics, and features. When you know how to make a drone controller from scratch, you’re not just assembling parts—you’re crafting a flight experience tailored to your exact needs. This guide walks you through every critical connection, configuration setting, and safety check required to create a fully functional controller system that responds precisely to your inputs. Whether you’re building a racing quad or a photography drone, understanding how to make a drone controller transforms your flying capabilities and troubleshooting skills.
Essential Components for Your Custom Drone Controller
Before you start building, gather these five critical components that form the foundation of any functional drone control system. Each piece plays a specific role in translating your thumb movements into precise aerial maneuvers, and skipping any component will result in a non-functional controller.
Transmitter Selection and Setup Requirements
Your transmitter is the handheld portion of the controller system that sends your commands through the air. Choose a transmitter with at least 6 channels for basic quadcopter control—more channels allow for additional features like camera tilt or flight mode switching. Before assembly, verify your transmitter operates on the correct frequency band (2.4GHz is standard) and has sufficient range for your intended flying environment. Professional builders recommend starting with popular open-source transmitters like the Taranis Q X7 that allow extensive customization through firmware like OpenTX.
Receiver Compatibility and Installation Process
The receiver acts as your drone’s communication hub, catching signals from your transmitter and converting them into digital commands. Match your receiver to your transmitter brand for guaranteed compatibility—mixing brands often causes signal issues. When installing, position the receiver away from motors and power wires to prevent electromagnetic interference. Secure it with double-sided tape or vibration-dampening mounts, then connect the antenna properly: a 90-degree bend (L-shape) provides optimal signal reception without risking damage during crashes.
Motor and ESC Integration Steps for Reliable Control
Your drone’s physical response to controller inputs depends entirely on proper motor installation and ESC configuration. Get this step wrong, and even the most sophisticated controller won’t deliver stable flight.
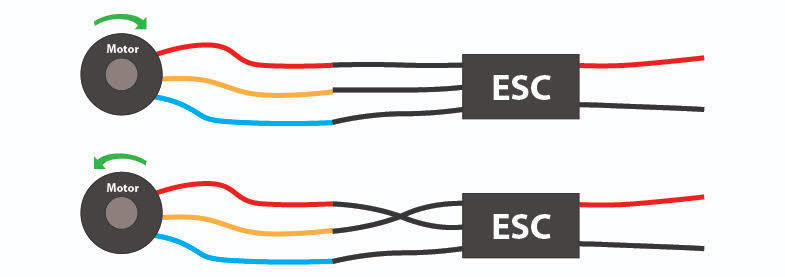
Correct Motor Wiring Sequence
Begin by securing motors to frame arms using the included mounting screws—don’t overtighten, as this can crack carbon fiber arms. Position motors with wire leads facing inward toward the center plate to prevent propeller strikes. Connect each motor’s three wires to its corresponding ESC, matching the color-coded bundles. If a motor spins backward, simply power down and swap any two wires to reverse rotation. Secure all connections with heat shrink tubing (not electrical tape) to prevent mid-flight disconnections that cause catastrophic crashes.
ESC Signal Connection Protocol
Mount ESCs along the arms or center plate based on your frame design, ensuring adequate airflow for cooling. Route signal wires toward the center where they’ll connect to the flight controller using standard servo-style connectors. Verify each ESC connects to the correct motor output on the flight controller—most boards label these as M1 (front-right), M2 (back-right), M3 (back-left), and M4 (front-left). Incorrect motor mapping causes your drone to flip uncontrollably on first flight.
Flight Controller Configuration Process
Your flight controller serves as the brain that processes your inputs and calculates exact motor responses. Proper configuration transforms basic components into a responsive flying machine.
Accelerometer Calibration Technique
Connect your flight controller to your computer via USB and launch configuration software like Betaflight. Place your drone on a perfectly level surface before calibrating the accelerometer—this critical step ensures accurate horizon detection. Follow the software prompts to complete calibration, which typically takes 10-15 seconds. Never skip this step; improper calibration causes drifting during hover and unstable flight characteristics that frustrate even experienced pilots.
Motor Mixing Setup for Quadcopters
Configure motor mixing to match your frame type—select “Quad X” for standard quadcopters where motors form an X pattern. The software automatically adjusts motor outputs based on stick inputs and gyroscope readings. For beginners, use default PID settings initially; advanced users can fine-tune these values later for specific flight characteristics. Test motor direction by spinning each motor individually without propellers—front-right and back-left should spin counter-clockwise while front-left and back-right spin clockwise.
Remote Control Pairing Sequence Without Failures

Successful transmitter pairing creates the unique communication link between your hands and the drone. Skip this step correctly, and you risk interference from other pilots or complete signal loss.
Binding Process for Reliable Connection
Power on your transmitter before connecting the drone battery—reversing this sequence causes binding failures. Enter binding mode by holding the bind button while turning on the transmitter (consult your manual for specific button combinations). The transmitter’s LED will blink rapidly during binding mode. Activate binding on the receiver by pressing and holding its bind button while connecting the drone battery. Release when the LED changes from blinking to solid, indicating successful pairing. This one-time process prevents interference from other pilots at the field.
Control Channel Verification Method
Test control inputs systematically before first flight: move each stick while observing channel response in your configuration software. Throttle (channel 1) should register 1000-2000 microseconds as you move the stick. Roll (channel 2), pitch (channel 3), and yaw (channel 4) should respond smoothly without jitter. Verify all controls respond in the correct direction—reversed channels cause immediate crashes. Most transmitters include channel reversing switches to fix direction issues without reconfiguring the flight controller.
Pre-Flight Testing Protocol for Safety
Systematic testing prevents crashes and equipment damage. Professional drone builders follow this exact sequence before every maiden flight.
Bench Testing Without Propellers
Begin testing with propellers removed to prevent injury. Arm your drone by moving the throttle stick to bottom-right (throttle minimum + yaw right), then verify each motor spins when commanded through the software motor tab. Test failsafe by turning off your transmitter—the motors should stop immediately. Check all control surfaces respond correctly: pushing the right stick forward should increase front motor speed while decreasing rear motor speed for forward movement.
Range Testing for Signal Reliability
Perform a range test by walking away from your drone while monitoring control response. Most transmitters include a range test mode that reduces power output. Start at 30 paces away while maintaining visual contact, then gradually increase distance. If controls become erratic before 100 feet, check for interference sources like power lines or other transmitters. Never fly beyond reliable range—most crashes occur when pilots exceed their transmitter’s effective range.
Troubleshooting Common Controller Issues
Most controller problems stem from three sources: power issues, connection problems, or configuration errors. Diagnose systematically to save hours of frustration.
No Response From Drone: Quick Fixes
If your drone shows no response, check battery voltage first—lithium batteries below 11 volts need charging. Verify receiver binding by checking for a solid LED light rather than blinking. Confirm all signal wire connections between receiver and flight controller are secure and properly seated. Loose servo connectors cause intermittent signals that mimic more complex issues. Always power cycle both transmitter and drone after making connection changes.
Erratic Control Response Solutions
When controls respond unpredictably, check for electromagnetic interference near signal wires. Keep receiver antenna away from power wires and motors. Verify all ground connections are secure—poor grounding causes signal noise. If using a brushed motor drone, install ferrite beads on motor wires to reduce electrical noise. For persistent issues, reduce your transmitter’s power output to minimize signal reflection in indoor environments.
Advanced Controller Enhancements for Serious Pilots
Once your basic controller functions reliably, add these advanced features that dramatically expand flight capabilities and safety margins.
GPS Integration for Autonomous Flight
Install a GPS module on the top center of your frame, away from electronic interference. Connect the GPS to the appropriate serial port on your flight controller and configure through your software. Enable position hold mode for stable hovering and return-to-home functionality for safety. Professional drone photographers rely on GPS for smooth cinematic shots without constant manual correction. Always verify GPS satellite count (minimum 6) before engaging autonomous modes.
Telemetry System Setup for Real-Time Data
Connect a telemetry module to your transmitter for real-time flight data including battery voltage, GPS coordinates, and flight speed. Configure your transmitter to display critical alerts like low battery warnings—most systems trigger both audible alarms and visual LED indicators. Serious pilots monitor these metrics constantly; ignoring voltage warnings causes sudden power loss mid-flight. Start with basic telemetry (battery voltage and RSSI) before adding advanced metrics like current draw and flight time.
Building your own drone controller creates unparalleled understanding of flight systems while providing complete customization. Start with basic functionality, then gradually add advanced features as your skills develop. Always prioritize safety protocols and systematic testing—these prevent crashes and ensure reliable operation. When you know how to make a drone controller properly, you’re not just operating a drone; you’re mastering the complete flight ecosystem. Your custom controller will become an extension of your hands, delivering the precise responsiveness that transforms good flying into exceptional piloting. Ready for your first controlled takeoff? Double-check those connections, verify your failsafe settings, and prepare for flight.


