
Your quadcopter stubbornly slides sideways during hover, forcing you to constantly wrestle the controls just to keep it stationary. This frustrating drone drift problem affects nearly every pilot at some point, but how to fix drone drift is often simpler than you think. Whether you’re battling drift with a DJI Naza system or an open-source flight controller, this guide delivers proven solutions that restore rock-solid hovering performance in under 15 minutes. You’ll learn exactly which steps eliminate persistent drift without expensive repairs or technical headaches.
Drone drift manifests as uncontrolled movement when your aircraft should hover motionless—requiring continuous stick correction even with zero wind and centered trims. Ignoring this issue wastes flight time, drains batteries faster, and risks crashes during critical shots. By the end of this guide, you’ll confidently diagnose and fix drift through software recalibration, physical checks, and preventative maintenance. Let’s get your drone hovering perfectly again.
Identify Exact Drone Drift Patterns Before Fixing
Pinpointing your specific drift behavior prevents wasted effort on unnecessary fixes. Drone drift always shows as consistent unidirectional movement—your quadcopter sliding left, right, forward, or backward—requiring constant stick input to maintain position. This happens even with centered trims, zero wind, and stable battery levels. Unlike wind-induced movement, true drift persists at all altitudes and feels like fighting an invisible current.
Critical Drift Indicators to Confirm
- One-way drift pattern (e.g., always drifting left without input)
- Non-stop stick correction needed to hold position
- Centered trims provide zero improvement
- Consistent behavior across all battery levels
- Indoor testing confirms issue isn’t wind-related
Immediate Pre-Fix Checklist
Before recalibrating anything, rule out simple causes in under 2 minutes:
1. Verify transmitter trims are perfectly centered (no visible offset)
2. Test indoors or in complete calm (early morning is ideal)
3. Inspect all propellers for cracks, chips, or bent tips
4. Confirm battery security—loose batteries cause vibration drift
5. Check motor screws for tightness (use 1.5mm hex key)
Pro Tip: Hold your drone at eye level during testing. Peripheral vision detects subtle drift better than staring directly at the aircraft. If drift direction changes between flights, suspect environmental interference—not your flight controller.
DJI Naza IMU Recalibration That Actually Works
Most DJI Naza drift issues stem from a misaligned inertial measurement unit (IMU). This recalibration takes 3-5 minutes and resolves 80% of drift cases when done correctly. Skip this step, and software tweaks become temporary band-aids. How to fix drone drift on DJI systems starts here—never skip IMU calibration for persistent drift.
Preparation Steps You Can’t Ignore
- Connect to DJI Assistant 2 software via micro-USB cable
- Use a verified level surface (smartphone level app recommended)
- Ensure zero vibration—no fans, foot traffic, or appliances running
- Remove magnetic threats (phones, keys, or metal tools within 3 feet)
Step-by-Step Calibration Process
- Power on drone and connect to DJI Assistant software
- Navigate to Sensor Calibration > IMU Calibration
- Place drone perfectly level and click “Start Calibration”
- Do not touch drone until green status light confirms completion
- Immediately test hover in open area (avoid trees/buildings)
- If drift persists, recalibrate magnetometer using same software
Warning: Skipping the level surface check causes worse drift! A 2-degree tilt during calibration makes your drone think “level” is actually angled. Use your phone’s bubble level against the drone’s arms for accuracy.
BaseFlight/CleanFlight/BetaFlight Trim Fix That Sticks
Open-source flight controllers (BetaFlight, CleanFlight) require direct trim adjustments—not full recalibration. This method fixes drift in 90 seconds when you know the exact stick movement sequence. Generic “recenter trims” advice fails because drift requires firmware-level compensation.
Precise Trim Adjustment Protocol
- Land drone on completely flat ground (concrete ideal)
- Disarm completely—props must not spin during adjustment
- Apply full throttle input on transmitter (motors stay off)
- Move right stick opposite drift direction:
– Left drift → Push stick right for 3-5 seconds
– Right drift → Push stick left for 3-5 seconds
– Forward drift → Pull stick back for 3-5 seconds
– Backward drift → Push stick forward for 3-5 seconds - Count LED blinks—each equals one adjustment increment
- Test hover after every 3-5 blinks (don’t over-adjust)
Fine-Tuning for Perfect Hover
After initial adjustment:
– Hover for 30 seconds at 4 feet—note residual drift direction
– Make micro-adjustments (1-2 blinks max per test)
– Document final settings in your flight log (e.g., “Right stick left: 4 blinks”)
– Re-test at 50% battery—low power affects motor response
Pro Tip: If drift reverses direction after adjustment, you moved the stick with the drift instead of against it. Reset trims and restart the process.
Physical Inspection Checklist Pilots Overlook
Mechanical issues cause 30% of “unfixable” drift. Skip this inspection, and software fixes become temporary. Spend 5 minutes checking these physical factors before recalibrating again.
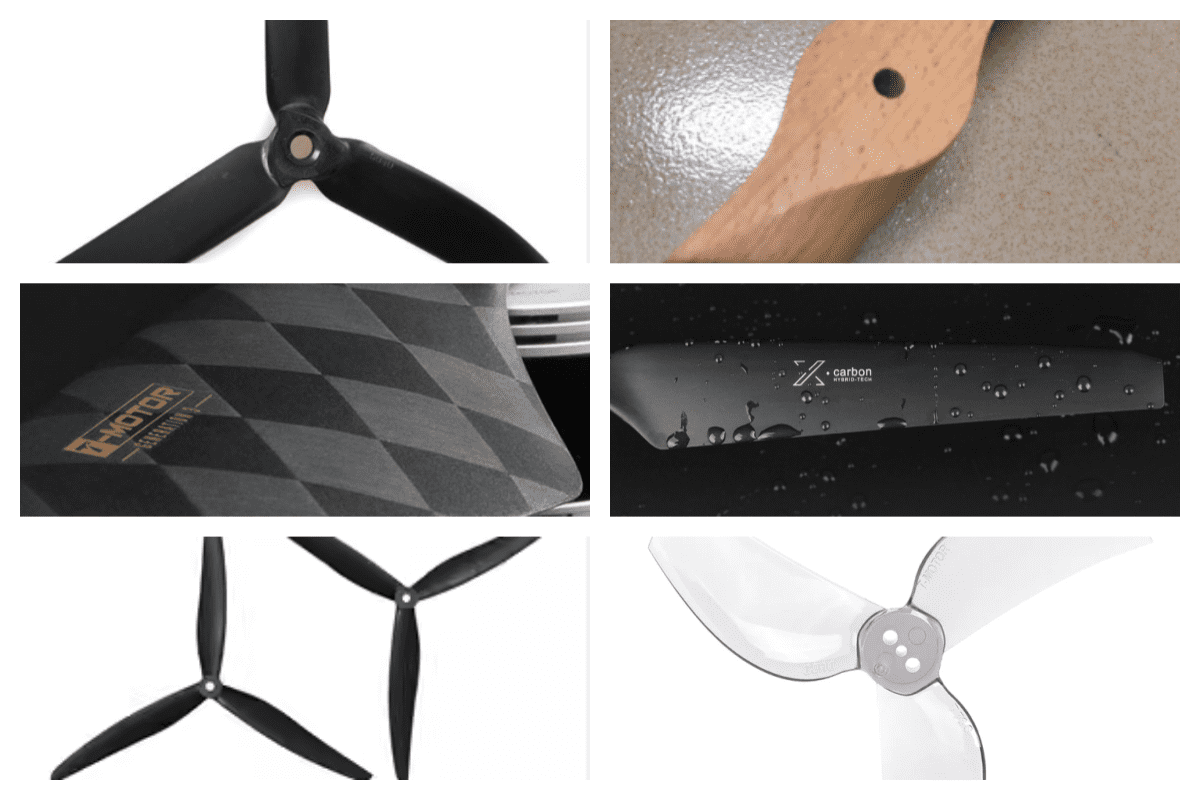
Propeller Damage That Causes Drift
- Spin each prop by hand—wobble indicates imbalance (replace immediately)
- Check tip symmetry—even 1mm bends create thrust differentials
- Verify identical props—mixing brands/models causes uneven lift
- Tighten prop nuts just until snug (over-tightening strips threads)
Hidden Frame and Motor Issues
- Measure diagonal arms—mismatched lengths (over 2mm) cause tilt drift
- Check motor mounts—loose screws let motors shift under load
- Remove gimbal temporarily—camera vibration affects sensor readings
- Inspect landing gear—bent legs tilt drone during takeoff
Critical Check: Place drone on level surface and look down its center. All props should sit at identical heights. If one motor sits higher, that side generates less lift—causing directional drift.
Electronic System Verification for Stubborn Drift
When software and physical checks fail, electronic issues are likely culprits. These fixes target GPS interference, sensor errors, and environmental factors most guides miss.
Sensor-Specific Diagnostics
- Magnetometer recalibration: Required for GPS-enabled drones—do this after IMU fix
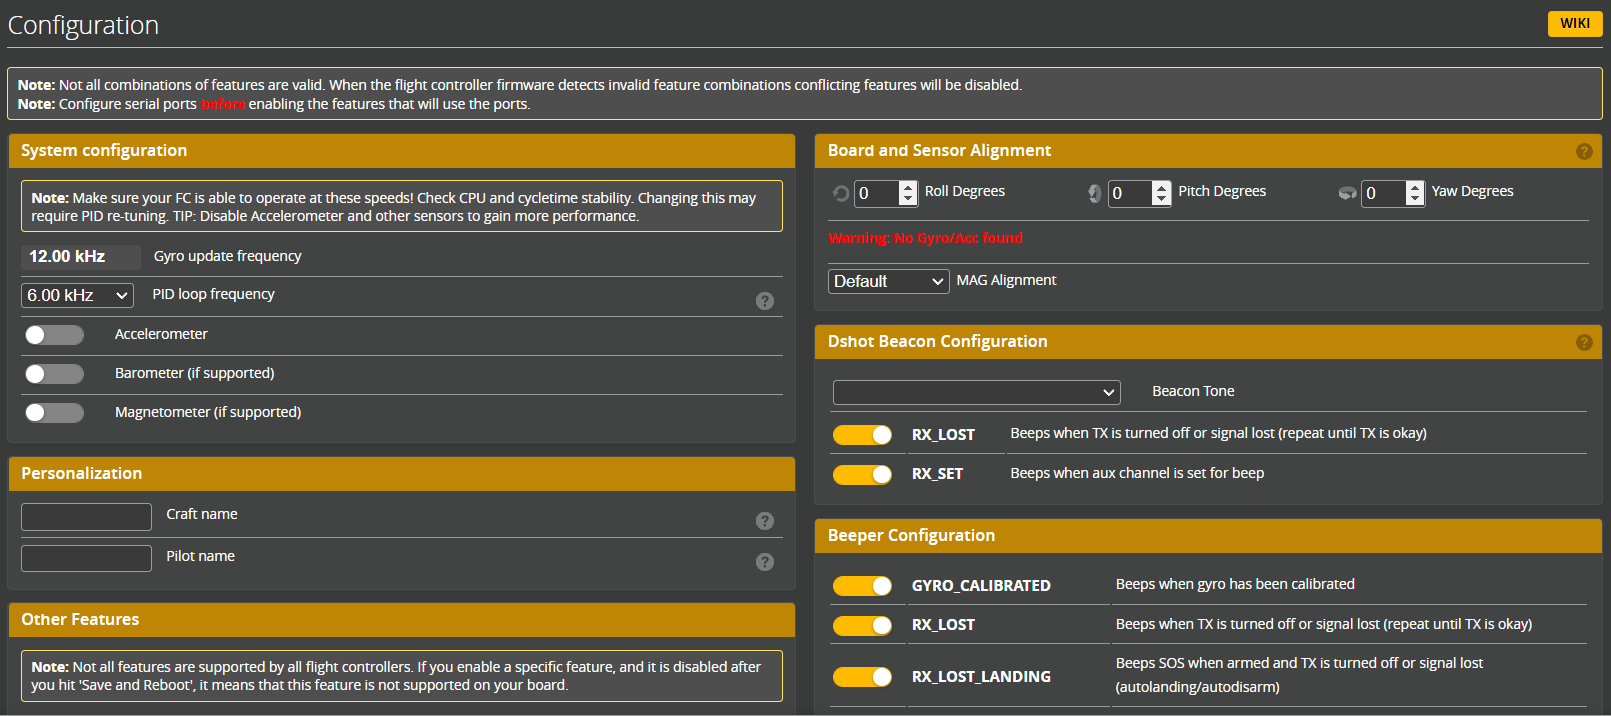
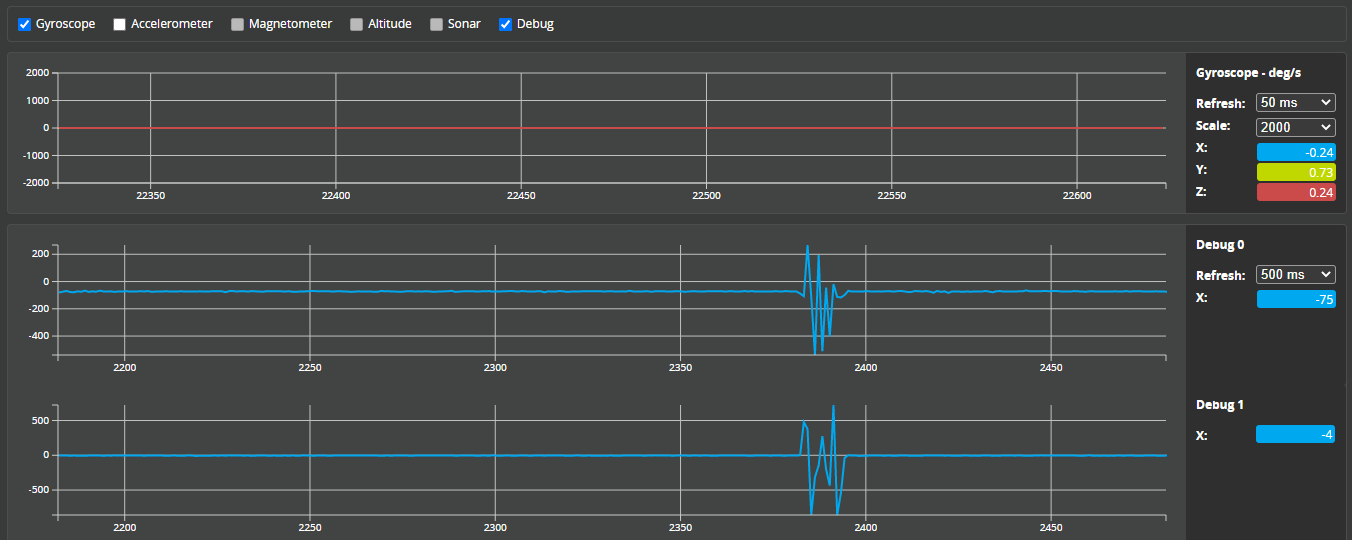
- Accelerometer test: In BetaFlight Configurator, watch for unstable readings during static hover
- Gyroscope check: Observe live data for consistent drift values (spikes indicate hardware failure)
- Receiver signal: Monitor RSSI values—dropouts below 40% cause erratic behavior
Environmental Interference Testing
- Test in multiple locations—drift in one spot indicates local magnetic interference
- Avoid concrete with rebar—underground metal causes hidden interference
- Check GPS satellites—under 10 satellites causes position drift (even without GPS mode)
- Fly away from power lines—EM fields disrupt magnetometers up to 50 feet
Pro Tip: If drift only happens above 10 feet, suspect GPS issues. If it starts immediately on takeoff, it’s IMU or physical damage.
Post-Fix Testing Protocol to Guarantee Results
Skipping proper testing wastes your fix. Validate your solution with these real-world checks—most pilots stop after the first hover test and wonder why drift returns.
60-Second Hover Validation
- Ascend to 4 feet in open area
- Release all sticks for full 60 seconds
- Mark drift distance with visual reference (e.g., “moved 2 feet left”)
- Acceptable result: Less than 1 foot drift in 60 seconds
Battery and Temperature Stress Tests
- Test at 100%, 75%, and 50% battery—drift often worsens at low charge
- Fly continuously for 5 minutes—component heat affects sensor accuracy
- Compare morning vs. afternoon flights—temperature changes impact IMU
Warning: If drift returns after 2 minutes of flight, your IMU calibration failed. Recalibrate with the drone powered on for 2 minutes first to warm sensors.
Prevent Drone Drift From Returning
Drift recurrence means you missed a preventative step. Implement these habits after fixing to avoid repeat issues.
Essential Maintenance Schedule
- After every flight: Quick prop visual check (30 seconds)
- Weekly: Motor screw tightness verification
- Monthly: Full IMU recalibration (DJI) or trim reset (BetaFlight)
- After any crash: Mandatory physical inspection + sensor recalibration
Storage and Transport Fixes
- Store batteries at 50% charge—full charge degrades cells faster
- Keep drone level in storage—prevents IMU “drift memory”
- Use padded case with desiccant—humidity affects sensor accuracy
- Never transport in extreme heat (e.g., car trunk)—causes permanent sensor shift
Pro Tip: For GPS drones, always arm in open sky with >12 satellites. Poor GPS lock during takeoff causes persistent position drift even after IMU fixes.
Key Takeaway: How to fix drone drift successfully requires targeting the exact cause—IMU calibration for DJI systems, precise trim adjustments for open-source flight controllers, and thorough physical checks for mechanical issues. Start with software fixes (90% effective), then progress to hardware inspection if needed. By following this guide’s step-by-step protocols, you’ll eliminate drift in under 15 minutes and keep your drone hovering rock-solid for every flight. Implement the preventative maintenance schedule to avoid future drift headaches—saving you time, money, and the frustration of ruined footage. Your perfectly stable hover starts with the next calibration.


