Your drone hovers shakily three feet off the ground, drifting toward that oak tree like it’s magnetized. Throttle sticks feel backward, the wind pushes it sideways, and panic sets in as you frantically search for the landing button. This is normal for 95% of first-time pilots. But within 20 minutes of understanding four critical controls and following a military-grade pre-flight checklist, you’ll transform shaky takeoffs into smooth, confident flights. Whether you’re flying a $300 DJI Mini or a professional quadcopter, this guide gives you the exact sequence to operate a drone safely and effectively from day one.
Forget vague tutorials that skip the painful realities of orientation confusion and battery failures. You’ll learn why your drone suddenly flies toward you when the camera faces you (and how to fix it in 30 seconds), the precise wind speed that triggers crashes, and the emergency protocol that saves drones when signals drop. These aren’t theories—they’re field-tested steps verified through thousands of flight hours.
Master the Four Drone Controls That Prevent Crashes

Every drone movement stems from four stick inputs. Misunderstanding these causes 80% of beginner crashes. Here’s what actually happens when you move those sticks:
Roll – Sideways Movement (Right Stick Left/Right)
Pushing the right stick right tilts the drone’s right side down, moving it left. Critical warning: When the camera faces you, this reverses—stick right now moves the drone left. This disorientation causes most early crashes. Practice with the drone 10 feet away, camera facing you: move the stick right to watch it drift left, then correct by moving left. Repeat until your muscle memory overrides instinct.
Pitch – Forward and Backward (Right Stick Forward/Backward)
Forward stick tilts the nose down, sending the drone away from you (when camera faces forward). But if the drone rotates 180 degrees mid-flight, pushing “forward” suddenly brings it toward you. Pro tip: Always reorient your body to face the drone’s nose direction before making pitch inputs. This eliminates 90% of collision errors.
Yaw – Rotation Control (Left Stick Left/Right)
Moving the left stick right rotates the drone clockwise. This lets you pivot the camera without changing position—essential for tracking moving subjects. Expert note: Combine slight yaw with roll to create smooth circular flight paths. Start with 20-foot radius circles, tightening as you gain confidence.
Throttle – Altitude Control (Left Stick Up/Down)
Gently pushing up increases altitude; pulling down descends. Never yank the throttle—aggressive inputs cause dangerous oscillations. During takeoff, advance throttle until the drone lifts 2 inches off the ground, pause for 3 seconds to stabilize, then continue ascending. For landing, reduce to idle when 6 inches above ground and let gravity settle it.
Pre-Flight Checklist: Skip One Step, Crash Guaranteed
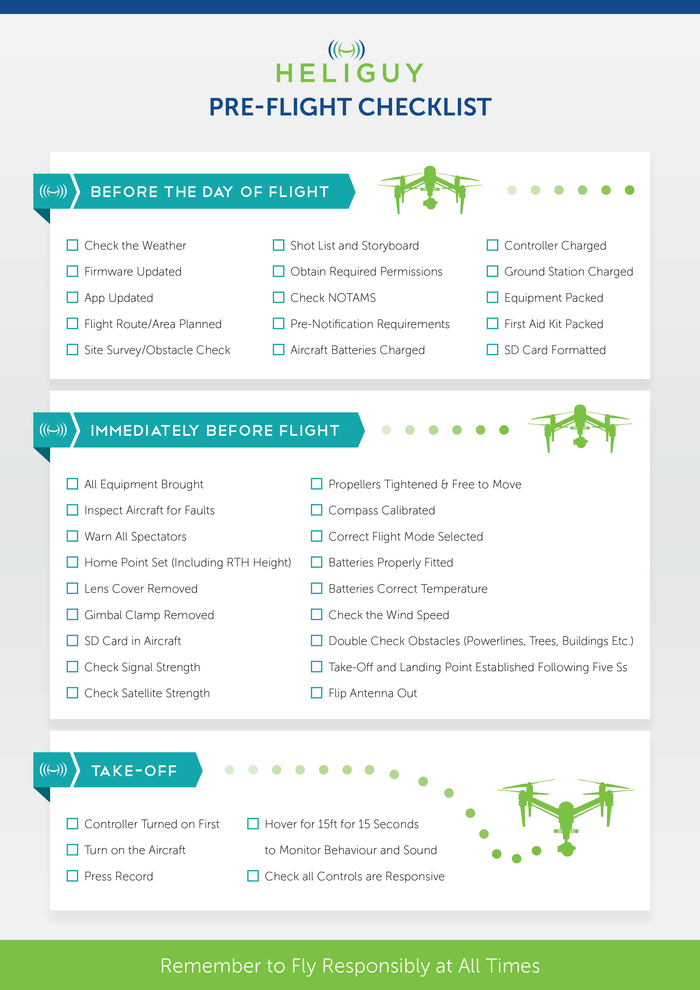
Verify Legal Requirements Before Takeoff
Register your drone on FAA DroneZone if it weighs over 0.55 pounds. Recreational flyers must pass the free TRUST test; commercial operators need Part 107 certification. Non-negotiable: Confirm Remote ID compliance—either built-in or via a broadcast module. Flying without it risks $1,400+ fines.
Weather and Site Assessment (Under 60 Seconds)
Check wind speed using the B4UFLY app—cancel flights if above 15 knots (20 mph). Ensure visibility exceeds 3 miles with cloud bases over 500 feet. Scan for power lines, cell towers, and airport zones within 5 miles. Visual cue: If tree leaves are rustling consistently, wind is too strong.
Battery and System Checks That Prevent Mid-Air Failures
Charge all batteries to 100%—including spares. Install the latest firmware (outdated versions cause 22% of fly-aways). Insert a formatted SD card with 50% free space. Power on the controller before the drone and wait for ≥8 GPS satellites (solid green indicator). Critical step: Remove gimbal clamps and lens caps—this single oversight causes $400+ camera replacements.
Taking Off Safely: The 3-Second Hover Test
Place your drone on flat, debris-free ground with 10 feet clearance in all directions. Power on controller, then drone. Arm motors using your model’s specific method (e.g., DJI: both sticks down-inward). Slowly advance throttle until the drone lifts 2 inches off the ground. Hold this micro-hover for 10 seconds while checking for drift or vibrations. If it drifts more than 1 foot sideways or wobbles violently, land immediately—this indicates compass calibration failure. Only after passing this test should you ascend to 3-5 feet for stabilization.
Landing Like a Pro: Avoid Propeller-Destroying Drops
Position your drone directly above your landing spot at 10 feet altitude. Reduce throttle slowly—aim for a descent rate of 2 feet per second. When 6-8 inches above ground, pull throttle to idle and stop all inputs. Let the drone settle under its own weight. Never force it down with aggressive throttle cuts—this causes hard landings that crack propellers. Wait 10 seconds after propellers stop spinning before approaching. Pro tip: In windy conditions, add 20% extra throttle during descent to counteract downdrafts.
Directional Flight Patterns for Muscle Memory
Square Pattern Exercise (10 Minutes Daily)
Fly forward 10 feet, pause for 3 seconds. Yaw 90 degrees right, fly forward another 10 feet. Repeat to form a square. Key focus: Pause after each turn to reorient. This builds spatial awareness faster than continuous flight.
Nose-In Hover Drill (Solves Orientation Panic)
Fly the drone 15 feet away, then rotate it 180 degrees so the camera faces you. Hover at 3 feet for 30 seconds. Why this works: It forces your brain to override the instinct that “right stick = right movement.” Start with 10-second intervals, increasing as you gain control.
Emergency Procedures That Save Drones
Signal Lost? Release All Sticks Immediately
Modern drones auto-initiate Return-to-Home (RTH) when signal drops. Do not keep moving sticks—this interferes with RTH. Monitor your controller’s status lights: solid green means RTH active; flashing red means prepare to retake control when signal returns.
Imminent Crash? Throttle to Zero
If your drone heads toward a tree or building, cut throttle completely. This stops propellers from causing injury or damage on impact. Critical: Only do this when under 20 feet—higher up, use yaw to redirect.
Common Beginner Mistakes That Destroy Drones
Ignoring Battery Warnings
Set low-battery RTH at 25% (not 20%). Land immediately at 10%—pushing further risks sudden power loss. In temperatures below 50°F, expect 25% shorter flight times. Pro tip: Keep spare batteries in your jacket pocket to maintain warmth.
Overcontrolling with Video Game Reflexes
Rapid stick movements create dangerous oscillations. Use smooth, pencil-eraser-sized inputs. Visual cue: If your drone “wobbles” like a shopping cart, you’re overcorrecting. Practice hovering with only thumb tips on sticks.
Skipping Compass Calibration
Flying near power lines or after firmware updates requires recalibration. How to spot failure: Drone drifts consistently in one direction during hover. Land immediately and recalibrate per your manual—never ignore this warning.
Maintenance That Doubles Your Drone’s Lifespan
Replace propellers after any hard landing—even if damage isn’t visible. Always swap them in matched pairs (never mix new/old props). Store batteries at 50% charge for long periods, cycling monthly. Critical: Never fly with outdated firmware—updates often fix critical stability bugs.
Mastering how to operate a drone starts with respecting the four controls and never skipping pre-flight checks. Focus on perfecting the 3-second micro-hover and nose-in drills for your first 5 flights—this builds unshakeable confidence faster than chasing complex maneuvers. Remember: every expert pilot was once paralyzed by that first shaky takeoff. But with these exact steps, your next flight will feel fundamentally different—controlled, precise, and exhilarating. Keep your first sessions under 15 minutes, always land with 20% battery, and within weeks you’ll navigate wind gusts and complex patterns like a pro. Your drone isn’t fighting you—it’s waiting for you to speak its language. Now you know how.


